
Look out the back door after a long week. The grill is crowded onto a small slab, the fence leans a little more every season, and the yard has space but no real function. That is the point where a renovation stops being about curb appeal and starts becoming a planning job.
Homeowners are putting more money into usable outdoor space, with seating areas, fire features, and visual upgrades ranking high in current backyard trend reports, according to Alan's Factory Outlet's 2026 backyard trends infographic. In California, that usually means balancing comfort with heat, water use, coastal moisture, and permit rules that can change the build from simple to expensive in a hurry. If you want more examples of layout direction and patio zoning, you can also discover Atlanta patio designs.
Good backyard renovation ideas need more than a nice sketch. The base materials, the fasteners, the post caps, the footing depth, and the order of installation decide whether the project still looks good in five years. I have seen plenty of yards with attractive finishes laid over poor framing or bargain hardware, and those jobs usually come back as callbacks.
That is the angle here. These are not just ideas. Each project is treated like a mini blueprint, with the how, the hardware, the DIY versus pro decision, and the rough cost and timeline you should expect before buying a single board or paver. Where fastening matters, start with the right composite deck fasteners for clean, secure board installation, because small hardware choices often decide how polished the final build feels.
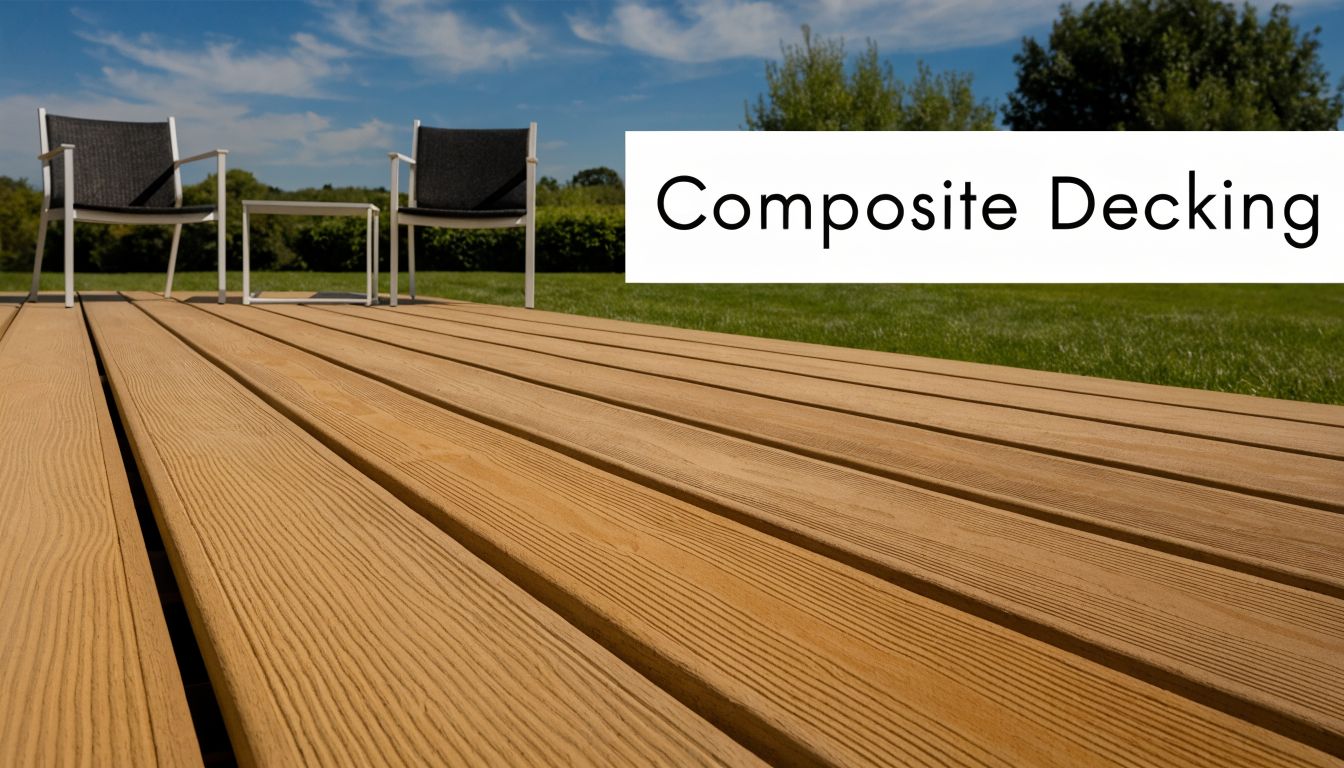
1. Composite Decking Installation
You notice the yard every time you step out the back door. The grade drops, patio chairs wobble, and the space never quite works for dinner, a grill, and a place to sit. A composite deck solves that by creating one level surface you can use, especially on lots where slope, drainage, or worn-out concrete make a basic patio setup frustrating.
Composite earns its keep in busy backyards because it cuts down on the maintenance cycle that pushes many wood decks into early decline. Homeowners choose it for the cleaner finish, but the long-term result still depends on framing, spacing, and the hardware package under the boards.
Build details that matter
Start with the substructure. If the frame is out of plane, the deck will telegraph every mistake through uneven board lines, soft spots, and standing water. I tell clients to budget for the framing first and the surface boards second, because a premium composite product installed over weak joists still feels cheap underfoot.
Board movement is the next issue. Composite expands and contracts more than many homeowners expect, particularly in full sun, so end gaps, breaker boards, and manufacturer-approved fastening patterns need to be planned before the first board goes down. Skip that step and the deck may look fine at handoff, then start crowding joints and pushing lines out of square during hot weather.
Use corrosion-resistant joist hangers, post base connectors rated for exterior exposure, and hidden clips or screws designed for the exact board profile. If you're buying the fastening package separately, start with composite deck fasteners that match the system. For stair stringers, gate transitions, or adjacent access points, it also helps to line up your fence and gate hardware for backyard access and deck connections before framing wraps up, so openings and post locations are set correctly the first time.
Layout matters too. A plain rectangle is often the cheapest option, but it is not always the most useful. The better builds usually reserve enough depth for a dining table, then protect a smaller corner for lounge seating or a grill path, with stairs placed where foot traffic will not cut through the furniture zone.
For a straightforward ground-level deck, an experienced DIYer can handle the job if the site is square, access is easy, and local code requirements are clear. Multi-level decks, raised platforms, and any build that needs ledger attachment, substantial footings, or permit review belong in a pro bid stack. Roughly speaking, simple composite deck projects take about one to two weeks once materials are on site, while custom layouts and stairs add time fast.
2. Modern Fence Installation with Quality Hardware
You notice a fence twice. The day it goes in, and the first windy week when the gate starts rubbing, the posts show movement, or the fasteners stain the face boards. A modern fence can clean up a yard fast, but the build only holds up if the hidden parts are chosen with the same care as the visible finish.
Privacy is usually the driver, but layout matters just as much as style. A full-height perimeter fence gives screening and security. A shorter feature wall can block a bad sightline, hide equipment, or frame a seating area without making the yard feel boxed in. If you're comparing concepts, these outdoor living space ideas for privacy, structure, and flow help narrow down what the fence needs to do before you price materials.
The failure points are consistent on fence jobs. Posts are undersized for the panel span. Footings are too shallow for local frost or wind exposure. Homeowners spend on premium boards, then hang a heavy gate with light-duty hinges and generic screws that do not belong outdoors.
Hardware selection is where a lot of fence budgets go off track. Cedar, pressure-treated lumber, composite, aluminum, and mixed-material systems all move and weather differently. The fasteners, brackets, hinges, and post caps have to match that assembly. In coastal, wet, or fog-prone conditions, corrosion resistance is not a cosmetic upgrade. It is what keeps black streaks, seized hinges, and early fastener failure from showing up a year or two later.
Build the fence from the post up
Start with the posts and the gate opening. Those two decisions control most of the long-term performance.
- Posts: Set post size and embedment depth based on fence height, panel weight, wind load, and soil conditions.
- Footings: Bell-shaped or wider footings can help in loose or wet soils, but they need to be formed and placed correctly.
- Gates: A gate opening needs room for hardware, swing clearance, and seasonal movement. Build it too tight and it will bind.
- Fasteners: Use exterior-rated screws, structural connectors, and lag hardware that fit the material package.
- Post tops: Quality post caps are not just decorative. They help limit water entry at the most exposed end grain.
For a privacy fence or horizontal slat design, I would rather cut a decorative add-on from the budget and put that money into better hinges, stronger latch hardware, and cleaner post protection. A well-fitted pyramid post cap, such as a Decorex style, gives the run a finished look and helps shed water off the post top. That small detail often adds years to a wood fence.
Gate construction deserves more respect than it gets. Gates fail first because they carry weight in motion. A wide wood gate looks great on paper, but it gets heavy fast once you add frame stock, cladding, and hardware. In many yards, two narrower leaves or a steel-reinforced frame is the better choice. If you're pricing the full package, start with the fence and gate hardware category first, because hinge capacity, latch type, and mounting method should guide the gate design, not the other way around.
DIY works for a straight run on accessible ground if property lines are confirmed and local rules are clear. Long sloped runs, masonry transitions, custom metal frames, and any fence tied to a pool barrier usually belong in a pro bid. As a rough rule, a basic residential fence can move quickly once posts are set and materials are on site, while custom gates and mixed-material details add time faster than homeowners expect.
Mixed-material fences can look sharp. Composite infill with metal posts is a reliable combination if the fastening pattern accounts for movement. Random ornamental inserts usually age poorly unless they are repeated with purpose and installed as part of a clear design, not as afterthoughts.
3. Outdoor Kitchen and Entertainment Area
Saturday night is when bad layouts show up. One person is on the grill, two are reaching for drinks, and someone always ends up walking through the hot zone. A good outdoor kitchen fixes that before you pick stone, appliances, or bar stools.
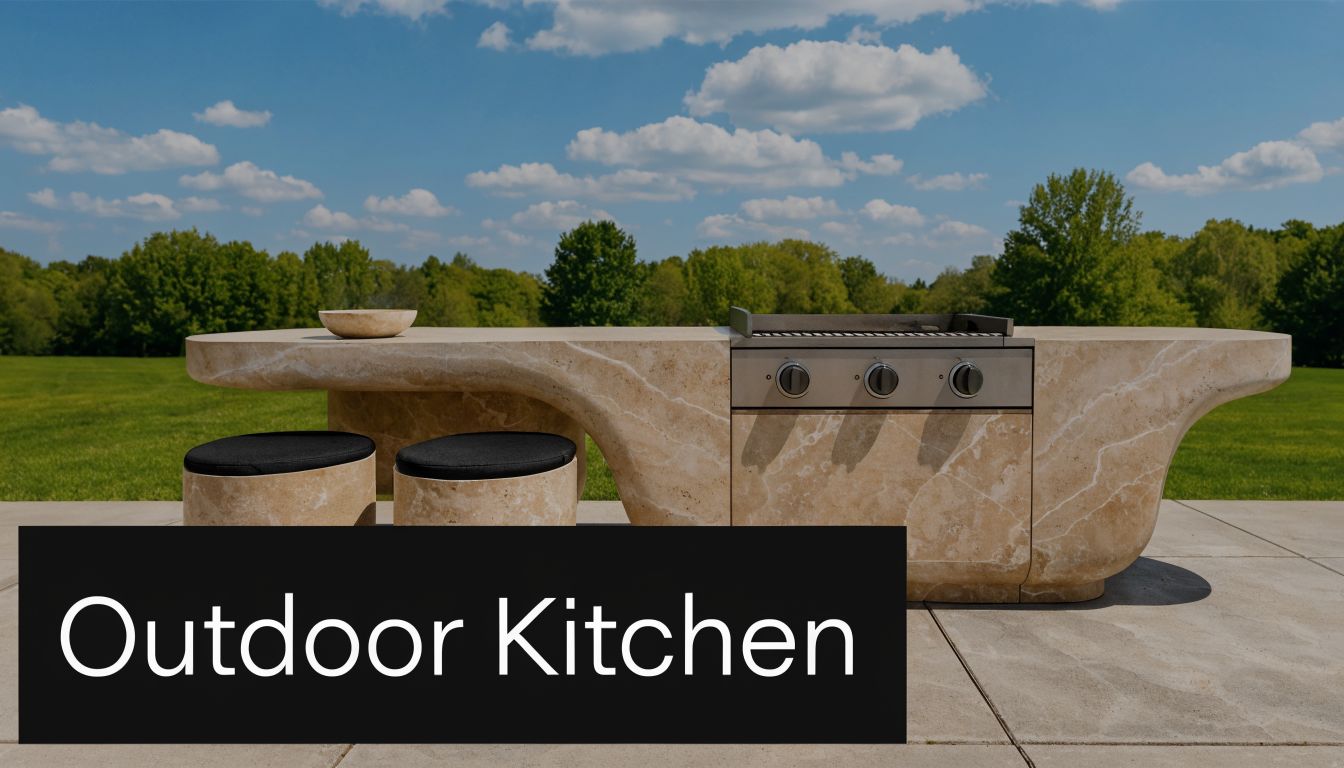
The footprint drives the whole project. I usually start with three working zones: cooking, prep, and guest traffic. If those overlap, the kitchen feels crowded no matter how expensive the finish package is. If they stay clear, even a modest build works well.
Build the base like it belongs outdoors
An island carries more weight than homeowners expect. A built-in grill, countertop slab, cement board, veneer, and undercounter storage add up fast. If the kitchen sits on a deck, the framing plan has to account for that load before the deck surface goes down. That means checking joist spans, adding blocking where appliance cutouts and posts land, and using the right hangers, structural screws, and post brackets for the assembly.
On a patio, the slab matters just as much. Small hairline cracks are common. Settling at one end of the island is a different problem, especially under stone or tile, because movement telegraphs through the finish.
A compact L-shape usually beats a long straight run. It keeps prep close to the grill, creates one natural serving edge, and avoids the bowling-alley effect that wastes square footage. Straight runs still make sense in narrow side yards or tight patios, but only if there is enough room behind the cook for someone to pass safely.
Hardware and utility details that decide whether it lasts
Outdoor kitchens fail at the details first. Stainless fasteners, rated connectors, and weather-resistant access doors cost more up front, but they hold up better around grease, heat, and rain. Powder-coated components can work well too, though coastal or high-moisture areas are harder on finishes and usually justify stepping up to better corrosion resistance.
Plan these items before finish work starts:
- Grill placement: Put the grill where smoke clears seating and doorways, even if that shifts the island off center.
- Ventilation: Built-in grills in enclosed islands need the manufacturer's required ventilation openings. Skip that, and heat buildup becomes a safety issue.
- Drainage: Storage stays dry only when the enclosure sheds water well and the surrounding patio does not pitch runoff toward the cabinet faces.
- Power and lighting: Outlet locations, task lights, and low-voltage wiring need rough-in space before stone, stucco, or panel finishes close everything up.
- Gas access: Long gas runs, shutoff location, and whether the appliance is natural gas or propane should be settled early, not during countertop templating.
If you're tying the kitchen into a lounge or dining zone, these outdoor living space ideas for full-yard layouts help you plan the whole use pattern instead of dropping an island into open space and hoping it works.
One trade-off comes up on nearly every build. Masonry islands feel permanent and take abuse well, but they are slower to build and harder to modify later. Modular metal-framed systems install faster and simplify utility access, but they need clean finish work and careful moisture detailing to avoid a patched-together look.
DIY makes sense for a simple grill station on an existing patio if utility runs are already in place and the appliance specs are straightforward. Gas work, dedicated electrical circuits, large countertops, overhead structures, and heavy veneer usually belong in a pro scope. The timeline also changes fast once plumbing, electrical, and countertop fabrication enter the job.
One practical note before you build. Watch a few install sequences, not just inspiration clips, so you understand the order trades need on site.
Stone, concrete block, stainless steel, and composite trim all have a place here. The right choice depends on exposure, maintenance tolerance, and whether you may want to service or expand the kitchen later. Treat it like a permanent exterior build, not patio furniture with a grill dropped in the middle.
4. Pergola and Shade Structure Installation
By 3 p.m. in July, a patio can become dead space. The table is too hot to use, chairs bake in the sun, and the yard loses the part of the day when people want to sit outside. A pergola fixes that if it is placed for real sun exposure, built with the right connections, and sized around how the space will be used.
Pergolas do more than add overhead lines. They define a dining area, give a seating zone some cover, and make a slab or paver patio feel connected to the house instead of left over. The best results come from treating the structure as part of the build, not as a decorative add-on ordered after the furniture arrives.
Choose the structure before you choose the finish
Freestanding pergolas work best when you need to create a destination away from the house. Attached pergolas usually make more sense near a back door, especially when shade over a dining table or grill path matters more than symmetry in the yard.
Placement decides whether the structure helps or frustrates. I always check sun angle, walking paths, door swing, and furniture clearance before I care about whether the pergola looks centered on a plan. A layout that is visually perfect but drops posts into traffic routes gets annoying fast.
Set the pergola where the shade falls during the hours you actually use the yard.
The hardware matters as much as the beams. Post bases need to match the footing or slab below. Through-bolts usually outperform undersized lag screws on primary connections. Structural screws rated for exterior use save time in some assemblies, but they are not interchangeable with framing hardware chosen for specific load points. On exposed wood posts, metal post caps are a small detail that help shed water and clean up the finished look.
Material choice comes with trade-offs. Cedar looks better on day one than pressure-treated lumber, stays straighter if you buy good stock, and costs more. Pressure-treated wood is budget-friendlier, but it needs time to dry before staining and can twist if the build quality is loose. Aluminum and steel systems cut maintenance and give a cleaner profile, though they can feel too sharp next to softer planting beds or traditional homes. Composite-wrapped posts can work well if you want less upkeep, but the wrap has to be detailed so it does not trap moisture around the structural core.
Louvered roof systems give better sun control than an open pergola, but they move this project into a different budget and installation category. Motorized units, integrated drainage, and wind ratings usually push the job into pro territory. A basic wood pergola is realistic for an experienced DIYer with solid footings, careful layout, and help lifting beams. Large spans, house attachment, electrical for fans or lighting, and any engineered kit with strict fastening schedules should be installed exactly to spec.
Climbing plants soften the structure, but only if the frame was designed for the added load and moisture. Too many builds look fine the first season, then start to rack because the posts, anchors, or beam connections were sized for appearance instead of weight.
A simple site-built wood pergola often lands in the moderate cost range and can move quickly once footings are in and inspections are cleared, if required. Louvered systems and custom metal work cost more and usually take longer because fabrication, lead times, and precise leveling all matter. The mini-blueprint is straightforward. Pick the use case first, size the structure to the furniture below it, choose materials based on maintenance tolerance, and do not cut corners on post bases, fasteners, or attachment details.
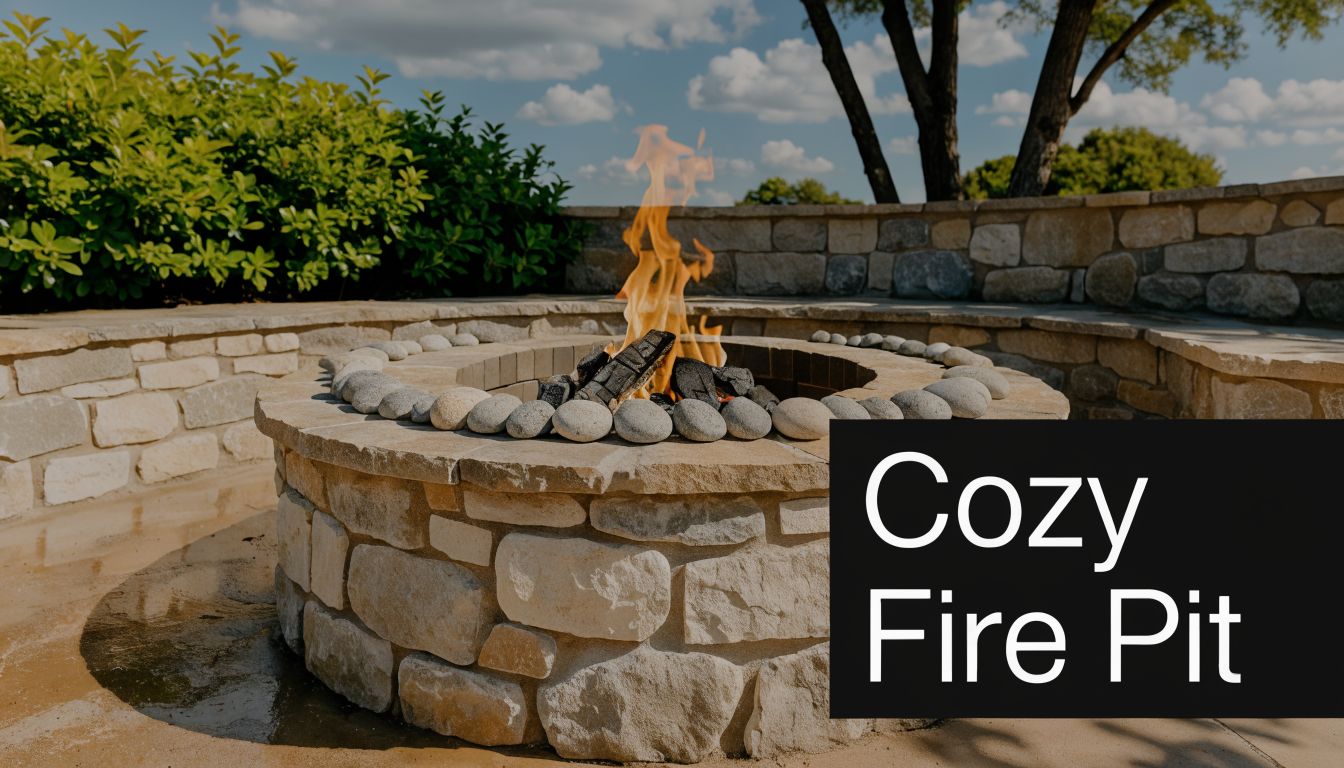
5. Fire Pit and Outdoor Seating Area
The test for a good fire pit setup happens at 8 p.m., not at noon. If guests are dragging chairs into place, turning away from smoke, or stepping around uneven pavers with a drink in hand, the layout was wrong before the first spark.
A fire feature earns its keep when the seating, surface, and clearance work as one small outdoor room. Treat it like a mini-blueprint, not a decorative add-on. Start with how many people you want to seat on a normal weekend, then set the pit size, chair spacing, and walking paths around that use.
Build the layout around comfort and clearance
Circular plans usually feel better for conversation. Straight or U-shaped seating works better when the fire pit ties into an existing patio, retaining wall, or deck edge. Built-in benches save space and look more finished, but loose chairs are easier to reposition when wind shifts or the crowd changes.
Clearance matters more than style here. Leave enough room to pull out a chair, pass behind it, and approach the fire without crowding the flame. On mixed-material patios, I also like to define the zone with a consistent non-combustible surface so the seating area reads as intentional instead of scattered.
Pick the fire type before you choose the finish materials
Wood-burning pits give you the crackle and smell people expect, but they also bring ash, smoke control problems, and local code restrictions in some areas. Gas and propane units light fast, shut down cleanly, and are easier to use on weeknights. Fire tables make sense on smaller patios because they combine a flame feature with a usable top.
Material choice follows the fuel type. Natural stone, concrete block, and precast kits hold up well around wood-burning heat if they are built on a stable base. Powder-coated steel and concrete units fit modern yards and pair well with gas burners. If seating sits nearby, keep combustible framing, composite trim, and loose cushions outside the manufacturer's listed clearances.
Hardware and build details that decide whether it lasts
A lot of failures start below grade. The base needs compacted gravel and a level setting bed if you're building on pavers. For masonry seat walls or stone veneer surrounds, use exterior-rated mortar or the adhesive system specified by the manufacturer, not whatever tube adhesive is on the shelf. Metal burner pans, gas valves, flexible gas lines, and ignition kits need to be rated for outdoor fire features and installed to code.
DIY is realistic for a basic gravel fire circle, a portable fire bowl on a properly built patio, or a simple kit assembled on a stable base. A permanent gas unit, seat wall with footings, or any project tied to a deck, roof cover, or utility line usually belongs in pro hands. Gas permits, trenching, ventilation, and exact burner clearances are not guesswork.
A simple wood-burning area with loose seating can be one of the faster backyard upgrades. Custom masonry, gas service, and built-in benches raise both cost and timeline. The right sequence stays the same. Set the seating plan first, choose the fuel, build the base correctly, and use materials and hardware that can handle heat, weather, and regular use.
6. Composite Deck Railing and Baluster Systems
You notice bad railing work the first time you put a hand on it. A little sway at the corner, uneven baluster gaps, a stair transition that feels awkward underfoot. Those are not cosmetic misses. They signal problems in the framing, fastening, or layout that can shorten the life of the whole system.
Composite railing earns its keep when the goal is lower maintenance without giving the deck a heavy, plastic look. I usually see the best results from mixed systems. Composite top and bottom rails keep the colour consistent with the deck boards, while powder-coated aluminum balusters keep sightlines open and put less visual weight around pools, raised patios, and second-story decks.
The hardware choices matter more than the brochure
Rail kits look simple on the shelf. The installation rarely is.
Post stiffness decides whether the railing feels solid. That starts with the structural post and how it is tied into the framing, not the composite sleeve that hides it. Through-bolts, approved tension ties, blocking, and manufacturer-specific brackets all need to work together. If the post moves, the rail will never feel right no matter how clean the finish looks.
Baluster spacing has to stay consistent, and stair sections are where crews lose time. Angle cuts, bracket alignment, and bottom-rail clearance all need to be laid out before anything gets fastened tight. Good installers dry-fit these sections first because one rushed cut can throw off an entire run.
Post caps are more than decoration. They finish the sleeve, help shed water, and can house low-voltage cap lights if wiring is planned early. Stainless or coated fasteners also matter, especially near pools or in wet climates where corrosion shows up faster than homeowners expect.
Design for the view, then build for movement and weather
A quiet railing design usually ages better than a busy one. Slim balusters, clean post spacing, and a rail profile that matches the scale of the deck tend to hold up visually for years. Decorative panels and ornate inserts can work in a short feature section, but covering every span with detail often makes the deck feel smaller and more crowded.
Sightlines should stay open where the yard has something worth looking at. On raised decks, that often means narrower balusters and fewer visual interruptions. On family decks, I also like a broad, comfortable top rail where people naturally rest a hand or set a drink.
DIY is realistic for a small, ground-level platform using a manufacturer kit and straightforward corner conditions. Raised decks, stair runs, cocktail rails, and any guard tied into older framing are different. Those jobs need careful post reinforcement and close attention to code height and opening limits. A railing failure is expensive to rebuild because the trim parts come off first, then the rails, then often sections of decking to reach the framing below.
Material cost sits above basic treated wood and below many custom metal systems. Installation time stays reasonable on straight runs and climbs fast once stairs, corners, and lighting enter the plan. If the budget is tight, spend money on the posts, brackets, and fasteners first. That is what keeps the system solid after a few seasons of sun, movement, and regular use.
7. Landscape Lighting and Ambient Outdoor Lighting
You feel the weak spots in a backyard after sunset. The dining area disappears, the walk to the gate gets tentative, and one hard floodlight makes the whole space feel flat. A good lighting plan fixes use, safety, and mood at the same time.
The best setups are layered and restrained. I usually start by lighting circulation first, then gathering areas, then focal points. That order keeps the yard usable every night, not just pretty in photos.
Build the plan around how the yard is used
A simple lighting layout usually includes a few fixture types with clear jobs:
- Path lights: Guide people to entries, gates, and patio edges.
- Step and riser lights: Mark elevation changes where trips occur.
- Post cap or rail lights: Add low-level glow on decks, stairs, and fence lines.
- Uplights or spot fixtures: Draw attention to a tree canopy, pergola post, screen wall, or stone detail.
- String lights or overhead pendants: Define a dining or lounge zone without overlighting the whole yard.
Warm LED color temperatures tend to read better in residential spaces. Cooler light can work at a side yard or service path, but around seating it often feels harsh. Keep output modest and let contrast do some of the work.
Choose the wiring method before you finish the carpentry
Projects either stay clean or turn into rework. If lights are going into posts, caps, stair risers, or railing sections, run conduit and wiring paths before trim boards, skirts, and finish fasteners are installed. I have seen homeowners buy good fixtures, then settle for exposed wire because the deck was already closed up.
Low-voltage wired systems cost more up front than basic solar fixtures, but they are usually more reliable under tree cover, through cloudy weeks, and across larger yards. Solar can still make sense for a short path or a trial run before committing to trenching and transformers.
Hardware matters more than people expect
Outdoor lighting fails at connections first. Use exterior-rated wire, waterproof connectors, burial cable where required, and transformers sized for the actual load with room for future fixtures. On wood structures, I prefer stainless or coated fasteners anywhere a fixture base or bracket meets the framing. Cheap hardware stains surfaces and loosens early.
DIY is realistic for plug-and-play string lights, a small solar path run, or a basic low-voltage kit on an accessible patio. Hardwired line-voltage fixtures, long trench runs, and any setup tied into stairs, posts, or masonry usually justify a pro. The labor cost is easier to swallow than tearing out pavers or trim later to fix a bad layout.
A modest system can be installed in a weekend if the runs are short and access is open. A larger yard with multiple zones, buried cable, transformers, and integrated post lighting usually stretches into several days. For visual inspiration before you buy fixtures, these 7 landscape lighting ideas for 2026 are useful for planning styles and fixture mix.
8. Water Features and Pond Installation
Water features add something most backyards are missing. Sound. A small fountain can mask road noise and make a seating area feel more enclosed without building another wall or fence.
This is one of the most misunderstood backyard renovation ideas because people tend to think too big too early. A pondless waterfall, compact basin fountain, or modest recirculating feature often gets used and appreciated more than a large pond that demands constant cleanup.
Put the feature where you'll hear it
The right location is usually near a primary seat, not hidden in the far corner of the yard. If the feature only looks good from one angle and can't be heard from the patio, it becomes expensive scenery.
Drainage around the feature matters as much as the feature itself. Water can't be allowed to undermine nearby deck footings, seep toward the foundation, or sit against fence posts and planters. Any deck edge or viewing platform beside the water needs stable rails, proper post caps, and fasteners that can handle routine moisture exposure.
- Basin fountains: Best for small patios and low maintenance.
- Stream and waterfall features: Strongest sound effect, more grading work.
- Ponds: Good when you want fish or aquatic planting, but they ask for real maintenance discipline.
Match the style to the yard
Modern yards take well to simple spill bowls, linear rills, or dark stone basins. Cottage-style and naturalistic yards usually want irregular stone, softer planting, and less obvious equipment.
Night lighting changes the whole effect. A small spotlight, underwater light, or nearby path fixture can make a plain daytime feature feel dramatic after sunset. If you're already planning a lighting package, it is at this stage that the systems should meet.
9. Garden Beds, Planters, and Vertical Growing Systems
You feel the difference the first weekend after these go in. Herbs are within reach of the grill, tomatoes have a proper trellis instead of sprawling across the yard, and watering takes minutes instead of a full circuit with the hose. That is why raised beds and vertical growing systems are such a strong backyard upgrade. They add function fast, and they do it without the cost and disruption of a full hardscape project.
The best results come from treating this as more than a planting project. It is a layout, materials, irrigation, and hardware project. Bed height affects comfort. Bed width affects whether you can reach the center without compacting soil. Fasteners matter too, especially in boards that cycle through heat, irrigation, and dry spells all season.
Build for reach first, appearance second
A bed that is 3 to 4 feet wide is usually easier to live with than an oversized box that only looks good on day one. If you need access from one side only, keep it narrower. Leave enough path width for a wheelbarrow, a hose, and your feet when the soil is wet.
Vertical systems solve a different problem. They get production up without taking over the yard. A simple cattle-panel trellis between posts, wall-mounted planters with proper blocking, or tiered cedar boxes near a patio can carry herbs, greens, strawberries, and climbing vegetables in a compact footprint.
A garden bed earns its space when you can water it quickly, reach every corner, and replace one board or bracket without rebuilding the whole thing.
Choose materials that match the workload
Cedar and redwood are easier for DIY builds and look right in many backyards, but they do wear down over time where soil stays damp. Composite boards last longer in wet-dry cycles and keep a cleaner edge, though they need better support because some profiles can flex if spans are too wide. Metal beds go in quickly and hold up well, but they can heat the soil faster in hot sun.
Hardware is where cheap builds start to fail. Use exterior-rated structural screws, galvanized or stainless corner brackets where needed, and post caps on any exposed wood posts to slow water intrusion. For wall-mounted vertical systems, lag into framing or solid blocking. Do not trust hollow fence pickets to carry loaded planters after a summer of irrigation.
Plan the water before you fill the beds
Drip irrigation with a pressure reducer, filter, and simple battery timer saves more frustration than any decorative upgrade. It also keeps foliage drier and paths cleaner. In edible beds, I usually prefer separate zones for containers and in-ground boxes because they dry out at different rates.
Placement should follow use. Put herbs and salad greens near the kitchen door or outdoor cooking area. Put heavier producers where they get full sun and where runoff will not stain adjacent paving. If you are mixing edible planting with water-wise yard planning, this overview of smart landscaping tech is a useful companion read.
A basic DIY bed project can be a weekend job. A more finished setup with multiple boxes, trellises, drip lines, and built-in planters usually takes several days and a clearer materials list. Expect costs to swing widely based on lumber choice, irrigation, and whether the vertical elements need proper posts, anchors, or masonry fastening. That planning work pays off. These are the backyard projects people keep using.
10. Pool Installation and Deck Integration
Saturday afternoon is when weak pool planning shows up. Wet traffic cuts across the grill area, chairs sit on too-narrow decking, and one slick transition point near the steps becomes the spot everyone remembers for the wrong reason. A good pool project avoids that by treating the water, the deck, the gate hardware, drainage, and the walking paths as one build.
I plan pool surrounds from the shell outward. That means deciding early where people enter the water, where they dry off, where loungers fit, and how water leaves the deck without washing back toward the house. If those decisions wait until after installation, the result is usually cramped circulation and expensive rework.
Build for splash, chemicals, and bare feet
Poolside materials take abuse. They stay wet, heat up in full sun, and deal with chlorinated or saltwater exposure that can shorten the life of the wrong fasteners. For deck framing connections and visible hardware near the pool edge, stainless steel is usually the safer call. It costs more up front, but it holds up better than cheaper plated options in a harsh environment.
Surface choice matters just as much. Composite decking can work well around pools if the product is rated for ground or near-ground moisture exposure where needed, installed with the manufacturer's gap requirements, and paired with hidden clips or face-fastening systems designed for movement. Wood remains an option, especially on a tighter budget, but it needs regular sealing and closer inspection for checking, splintering, and fastener corrosion.
The details make the difference here. Use picture-frame boards carefully so trapped water does not sit at the perimeter. Add post caps to any exposed wood posts. Choose rail systems and gate hardware that meet pool code without crowding the usable deck. Self-closing, self-latching gates are part of the plan, not an accessory added at the end.
Keep the yard usable when nobody is swimming
The best pool layouts leave dry space for living. I want a clear route from the back door to seating or dining that does not cross the main splash zone, plus enough deck width for furniture legs to sit flat without blocking circulation. In smaller yards, a plunge pool or compact geometric layout often works better than stretching the waterline just because the space allows it.
Budget and schedule depend on scope. A simple deck tie-in around an existing pool may take several days to a couple of weeks, depending on demolition, footing work, and railing requirements. A new pool with integrated decking, fencing, lighting, and drainage is a multi-trade project that usually belongs in the pro column because layout errors, bonding requirements, and code inspections are expensive to fix later.
Night use needs planning too. Visible deck edges, step lighting, and gate locations should be clear after dark. The pool is the focal point, but the surrounding structure is what makes it safe, durable, and comfortable to use for years.
Backyard Renovation: 10-Item Comparison
Use this table as a first-pass filter before you price materials or call in trades. It compares each project by build difficulty, hardware and material demands, likely payoff, and the kind of yard where it makes sense. The goal is not just inspiration. It is to help narrow the shortlist and spot where details like post bases, stainless fasteners, drainage, and code requirements will decide whether the project holds up.
| Project | Complexity 🔄 (Implementation) | Resources ⚡ (Requirements) | Expected outcomes 📊 (Results & Impact) | Ideal use cases 💡 (When to choose) | Key advantages ⭐ |
|---|---|---|---|---|---|
| Composite Decking Installation | Medium to High 🔄 Precise framing, spacing, and fastening matter. Pro install is often the safer call | High ⚡ Composite boards, stainless or coated fasteners, joist hangers, skilled labor | High 📊 Long service life, low upkeep, stronger day-to-day usability | Homeowners who want a durable, low-maintenance deck surface | Durable and low-maintenance ⭐⭐⭐⭐ |
| Modern Fence Installation with Quality Hardware | Medium 🔄 Post layout, concrete depth, and gate alignment need accuracy | Medium to High ⚡ Material choice drives cost. Hinges, latches, post caps, and post bases affect lifespan | Medium to High 📊 Better privacy, security, and cleaner visual definition | Privacy upgrades, pet containment, property boundaries, modern curb appeal | Customizable and secure ⭐⭐⭐ |
| Outdoor Kitchen and Entertainment Area | Very High 🔄 Multi-trade work with structural, gas, plumbing, and electrical coordination | Very High ⚡ Appliances, counters, utility runs, licensed trades, permits | Very High 📊 Expands hosting capacity and adds strong lifestyle value | Frequent entertainers and households that cook outside often | High-impact entertaining and strong value ⭐⭐⭐⭐ |
| Pergola and Shade Structure Installation | Medium 🔄 Footings, beam connections, and uplift resistance need careful planning | Medium ⚡ Wood or aluminum framing, post bases, structural screws or lag bolts | Medium 📊 Adds shade, definition, and overhead structure for lighting or plants | Patios or decks that need relief from direct sun | Affordable focal point and usable shade ⭐⭐⭐ |
| Fire Pit and Outdoor Seating Area | Low to Medium 🔄 Ranges from simple portable setups to masonry builds with clearance rules | Low to Medium ⚡ Pit materials, base prep, seating, and sometimes permits | Medium 📊 Extends evening use and creates a natural gathering zone | Small to mid-size yards focused on casual social use | Affordable warmth and atmosphere ⭐⭐⭐ |
| Composite Deck Railing and Baluster Systems | Medium 🔄 Guard height, post attachment, and code compliance drive the work | Medium ⚡ Composite or aluminum rail kits, balusters, post sleeves, stainless fasteners, blocking | High 📊 Improves safety, cuts maintenance, and finishes the deck cleanly | Raised decks needing code-compliant railings | Low maintenance and code-compliant ⭐⭐⭐⭐ |
| Outdoor Lighting and Ambient Yard Lighting | Low to Medium 🔄 Fixture placement and wire routing are straightforward, but planning matters | Low to Medium ⚡ Fixtures, low-voltage wire, transformer or solar units, timers | Medium to High 📊 Better visibility, safer circulation, longer evening use | Paths, seating areas, steps, and entertaining zones used after dark | Energy-efficient atmosphere and safety ⭐⭐⭐ |
| Water Features and Pond Installation | High 🔄 Excavation, liner protection, pump sizing, and water management must be done right | High ⚡ Pumps, liners, filtration, stone, ongoing cleaning and seasonal care | High 📊 Creates a distinctive focal point, sound control, and habitat value | Garden focal points, tranquil settings, wildlife-friendly yards | Unique sensory appeal and wildlife attraction ⭐⭐⭐ |
| Pool Installation and Deck Integration | Very High 🔄 Excavation, utilities, inspections, drainage, and finish coordination across multiple trades | Very High ⚡ Major capital cost, contractors, fencing, decking, chemicals, ongoing service | Very High 📊 Strong recreation value and major impact on backyard use | Family recreation, luxury builds, high-use warm-weather yards | Major lifestyle upgrade and marketability ⭐⭐⭐⭐ |
No table replaces a site visit. Slope, drainage, access for equipment, frost depth, sun exposure, and local code can move a project from DIY-friendly to pro-only in a hurry. That is why the best backyard plans pair the idea with the build method, the right hardware, and a realistic budget before work starts.
Your Backyard's Next Chapter Starts Now
It is 6:30 on a Tuesday. Dinner is done, the weather is good, and you step outside hoping to use the yard for an hour. If the deck feels tired, the gate sags, the seating gets full sun, or the lighting leaves dark spots on the steps, that space stops working no matter how good it looked on paper. The best backyard renovation ideas fix those everyday friction points first.
That practical lens matters more than chasing features. A deck should stay stable without constant maintenance. A fence should provide privacy and hold its line through weather and gate use. A pergola should cast shade where people sit, not just where it looks good from the house. A fire pit area should feel comfortable enough that people stay longer than ten minutes.
Good results usually come down to the build details. Homeowners often spend heavily on surface finishes, then treat hardware like an afterthought. That is a mistake I see all the time. Joist hangers, deck screws, carriage bolts, lag bolts, sleeve anchors, wedge anchors, hinges, balusters, post base brackets, gate inserts, and post caps decide how well a project holds up once rain, sun, freeze-thaw cycles, and daily movement start working on it.
That is the thread running through every project in this guide. Each idea works better when you pair the concept with a basic build plan. Pick the right materials for the use case. Match the connectors and finishes to the exposure. Be honest about whether the job is cosmetic, structural, electrical, or utility-related. That is how a simple upgrade turns into a durable one.
Some jobs are realistic DIY projects. A careful homeowner can often handle planter systems, certain railing updates, lighting, or a straightforward gate hardware refresh with good measurements, decent tools, and the right fasteners on site. Other work belongs with a pro, especially anything involving footings, major framing, gas, pool integration, drainage correction, or code-sensitive stairs and guards. Saving money on labor does not help if the fix has to be torn out in a year.
Start with one question. What does the backyard need to do better next month, not just someday?
The answer usually points to the right project. Privacy leads to fencing. Shade points to a pergola or covered seating area. Frequent grilling and entertaining may justify a kitchen zone with durable surfaces and proper clearances. Kids, guests, and older family members often make safe walking surfaces, railings, and lighting the best first investment. Growing food or flowers may call for raised beds and vertical systems that are easier to maintain than in-ground planting.
This list was built to help you choose more than an idea. It gives you a working outline for each project, including where hardware matters, where DIY makes sense, and where labor, permits, or specialty trades can change the budget and timeline fast.
Build around use, then buy parts that support that use. That approach produces outdoor spaces that look better, last longer, and feel finished because the small components were chosen with the same care as the visible ones.
If you're ready to turn these backyard renovation ideas into a real project, XTREME EDEALS INC. is a practical place to start. The catalogue includes Decorex post caps, balusters, gate inserts, joist hangers, post base brackets, hinges, deck screws, carriage and lag bolts, anchors, washers, and other deck and fence hardware that DIYers, contractors, outdoor construction professionals, and property managers need to finish outdoor builds properly. Whether you're upgrading one gate or sourcing parts for a full deck and fencing package, XTREME EDEALS makes it easier to buy the small components that have a big effect on durability, safety, and curb appeal.