

You're usually standing in the same spot when this project starts. The deck is built, the posts are solid, the brackets are exposed, and the base of each post still looks unfinished. The structure is right, but the eye goes straight to the gap where the post meets the surface.
That's where wood post base trim for 6×6 posts earns its keep. It cleans up the transition, hides rough cuts and fastening hardware, and gives the whole post a deliberate finish. But it only looks professional when it fits the post you have, the bracket below it, and the conditions around it.
Most of the headaches happen before fastening. People buy “6×6” trim, assume it will drop straight on, and then discover the post isn't perfectly square, the hardware is in the way, or the mitres open up after assembly. The fix is simple. Measure like a carpenter, dry-fit everything, and don't trap moisture at the base.
Selecting the Right 6×6 Post Base Trim
A clean install starts with buying the right skirt, not with trying to force the wrong one into place.
A nominal 6×6 post measures about 5.5 inches by 5.5 inches, and the trim sold for that size is generally made to hide the exposed gap where the post meets the deck surface. Market listings also commonly describe this type of trim as a two-piece or wraparound accessory, which is exactly what makes it useful on an existing post that's already in place (Deckorators wooden post skirt reference).
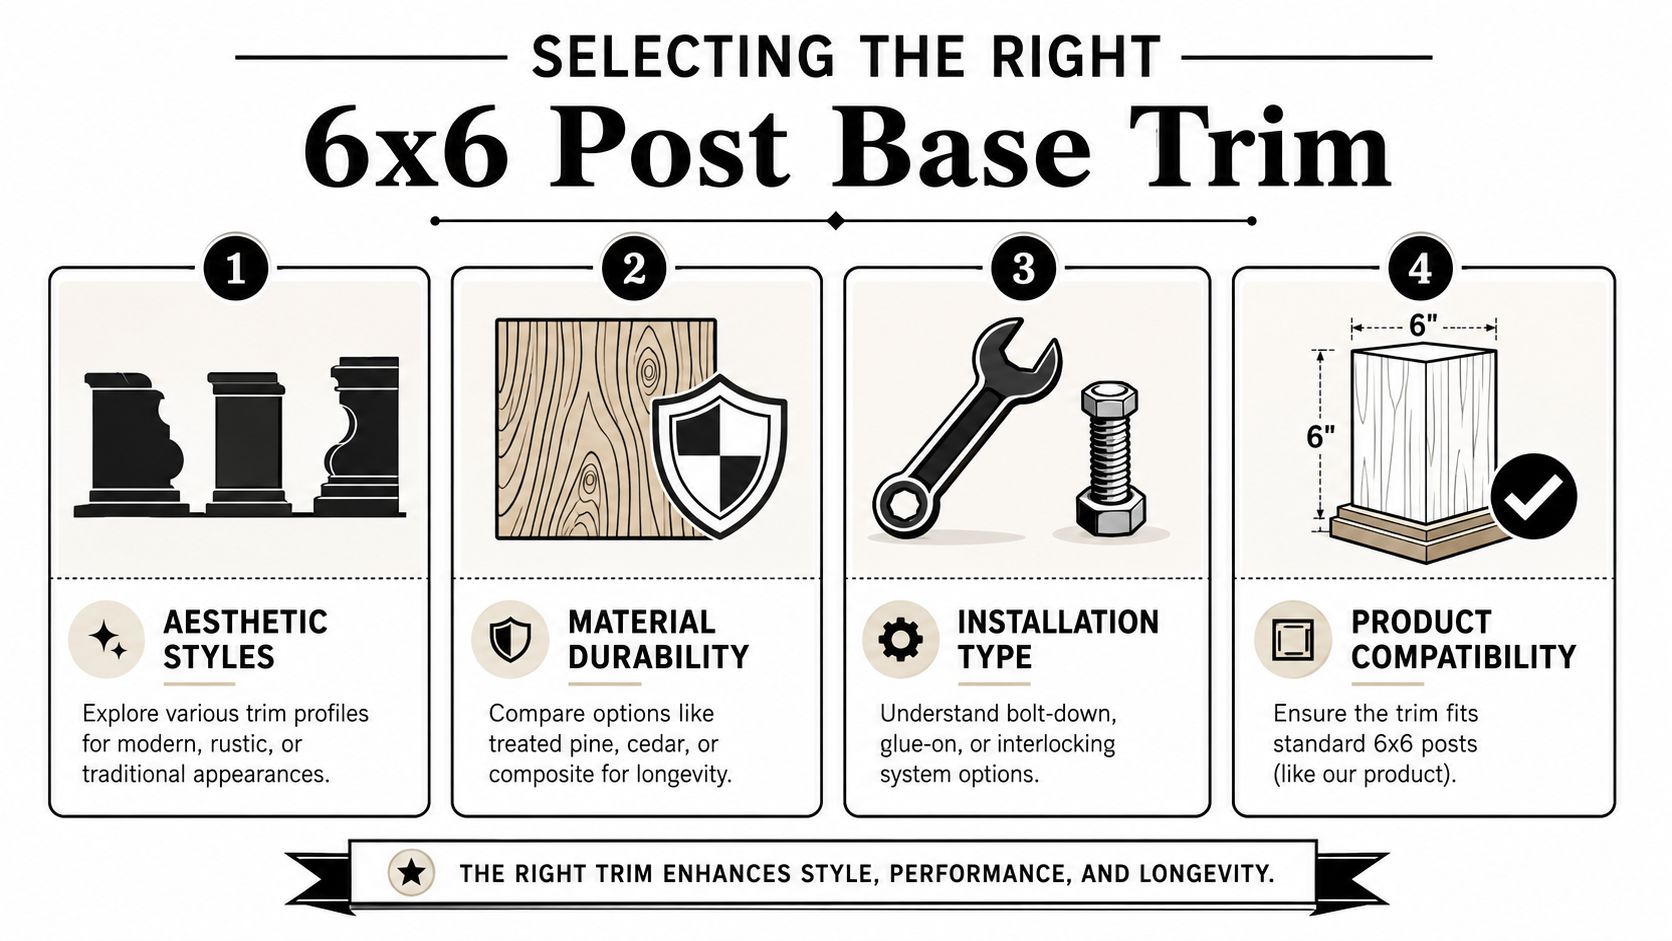
Start with the material and the look
If you want the trim to blend into a wood post, wood skirts make the most sense. They're easy to sand, easy to stain or paint, and they look right on cedar, treated lumber, and other traditional post builds. If the rest of the project uses low-maintenance finishes, composite trims can make sense, but they often give a different visual texture than real wood.
The style is more significant than commonly believed. A simple square skirt suits modern rails and straightforward deck lines. A more profiled skirt works better when the deck already has decorative caps, balusters, or a more traditional fascia treatment.
Fit matters more than the label
The label on the box doesn't tell you enough. “Fits 6×6” is only the starting point.
Look for these details before you buy:
- Two-piece construction so you can wrap the trim around an existing post instead of lifting the post out.
- Inside clearance that suits the actual post, not just the nominal label.
- Enough room for hardware if the post sits on a visible metal base or bracket.
- Finish compatibility if you plan to stain, paint, or leave the wood exposed.
If you're comparing options, one useful place to browse is 6×6 post base trim options, especially if you're matching trim with other deck or fence hardware.
Practical rule: Buy for the post you measured, not for the name stamped on the lumber.
Check bracket clearance before ordering
This is the part many DIYers skip. The trim may fit the wood post and still fail at the bottom because the bracket flares wider, sits proud of the decking, or leaves no flat bearing surface for the skirt.
A quick field check saves a lot of aggravation:
| What to check | Why it matters |
|---|---|
| Post width at the base | Posts aren't always perfectly uniform near the cut end |
| Visible bracket shape | Some bases interfere with skirt corners or inside edges |
| Deck surface flatness | Uneven boards can leave one side floating |
| Final finish plan | Painted trim and stained posts need cleaner joint work |
If your project is part of a larger exterior upgrade, details like post trim often tie into the overall finish standard used on residential patio cover installation work as well. The principle is the same. The structural member has to stay serviceable, and the trim has to look intentional rather than added as an afterthought.
For product selection, I'd lean toward a straightforward wood wraparound skirt when the goal is a traditional deck finish and easy field adjustment. That's why trims such as the Decorex Hardware wood post skirt style are practical on site. They're simple to fit, easy to modify, and don't force you into rebuilding the post base just to improve the appearance.
Essential Tools and Post Preparation
A professional-looking skirt job usually comes down to setup. If the post base is dirty, damp, or obstructed, even a well-cut trim assembly won't sit right.
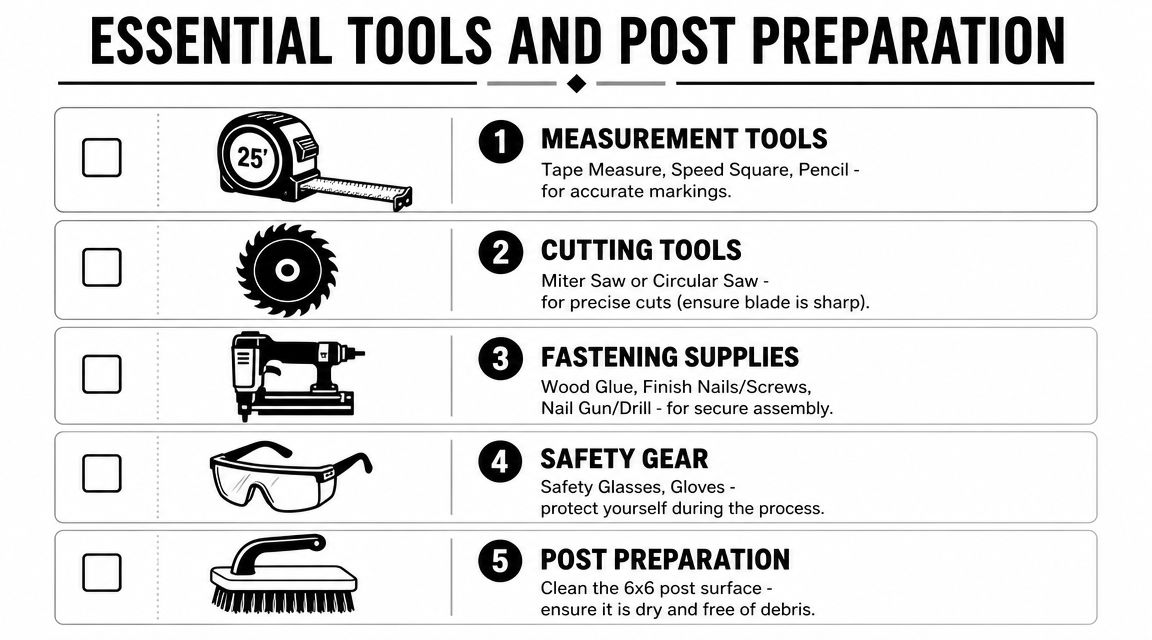
The tools that actually get used
You don't need a shop full of gear, but the basics need to be accurate.
- Tape measure and pencil for marking each piece clearly.
- Speed square to verify reference lines before cutting.
- Mitre saw with a sharp blade for clean corner joints.
- Clamps to hold short trim pieces safely during cuts or assembly.
- Exterior wood glue for the mitred corners.
- Brad nailer or drill/driver depending on your fastening method.
- Wood filler, sandpaper, and paintable exterior caulk for final finish work.
- Safety glasses and gloves because trim work still involves flying chips and sharp edges.
If you need fastening supplies in the same order as your trim hardware, deck fasteners and fittings is a practical place to source nails, screws, and related hardware.
Prepare the post before you cut anything
A lot of trim gets blamed for bad fit when the underlying problem is at the post.
Run through this short prep list first:
- Clear the base area. Sweep out dirt, sawdust, leaves, old caulk, and loose paint.
- Check for protrusions. Old nails, screw tips, splinters, and bracket tabs can stop the skirt from seating.
- Make sure the post is dry. If the wood is damp, hold off. Finish trim installed against wet wood can shift or telegraph stains later.
- Inspect the surface line. Look at the deck boards or concrete around the post. High spots matter.
If the trim rocks during dry-fit, don't force it shut with fasteners. Find the interference point and correct that first.
The extra few minutes here save you from recutting pieces that were never the actual problem.
Measuring and Cutting for a Perfect Fit
This is the part that decides whether the finished trim looks custom or looks patched together.
For a nominal 6×6 post, which is often 5-1/2 in. x 5-1/2 in., some commercial trim lists an inside opening of 6-1/16 in. That extra clearance is helpful, but it doesn't remove the need to measure the actual post in the field. A reliable installation sequence is to measure all four faces, confirm the trim's clear opening, cut the four skirt pieces at 45°, and test the joint closure. One important trade tip from installation guidance is that bad mitres are often caused by length error rather than angle error (post base trim installation reference).
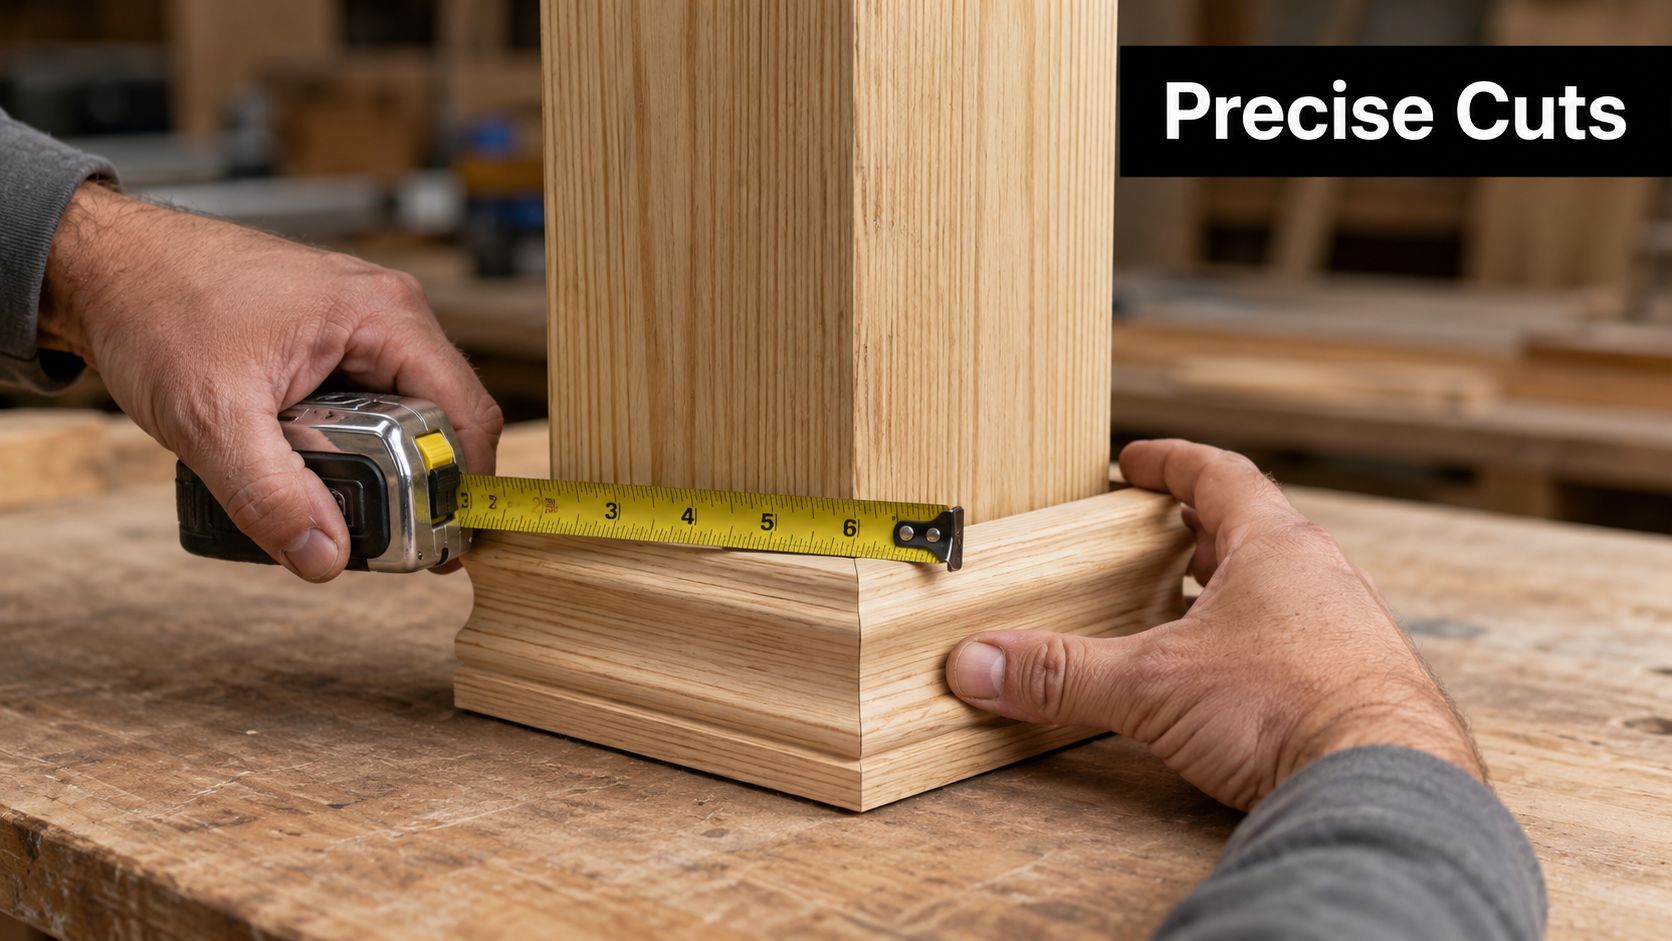
Measure the post on every side
Don't assume the post is perfectly square because it came from the yard as a 6×6. Check each face near the base where the trim will sit. Treated posts can vary slightly, and the corners may not be identical after weathering, planing, or site cutting.
Use the tape on all four faces and write the measurements down. Then look at the biggest dimension, not the smallest one. The trim has to clear the fattest point without being forced.
Mark from a reference edge
Pick one clean edge on your trim stock and use it as your reference for every piece. That keeps your reveal consistent and your mitres easier to close.
A few habits make a big difference:
- Mark the inside face so you don't accidentally cut mirror-image pieces.
- Label each side if the post isn't perfectly uniform.
- Sneak up on the length when the fit is close rather than trying to hit it in one cut.
- Keep the bottom edge consistent so the skirt sits level when assembled.
A mitre can be cut at the right angle and still open up if one piece is just a little longer than its mate.
Use a stop block for matching lengths
If you're making four loose trim pieces instead of using a pre-made wrap, set a stop block on the saw station after confirming the first good piece. That way, the opposite side matches exactly, and the remaining pair can be repeated off the same setup.
DIY installations typically go off line. People trust the saw scale, cut all four corners, and then try to “pull” the joint closed during fastening. That never looks as clean as equal-length pieces cut from a stable setup.
Here's a simple cutting sequence that works:
- Cut one end with the saw set to the correct mitre.
- Measure and mark the finished long point or short point consistently.
- Cut the matching opposite mitre.
- Dry-fit that first piece against the post.
- Lock in a stop block only after the first piece proves the measurement.
- Cut the matching opposite side.
- Repeat for the remaining pair.
A visual walkthrough can help if you want to compare your saw setup and cut sequence:
Test the corners before final assembly
Stand the pieces around the post and check each joint. If one corner opens at the outside edge, don't immediately blame the saw angle. Compare the opposite pieces for exact length first.
Look for these clues:
| Symptom | Likely cause |
|---|---|
| One joint open, others tight | One piece is off in length |
| All joints slightly open | Saw setup or stock movement |
| Trim binds on one side | Post out of square or hidden obstruction |
| Assembly twists during test fit | Uneven deck surface or inconsistent bottom cuts |
When the fit is close but not perfect, trim carpenters usually correct the stock, not the post. A careful recut is faster than trying to fill a bad corner and pretending it will disappear after paint.
Assembly and Fastening Techniques
Once the pieces fit properly, the assembly should feel controlled, not rushed. This stage is where the trim starts looking like a single unit rather than four separate parts.
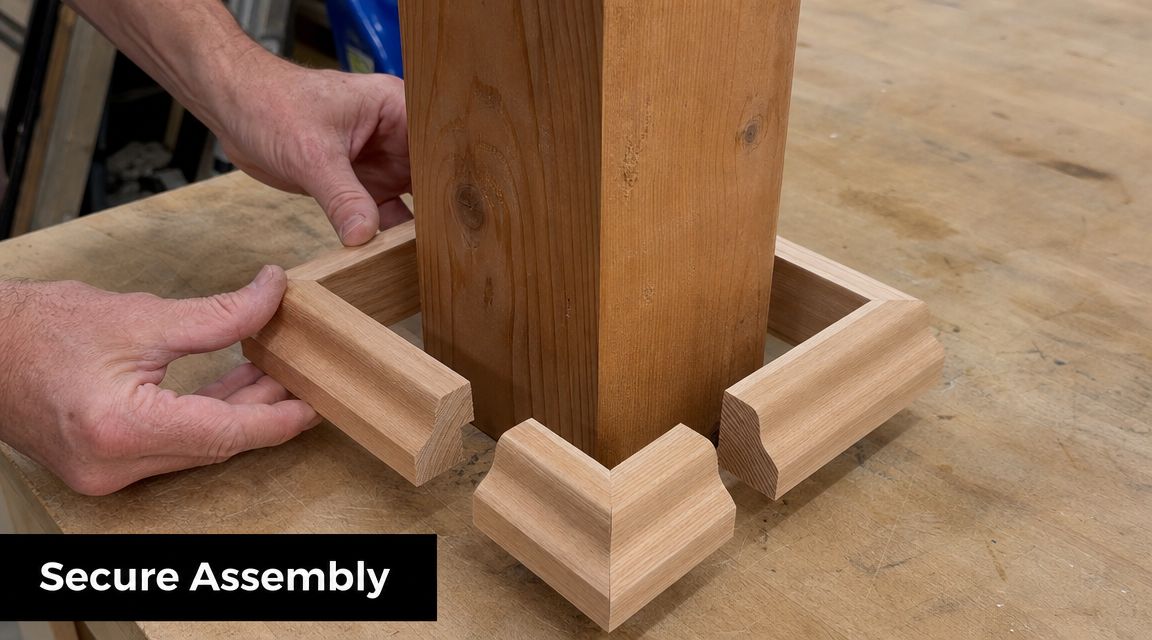
Dry-fit before glue touches wood
Wrap the pieces around the post and check three things. Make sure the corners close, make sure the trim sits flat to the deck or surrounding surface, and make sure the bracket doesn't force any side outward.
If the post uses visible support hardware, compare the trim profile to the base hardware before fastening. A 6×6 post bracket can affect where the skirt lands and whether the inside edges need a slight relief cut.
Glue the mitres, then pin or screw
Use exterior-grade wood glue on the mitred edges, not heavy blobs and not a dry joint. You want full contact on the faces without so much squeeze-out that cleanup becomes the whole job.
For fastening, there are two common paths:
- Brad nails work well when the trim is primarily decorative and the fit is already snug. They leave small holes and are quick to place.
- Trim-head screws give you more pull and are useful when the stock is a bit stiffer or when conditions outside are rougher.
If you want a general refresher on screw selection, these essential wood screw recommendations are a useful comparison point for thread style and application. For this job, the main concern is clean seating and avoiding split-out near the corners.
Place fasteners where they disappear
Don't shoot nails too close to the mitre tips. That's where wood wants to split, especially on narrow skirt profiles.
A cleaner approach is:
- Pin near the centre of each face so the trim stays stable without stressing the corner.
- Hold the joint closed by hand or clamp while fastening.
- Wipe glue squeeze-out early before it skins over.
- Use fewer, smarter fasteners instead of peppering the trim and creating extra filling work.
Shop note: If the dry-fit is right, the fasteners only hold the work in place. They shouldn't be used to bend bad cuts into submission.
XTREME EDEALS INC. carries deck and fence accessories, including post-base and related hardware, so it can be a practical source when you're matching trim details with brackets, screws, caps, and other finish components on the same project.
Finishing Touches and Long-Term Care
The trim may already look good once it's fastened, but this is the stage that makes it look built-in.
Clean up the surface work
Fill nail holes with an exterior-grade filler that suits your final finish. If you're painting, you can be a little more aggressive with filling and sanding. If you're staining, keep filler use minimal and precise because patched areas usually read differently than surrounding wood.
After the filler cures, sand the mitres lightly until the transitions feel even under your hand. You're not trying to reshape the skirt. You're just removing tiny ridges and softening any glue residue left at the joint.
A small bead of paintable exterior caulk where the trim meets the post can sharpen the appearance, especially on painted assemblies. Keep it neat. Sloppy caulk lines make good carpentry look average.
Don't seal the bottom tight
This is the durability point many people miss. Decorative trim can trap moisture against the post, and that can accelerate rot if the skirt blocks ventilation or makes the post-to-support area hard to inspect. In moisture-sensitive conditions, it's important to maintain airflow and avoid trim details that interfere with checking the base connection over time (durability guidance on post base inspection and moisture risk).
That changes how I finish the bottom edge. I don't like to pack the entire lower seam shut. A tiny drainage and ventilation break is usually smarter than a sealed ring that holds water where you can't see it.
A practical maintenance routine
Use this simple approach after installation:
- Inspect the base periodically for staining, softness, or trapped debris.
- Keep mulch, soil, and leaf buildup away from post bases on fences, pergolas, and lower decks.
- Refresh paint or stain when the finish starts failing rather than waiting for raw exposure.
- Check that the skirt still allows visual inspection of the critical post connection area.
Good trim should hide the rough gap, not hide a developing problem.
On painted trim, pay close attention to the lower edges and corner seams. On stained trim, look for darkening or seasonal swelling. Either one can tell you water is lingering longer than it should.
Answering Your Post Trim Questions
Can you install wood post base trim 6×6 over a post on concrete?
Yes, if the post base is clean and the trim has room to clear the hardware. Concrete usually makes level checks easier, but surface irregularities around the bracket can still stop the trim from sitting flat. Dry-fit first and check for rocking before fastening.
Wood or composite for post base trim?
Wood is easier to fine-tune on site. You can trim, sand, fill, and finish it with common carpentry tools. Composite can be useful when low maintenance matters most, but it won't always match the look of a real wood post, and field modifications can feel less forgiving.
What if the surface is sloped?
Treat each piece as part of a custom fit. On a visible slope, a level skirt may look wrong, but a skirt cut to follow the surface needs careful layout or the joints will show it. On tricky slopes, make a quick template first instead of cutting the finish material blind.
Can trim cover ugly brackets completely?
Sometimes, but complete concealment isn't always the right move. If covering the bracket makes the base harder to inspect or traps moisture around the post, leave some visibility and prioritise serviceability over a cleaner-looking wrap.
If you're sourcing hardware for a deck, fence, or pergola upgrade, XTREME EDEALS INC. is one place to compare post trim accessories, brackets, caps, and fastening supplies in the same order. That makes it easier to match the finish details instead of piecing the project together from different suppliers.