
A lot of people start the same way. They stand at the bottom of their staircase, look at an outdated builder-grade rail, and think the fix is mostly visual. New balusters, a better profile, maybe a darker finish, and the whole entry will feel more finished.
That's partly true. But an iron railing for stairs isn't just décor. It's a structural assembly people lean on, pull on, and trust when they're carrying laundry, helping a parent up the steps, or moving too fast in socks. If the post base flexes, the anchors are wrong, or the finish can't handle your environment, the project can look right and still be wrong.
Why Your Stair Railing Is More Than Just a Handrail
Most first-time buyers focus on the part they can see. They compare scrollwork to straight lines, matte black to satin iron, square balusters to basket details. On site, the bigger questions come first. What is this railing fastening into. How much lateral movement will it have. Is the stair geometry clean enough for a prefab panel, or does it need field fitting.
That's why stair projects go smoothly when the railing is treated as part of the staircase, not an accessory added at the end. A good iron railing changes the look of the home, but it also has to feel solid in the hand, meet local code, and hold up to daily wear.
What clients usually realise after the first quote
The visible ironwork is only one part of the build. The key difference between a railing that lasts and one that becomes a callback often comes down to details like:
- Post anchoring: A decorative post still fails if the base plate is undersized or the fastener pattern is weak.
- Grip comfort: A handrail has to feel natural in use, not just match the room.
- Finish selection: Indoor dry air, damp basements, and coastal exposure all demand different protection.
- Field adjustments: Old stairs are rarely perfectly consistent, so installers need room to scribe, trim, and shim accurately.
Practical rule: If a railing feels slightly loose on day one, it won't tighten up with time. It only gets worse.
People often ask whether iron is worth it over wood. In many homes, it is. Iron gives you slimmer profiles, cleaner sightlines, and more flexibility in mixing traditional and modern details. It also pairs well with wood treads, painted stringers, and stone or tile landings.
The goal isn't merely to buy metal parts. It's to build a railing assembly that suits the house, passes inspection, and still looks right years later.
Choosing Your Iron Material and Style
Not all “iron” railings are the same. Homeowners usually group them together, but on a real project the material changes the price, the weight, the installation method, and how much custom work is realistic. The easiest way to think about it is the same way you'd choose fabric for furniture. One option is customizable and flexible. One is decorative and heavy. One is practical and sleek.

Wrought iron, cast iron, and tubular steel
Wrought iron is the choice when you want shaped details, forged character, and more freedom in custom layouts. It suits curved stairs, traditional homes, and projects where each panel needs some hand-fitted adjustment. It can look refined without feeling delicate.
Cast iron leans more ornamental. It's heavier, more formal, and better suited to repeating decorative elements than to fine field modifications. If the house has old-world detailing, thick trim, or masonry features, cast pieces can feel right at home.
Tubular steel is what many modern railing systems rely on. It's typically simpler to fabricate, easier to install in straight runs, and usually the most straightforward route for contemporary interiors. It doesn't carry the same handcrafted look, but it works well where clean lines matter more than ornament.
Iron Railing Material Comparison
| Material | Average Cost (Per Linear Foot) | Durability | Best For |
|---|---|---|---|
| Wrought iron | Varies by design complexity and fabrication | Strong and long-lasting when properly finished | Custom homes, traditional stairs, decorative work |
| Cast iron | Typically higher where ornate cast components are used | Durable but heavier and less flexible in field adjustments | Heritage-style interiors, formal entries |
| Tubular steel | Often the most budget-friendly fabricated option | Durable for many residential applications | Modern homes, straight runs, simpler installs |
Style is built from components
The overall look doesn't come from the handrail alone. It comes from the combination of balusters, posts, shoes, collars, and finials. A plain square bar gives you a quieter profile. Add a single twist, basket, or scroll, and the stair starts to read more traditional. Use larger feature balusters sparingly and the railing looks intentional instead of busy.
For homes with exposed beams, tapered columns, and warm trim, it helps to look at broader architectural references before choosing details. If you're working around a bungalow or lodge-style interior, these craftsman home plans are useful for seeing how stair parts fit into that style language without overpowering the room.
A practical place to start is the baluster itself. Suppliers such as iron stair balusters make it easier to compare simple square profiles against scroll and feature pieces before you commit to a full set.
A staircase usually looks better when one element does the talking. If the tread wood is dramatic, keep the iron simpler. If the stair shape is plain, the iron can carry more character.
What works and what usually doesn't
A few combinations consistently work well on site:
- Straight black balusters with wood handrail: Clean, adaptable, and forgiving across many home styles.
- Feature balusters every few pickets: Enough detail to register, without turning the railing into visual clutter.
- Chunky posts with very delicate infill: Good when the staircase needs a stronger visual anchor at the bottom and top.
A few choices often disappoint:
- Too many decorative elements together: Scrolls, collars, oversized finials, and ornate shoes can fight each other.
- Heavy iron in a narrow stairwell: It can make the space feel tighter and darker.
- Ultra-modern iron in a highly traditional home: Sometimes contrast works. Often it just feels disconnected.
The right material and style should fit the house first, then the budget, then your mood board.
Understanding Building Codes and Measurements
Code isn't paperwork. It's the part that keeps a railing from being uncomfortable, unsafe, or rejected after installation. Homeowners often want to start with finishes and layouts, but the smarter move is to measure first and confirm what your local authority expects before you order a single post or bracket.

In California, stair railings must meet the CBC. That means handrail height must be between 34 to 38 inches (865 to 965 mm) measured from the stair nosing, guards must be at least 42 inches where the drop exceeds 30 inches, and circular handrails must have a diameter between 1¼ and 2 inches according to this California stair handrail specification guide. Those numbers tell you what inspectors are checking, but they also explain what feels safe in normal use.
The measurements that matter first
Start with a notebook, a good tape, a level, and a bevel gauge or angle finder. Measure the stair as built, not as you think it should be.
- Count the treads and risers so you know how many picket spaces and transitions you're dealing with.
- Measure from nosing to nosing along the pitch line to understand the railing run.
- Check the landing edges because that's where post placement often gets tricky.
- Confirm finished surfaces such as hardwood, tile, or carpet, since final height is affected by what's already installed.
If the stair is older, measure both sides. One side can be surprisingly different from the other, especially near plaster walls or rebuilt landings.
Hardware matters as much as the measurements
A code-compliant height won't save a weak installation. Posts need proper anchoring into sound framing, concrete, or structural blocking. If you're planning a surface-mounted system, railing height code guidance is helpful for understanding how the visible dimensions and the fixing method work together.
Most failed DIY layouts don't happen because the owner can't use a tape. They happen because the owner measured the rail, not the stair.
Make a template before fabrication
For angled sections, a simple plywood or cardboard template saves time and rework. Mark the pitch, post centres, and any unusual offsets. On renovation jobs, this catches issues like bullnose treads, uneven overhangs, or trim that interferes with base plates.
If permits are part of the project, it also helps to review how local approval processes work. Even outside your province or state, practical permit writeups like this guide to home remodelling permits in Michigan are useful because they show the level of documentation inspectors often expect from homeowners.
A quick visual walk-through can help before you drill anything:
Common measuring mistakes
- Measuring from the tread surface instead of the nosing line: That can throw off handrail height on the whole run.
- Ignoring trim thickness: Skirt boards and base trim can interfere with brackets and shoes.
- Ordering parts before checking post spacing: Decorative panels rarely hide bad layout.
- Assuming internet diagrams match your stair: They often don't.
A clean installation starts long before the drill comes out. It starts with accurate stair geometry and a realistic understanding of what the inspector will want to see.
An Overview of Railing Installation Methods
There's more than one way to install an iron railing for stairs, and the right method depends on what you're fastening into, how visible the hardware will be, and whether the stair is interior wood, exterior concrete, or a mix of both. Clients often ask for “the strongest” method, but strength isn't the only issue. Serviceability, finish damage, and how clean the final look is matter too.
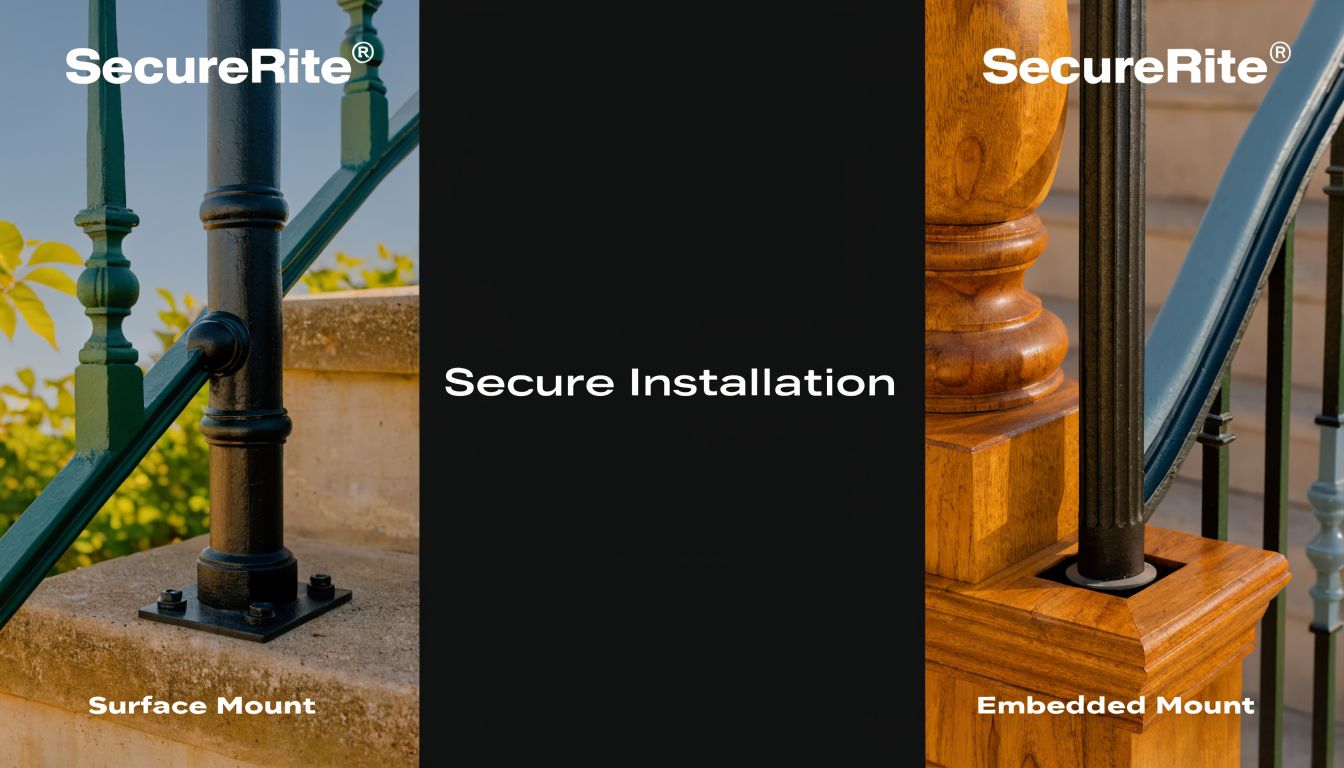
Surface-mounted posts
This is the method most homeowners recognise. The post sits on a base plate that fastens into the tread, landing, or floor framing below. Done properly, it's efficient and serviceable. Done badly, it gives you wobble, split treads, and visible patchwork when someone has to redo it.
Surface mounting works best when you have solid backing under the finished surface and room for proper fasteners. It's common on interior wood stairs, porch landings, and retrofit jobs where opening up the structure isn't practical.
Embedded posts
Embedded installation places the post into concrete or into a formed pocket that gets locked in structurally. This approach can produce a very rigid result and cleaner sightlines because you don't see a surface plate in the same way.
It's often the better route for new exterior work, masonry stairs, or jobs where the structure is still being built and you can coordinate with the concrete crew. It's less forgiving once set, so layout has to be right before the pour or core work begins.
Prefabricated panel systems
Prefab panels speed things up, especially on straight runs. They reduce on-site fabrication and can simplify alignment if the stair geometry is consistent. The trade-off is tolerance. If the stair is out of square or the rise pattern is inconsistent, you may spend just as much time modifying and shimming as you would with a more custom assembly.
A prefab panel saves time only when the stair was built accurately enough to accept it.
How a typical surface-mount install goes
For a capable DIYer, surface mount is usually the most approachable route. The sequence matters.
Lay out post locations
Dry-fit the end posts first. Check sightlines from the bottom of the stair and from the landing above. A post that is technically centred can still look wrong if it crowds a nosing or sits too close to trim.
Mark all base plate holes only after the rail line looks right in elevation.
Drill with the substrate in mind
Wood treads, engineered flooring, and concrete all behave differently. Pilot holes in wood help prevent splitting and keep your bolts on line. Concrete needs the correct bit, dust clearing, and anchor depth. If you drill oversized holes, the anchor can't do its job.
Anchor the posts before fitting infill
Get the main posts plumb and tight first. Check them from two directions. If the post moves, everything attached to it will move as well.
Fasteners for this stage are not interchangeable. Depending on the substrate, installers commonly use lag bolts, carriage bolts, wedge anchors, or sleeve anchors. The right choice depends on whether you're going into framing, through-bolting a structural member, or fixing into masonry.
Fit the rail and balusters
Once the posts are secure, fit the angled rail section and confirm consistent spacing. At this stage, small errors in stair measurement become apparent. Keep a file, touch-up paint, clamps, and a square close by. Minor trimming is normal. Forcing a badly cut section into place isn't.
If you need a reference for common hardware and install sequences, stair railing installation guidance gives a useful overview of the parts involved in typical assemblies. Retailers such as XTREME EDEALS INC. also stock practical components for this kind of work, including balusters, post base brackets, carriage bolts, lag bolts, washers, and sleeve anchors, which are the kind of site hardware installers usually need to assemble a railing properly.
Final tightening and inspection
Only do the last tightening after the full assembly is aligned. Then check for movement by hand at the posts and along the rail. Look for twist, not just front-to-back flex. A railing can feel firm from one angle and still rack under side pressure.
Where installs usually go wrong
- Fastening into finish material only: Hardwood flooring and stair trim aren't structural.
- Skipping blocking: Without backing, even good anchors can't hold the load properly.
- Using the wrong anchor for concrete: A generic fastener isn't a concrete solution.
- Ignoring plumb on the first post: Every other piece follows the first one.
The iron itself rarely causes the problem. The connection does.
Finishing Touches and Long-Term Maintenance
People often treat the finish as the cosmetic phase. It isn't. The finish is part of the protection system, and on iron railings it decides whether the project stays crisp or starts showing orange bleed at welds, base plates, and decorative joints.
Choosing the right finish for the setting
Powder coating gives a clean, uniform appearance and is popular for interior railings and covered areas. It's tidy and consistent, but it's not magic. Once it gets chipped and moisture reaches bare steel or iron underneath, corrosion can spread under the coating.
Paint systems can work well when the prep is thorough and touch-ups are expected as part of ownership. They're practical on custom work because field repairs are easier than with some factory finishes. The weakness is surface prep. If the substrate wasn't cleaned and primed properly, the coating won't stay honest for long.
Hot-dip galvanising is the heavier-duty choice when exposure is serious. For harsher environments, it's often the difference between a railing ageing acceptably and a railing becoming a maintenance project.
Coastal conditions change the answer
The biggest finish mistake I see is using the same specification for every location. That doesn't work. A dry interior stair in the centre of the home can live happily with a simpler finish than an exterior stair near salt air.
A 2025 UC Davis Corrosion Lab study found that in California's coastal fog belts, salt-laden air causes rust to form three times faster on untreated iron compared to inland areas. For a 50-year lifespan in these zones, CALGreen standards effectively require a combination of hot-dip galvanising plus an epoxy topcoat according to this California coastal handrail corrosion summary.
If the site gets salt, fog, or persistent damp air, choose the finish for the environment first and the colour second.
A maintenance routine that actually works
You don't need a complicated care plan. You need a consistent one.
- Inspect the vulnerable spots: Look at welds, underside edges, shoe collars, post bases, and any place where water can sit.
- Clean gently: Use mild soap, water, and a soft cloth. Aggressive abrasives can damage the protective surface.
- Touch up chips early: Small scratches are cheap to address. Left alone, they become coating failure.
- Watch movement points: If hardware loosens and parts rub, the finish wears faster at those contact areas.
- Refresh small visible details: Replacing worn post caps or decorative trim pieces can improve the look without replacing the entire assembly.
What holds up best over time
Interior railings usually fail cosmetically before they fail structurally. Exterior railings can go the other way if moisture gets into joints and anchors. That's why the “best” finish is the one matched to the use case.
For a dry indoor staircase, a clean powder-coated or painted iron system is often perfectly sensible. For damp entries, semi-exposed stairs, and coastal conditions, a more protective build-up is worth planning for from the start. It's easier to choose the correct finish now than to strip and rebuild later.
Budgeting Your Project and a Final Buyer's Checklist
Most stair railing budgets go sideways for one reason. People price the visible metalwork and forget the rest. Posts, base brackets, fasteners, touch-up materials, layout time, permit requirements, and substrate repairs all affect the final number.
Where the budget usually sits
Material cost per linear foot varies too much by design, finish, and fabrication style to give one honest figure without inventing a number. A straight run with simple square balusters is usually easier on the budget than a stair with turns, landings, ornate feature pieces, and custom transitions.
Labour also moves with the substrate. Installing over sound framing is different from opening up treads, adding blocking, or dealing with concrete. If you're trying to get your head around how construction budgets are usually broken down, even outside railing work, broader cost guides like this one on the cost to build a house in NC are useful because they show how quickly scope details change the final total.
The code issue that can become the expensive issue
Generic railing guides often miss regional requirements. In California, 90% of the state falls into high-risk seismic zones, requiring specific ductile iron and weld inspections for railings, and failed inspections for non-compliance can increase project costs by an average of 35% based on this California seismic railing compliance analysis.
That's why “cheap now, fix later” is the wrong approach on stair rails. If your region has special structural or inspection requirements, price those in before ordering anything.
Final buyer's checklist
Use this as the last review before you buy or hire.
- Confirm the material: Decide whether you need custom character, ornate weight, or a simpler fabricated system.
- Lock the style: Choose the baluster pattern, post design, and handrail profile together so the parts read as one railing.
- Measure the built stair: Don't order from old plans or rough framing dimensions.
- Check local code: Height, guard conditions, grip size, and any regional structural rules need to be confirmed locally.
- Match the fasteners to the substrate: Wood framing, engineered assemblies, and concrete all need different hardware.
- Choose the finish for the environment: Dry interior and exposed exterior conditions are not the same job.
- List every small part: Shoes, collars, brackets, anchors, washers, bolts, touch-up coating, and drill bits shouldn't be afterthoughts.
- Decide who's installing: A skilled DIYer can manage some systems, but complex stairs, concrete work, or code-sensitive jobs often justify a professional installer.
A good railing quote should describe the fixing method, not just the metal style and colour.
If you review the project that way, you'll make better choices and avoid the common trap of buying attractive components that don't solve actual site conditions.
If you're sourcing parts for an iron railing for stairs, XTREME EDEALS INC. is one place to look for balusters, post caps, post base brackets, anchors, bolts, and other hardware that typically goes into stair and railing work. Build your order around accurate measurements, local code, and the conditions the railing will face, and the finished result will look better and last longer.