
You’re usually standing at the same point when this decision gets made. The framing is done, the deck shape finally looks real, and now the railing stops being a sketch and starts becoming a safety system your family will lean on every day.
That’s where a lot of builds go sideways.
Pressure treated wood railings are popular for good reason. They’re practical, available, and built for outdoor exposure. But the lumber is only half the job. Modern treated wood behaves differently than older stock, and if you pair it with the wrong screws, brackets, bolts, or post hardware, the railing can age badly long before the wood itself is done.
In Ontario, that matters more than most homeowners realise. Snow load, freeze-thaw movement, wet springs, humid summers, and the odd shortcut taken during installation all show up at the railing first. A decent-looking guard can still be underbuilt, poorly fastened, or out of code.
The difference between a railing that lasts and one that loosens, stains around fasteners, or starts splitting at the connections usually comes down to details most guides barely mention. Treatment type. Fastener compatibility. Post protection. Proper spacing. Correct finishing timing. Those are the parts worth getting right the first time.
Why Your Railing Choice Matters More Than You Think
A homeowner sees railing as the finishing touch. A builder sees it as the part people test without thinking. Kids push on it. Guests grab it. Someone backs into it carrying a cooler. In winter, it gets wet, freezes, thaws, and gets stressed again.
That’s why I never treat the railing as trim. It’s a guard first, then a design feature.

Pressure treated wood is still the default choice on a lot of Ontario decks because it gives a workable balance of cost, availability, and outdoor durability. It handles exposure better than untreated lumber, and it fits a wide range of railing styles, from simple square-post guards to more dressed-up builds with caps, trim, and mixed baluster materials.
The mistake most people make
People spend time choosing board sizes and colours, then grab whatever screws and brackets are on hand. That approach used to be more forgiving. It isn’t anymore.
Modern pressure treatments protect the wood well, but they also change what hardware can safely live inside that wood. If the metal isn’t compatible, corrosion starts where you can’t always see it first. By the time a railing feels loose, the problem has usually been building for a while.
Practical rule: If the railing design is strong but the hardware is wrong, the railing is wrong.
Where good builds start
A solid pressure treated wood railing has to do three things at once:
- Meet code: Height, spacing, and load resistance aren’t decorative choices.
- Handle moisture: Ontario weather punishes exposed connections.
- Use compatible hardware: Posts, brackets, screws, bolts, caps, and anchors all need to suit treated wood.
That last part gets overlooked the most. It’s also the part that decides whether the build still feels solid years from now.
Understanding Pressure Treated Wood and Its Treatments
Pressure treatment is basically a protective process that pushes preservative deep into the wood fibres. This process is akin to a vaccination for lumber. The treatment helps the wood resist the outdoor problems that destroy ordinary boards, mainly rot, decay, and insect attack.
That’s why pressure treated wood railings are so common on decks, porches, and stairs. The wood is meant to live outside. But not all treated lumber behaves the same way once you start fastening metal to it.

The big treatment change that still affects builds now
Canada moved away from residential CCA-treated lumber in the early 2000s and shifted to copper-based preservatives such as ACQ and CA. By 2004, over 90% of residential pressure-treated wood in Canada had transitioned to those alternatives, and the newer treatments can drive corrosion rates up to 10 times higher on galvanized steel fasteners compared to CCA, which is why ceramic-coated or Type 316 stainless steel fasteners became necessary for railings in many Canadian conditions (details on the Canadian treatment shift).
That one change explains a lot of modern railing failures.
Older habits carried over. Builders used hardware that had worked fine before, but the chemistry of the wood had changed. The wood got safer from an arsenic standpoint for residential use, but the metal compatibility issue became much more serious.
What the common modern treatments mean on site
You’ll usually hear people refer to ACQ, CA, or Micro-CA. The practical question isn’t just what preservative is in the wood. It’s how that treatment affects the connectors and fasteners touching it.
| Treatment Type | Key Feature | Corrosion Level | Best For |
|---|---|---|---|
| ACQ | Copper-based residential treatment | Higher corrosion risk on standard galvanized steel | General outdoor framing and rails when paired with proper compatible hardware |
| CA | Copper azole treatment | High corrosion risk if hardware choice is poor | Railings, posts, and exterior assemblies needing treated protection |
| Micro-CA | Micronized copper treatment | Often chosen where reduced fastener corrosion is a priority | Railing systems where hardware compatibility and cleaner connections matter |
The safest habit is simple. Treat all modern pressure-treated lumber as material that needs corrosion-resistant hardware from the start.
What to check before you buy lumber
Not every piece belongs in every part of the railing. Before you build, check:
- Use rating: Above-ground material may suit rails and balusters, while posts or near-grade parts may need a heavier treatment level.
- Moisture condition: Fresh treated wood is often wet and still moving.
- Straightness: Twisted top rails and bowed baluster stock create headaches fast.
- Appearance grade: Visible rail components benefit from cleaner stock than hidden blocking.
If you’re sorting through pressure treated wood posts and fence materials, match the product to the job instead of assuming all treated lumber is interchangeable.
The best-looking railing stock in the pile isn’t always the best structural stock. Check for straightness first, then appearance.
Meeting Code with Your Railing Design
A railing can look clean and still fail inspection. That happens all the time when people build by eye, copy an old deck, or rely on rough spacing instead of actual measurements.
In Ontario, the code numbers matter because they’re tied directly to safety. For decks over 5'10", the Ontario Building Code requires a 42-inch minimum guard height, a maximum 100 mm (4-inch) opening, and a guard that can resist a 225 lb point load. Non-compliance is linked to a 35% higher rate of railing failure, especially in freeze-thaw conditions (Ontario railing code details).
The three numbers that drive most layouts
Those dimensions affect almost every cut and hardware location in the build.
- 42-inch guard height: This controls post height, rail placement, and finished proportions on raised decks.
- 100 mm opening limit: This is the spacing rule people usually refer to as the 4-inch rule. It affects baluster layout and any decorative opening in the guard.
- 225 lb point load: This is why guard assemblies can’t be treated like light trim. Post anchoring and rail-to-post connections have to be structural.
If you’re checking a layout before ordering materials, this guide to deck railing height code is a useful starting point.
Why these rules matter in real use
The spacing rule protects against pass-through hazards. The height rule keeps the guard functional where a fall would be serious. The load rule deals with real-world force, not gentle use.
A lot of weak railings fail at the connection, not in the middle of the rail. The post moves. The bolts loosen. The bracket pulls. Then the whole assembly feels shaky even though the lumber still looks fine.
A code-compliant railing shouldn’t just survive an inspection. It should still feel rigid when someone leans on it in February.
Common design misses
The trouble spots are usually predictable:
- Posts mounted too weakly: Surface fastening without proper structural backing.
- Baluster spacing measured before wood movement is considered: Wet material can change enough to create problems later.
- Top rails treated as decorative only: On a guard, that connection has to perform.
Good design starts with the code, not the sketch.
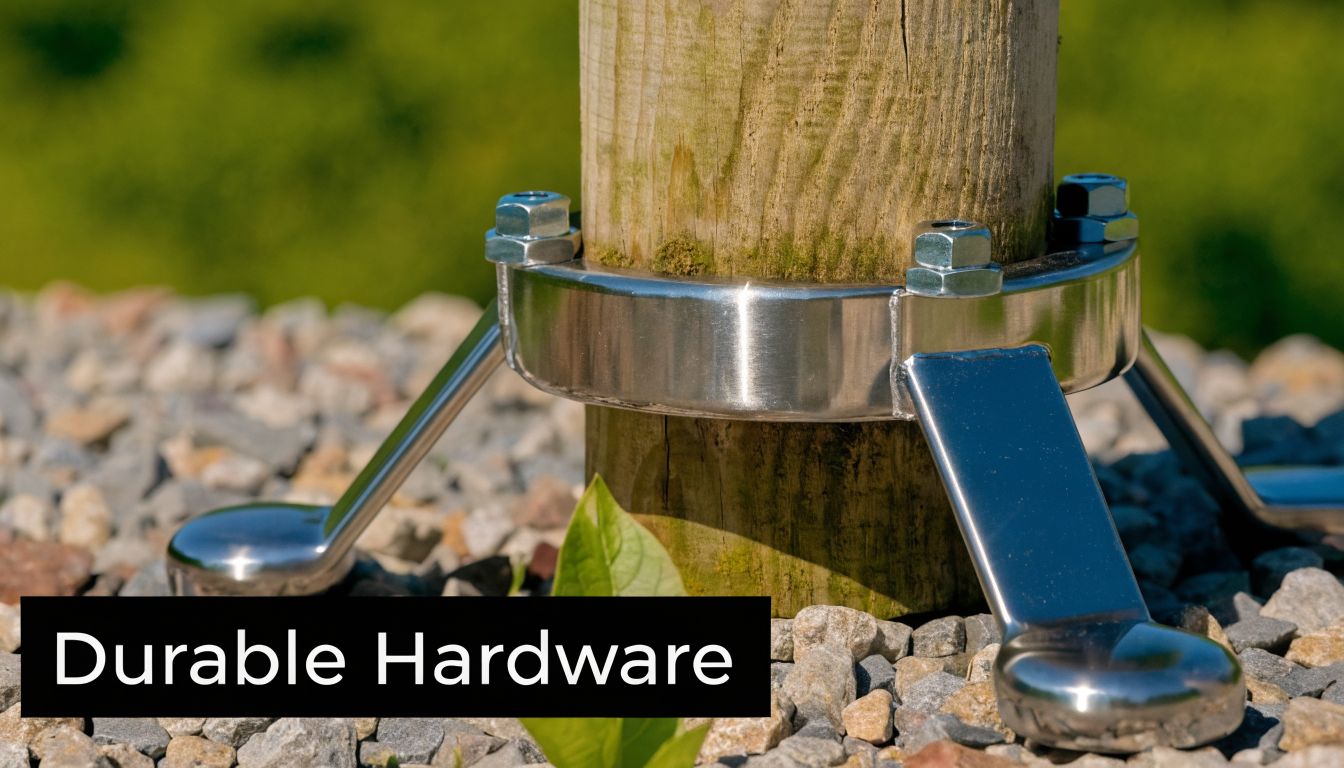
Choosing the Right Hardware for Lasting Railings
Modern pressure treated wood railings don’t forgive cheap hardware. That’s the plain truth. If the wood treatment is copper-based and the metal isn’t built to handle it, the connection becomes the weak point.
That’s why I treat hardware as part of the structure, not an add-on. The post base, the connector, the fastener coating, the washer, the post cap, even the hand-contact surface all matter.
Start with the fasteners
If you use drywall screws, interior screws, or generic light-duty hardware in treated railings, you’re building in failure. The first signs are often rust bleed, loose joints, or a connector that stains and pits around the fastener heads.
For most exterior railing work, the short list is straightforward:
- Hot-dipped galvanized fasteners: A common choice where the coating is appropriate for treated lumber exposure.
- Ceramic-coated structural screws: Useful where the manufacturer rates them for modern treated wood.
- Stainless steel fasteners: A strong choice for exposed, wet, or high-corrosion locations.
For rail assembly and visible exterior fastening, stainless steel deck screws are one practical option when you want corrosion resistance without guessing.
Match the hardware to the connection
Every railing has a few critical points where failure starts if the hardware is undersized or mismatched.
Post to deck
This is the big one. The strongest-looking railing in the world won’t matter if the post connection flexes. Use structural post bases, proper anchors where required, and backing that transfers load into the framing.
Rail to post
This connection takes repeated side load. Don’t rely on a couple of random screws through end grain and hope for the best. Use railing brackets, structural connectors, or properly designed through-fastened assemblies.
Balusters and infill
These parts affect both code and long-term appearance. Fasteners need to resist corrosion, but they also need to avoid splitting thinner stock. Pre-drilling helps, especially near board ends.
Don’t ignore hand contact and end grain
Hardware choice isn’t only about corrosion. It also affects how the railing feels to use. Health Canada material referenced in industry discussion notes that modern ACQ-treated wood can still leach copper, which may contribute to skin irritation from frequent hand contact on railings. That’s why sealants, metal post caps, and separate hand-contact surfaces can make practical sense on family decks (discussion of ACQ leaching and hand-contact concerns).
That’s one reason a lot of builders add accessories that do more than decorate.
- Metal post caps: These help protect exposed end grain where water likes to sit.
- Decorative brackets: Products such as Nuvo Iron and Decorex Hardware brackets can clean up rail-to-post transitions while covering vulnerable connection points.
- Alternative handrail pieces: In some builds, a separate handrail material gives a better feel in use and reduces direct contact with treated surfaces.
Where product selection actually helps
This is where catalog depth matters. A supplier that stocks post caps in common sizes, balusters, gate hardware, lag bolts, anchors, joist hangers, and mounting brackets saves a lot of pieced-together buying. XTREME EDEALS INC. carries those categories, including wood and metal post caps, decorative hardware, and deck fasteners that fit pressure treated railing builds.
Cheap lumber can sometimes be replaced. A failed post connection can take the whole guard with it.
Installation and Finishing for a Professional Look
A clean-looking pressure treated railing usually comes from patience more than speed. Fresh treated lumber can be wet, heavy, and a little unpredictable. If you rush the cuts, force joints tight, and finish it too early, the railing will show every one of those decisions later.
The installation itself doesn’t need to be fancy. It needs to be square, plumb, and honest.

Build for movement, not against it
Pressure-treated wood can warp 10-15% more than cedar as it dries, and many pros wait 6-8 weeks after installation before making final angle cuts for stair rails so the wood can settle and the baluster layout stays compliant (stair rail cutting guidance for treated wood).
That’s especially relevant on stairs, where bad angle cuts show up fast. A stair guard can look perfect on install day, then open up gaps or pull out of alignment as the stock dries.
Here’s what works better:
- Pre-drill near ends: This reduces splitting in rails and balusters.
- Check every post for plumb before locking in rails: Don’t trust the eye.
- Leave room for drying movement: Tight perfection in wet lumber rarely stays perfect.
- Hold final stair fitting until the wood has stabilised: This saves rework.
Finishing at the right time
A lot of homeowners want to stain as soon as the railing is up. Sometimes that’s too early. If the wood is still holding treatment moisture, the finish won’t penetrate or cure the way you want.
A simple field check is the water bead test. Sprinkle water on the surface. If it beads hard and sits there, the wood likely needs more drying time. If it absorbs more readily, the lumber is closer to ready for stain or sealer.
Before any finish goes on, the surface should be clean. Dirt, pollen, mill glaze, and job-site grime all interfere with how the coating performs. This guide on deck cleaning for a lasting finish lays out why washing first matters before staining or sealing outdoor wood.
Don’t judge treated wood by the week you installed it. Judge it by how it behaves after it dries.
Small details that make the railing look better
Good installation details don’t just add polish. They help the railing age more evenly.
- Ease sharp edges lightly: It helps finish adhesion and makes the rail nicer to touch.
- Seal cuts and exposed tops where appropriate: End grain is where water gets invited in.
- Keep fastener lines consistent: A straight screw line makes even basic railing look intentional.
- Use post caps instead of leaving the tops raw: They shed water and finish the look.
The best professional look usually comes from disciplined basics, not complicated joinery.
Budgeting and Buying Your Railing Materials
Most railing budgets go wrong in one of two ways. People either underbuy the hardware or they price lumber only and forget the pieces that make the guard compliant and durable.
The wood is the visible cost. The hardware is the performance cost.
For DIY homeowners
Build your list from the connections outward, not from the boards inward.
- Start with posts and rail lengths: That sets your layout.
- Add structural hardware next: Brackets, bolts, anchors, post bases, and exterior-rated screws.
- Then add finish parts: Post caps, balusters, trim pieces, and sealant.
- Leave room for code-driven adjustments: A minor spacing change can alter your baluster count fast.
Buying this way cuts down on the classic extra trip for washers, brackets, or one box of the right screws.
For contractors and repeat installers
Callbacks eat profit. A railing that loosens, stains around the hardware, or moves through winter costs more than the upgrade to proper fasteners ever did.
Regional code also affects cost planning. In California, for example, railings on walking surfaces over 30 inches high must be 36 inches tall and withstand a 200-pound load, and micronized copper treatments are often recommended where reducing fastener corrosion helps meet those conditions, especially in coastal areas (California railing requirements and treatment context). Different region, same lesson. Material choice and hardware choice are tied to code, and code affects the total budget.
A smart buy list includes the boring parts on purpose. Screws. Connectors. Anchors. Post caps. Washers. Brackets. Those aren’t accessories. They’re what make pressure treated wood railings hold up.
Frequently Asked Questions About PT Wood Railings
How long should I wait before staining new pressure treated wood railings
Wait until the wood has dried enough to accept the finish properly. Fresh treated lumber is often too wet right after installation. A practical check is the water bead test. If water still beads heavily on the surface, give it more time.
Can I use regular indoor screws if they seem strong enough
No. That’s one of the fastest ways to shorten the life of the railing. Pressure treated wood needs exterior-rated, compatible fasteners. Indoor screws can corrode, snap, stain the wood, or loosen at the connection.
What’s the best way to clean a pressure treated railing
Use a wood-safe cleaning approach that removes dirt and mildew without damaging the fibres. Don’t get aggressive with pressure or harsh methods that fuzz the surface. Clean first, let the wood dry, then apply stain or sealer when the lumber is ready.
Is pressure treated wood safe for families
For normal exterior use, modern residential treated lumber is widely used for decks and railings. The practical concern is frequent direct contact, especially on weathered surfaces. A good sealer, protected post tops, and thoughtful hand-contact details all help reduce exposure and improve comfort.
If you’re planning pressure treated wood railings and want the hardware list to match the lumber properly, XTREME EDEALS INC. carries practical categories for the job, including post caps, brackets, balusters, anchors, lag bolts, joist hangers, and exterior fasteners that fit deck and railing builds in Canadian conditions.