
You’ve got the frame done, the decking screwed down, and the project finally looks like a deck instead of a construction site. Then you get to the railing, and that last step turns out to be the part that’s easiest to make look uneven, fail inspection, or both.
Spacing deck balusters looks simple until you start laying them out on a real rail section. One run is a little longer than the next. Posts aren’t always spaced the same. A gap that looked fine by eye ends up too wide when you measure it. That’s why the cleanest railings come from math first, then layout, then installation.
The Final Touch Perfecting Your Deck Railing
A railing does two jobs at once. It has to keep people safe, and it has to make the whole deck look finished. If either part is off, you’ll notice it every time you walk outside.
Most DIY problems with spacing deck balusters come from rushing the last stage. Builders spend hours getting framing square and level, then start eyeballing spindle gaps because they’re ready to wrap up. That shortcut usually shows up immediately. You get one tight gap, one wide gap, then a strange leftover space near the post that pulls your eye every time you look at the rail.
Why the railing deserves more attention
Baluster spacing isn’t trim work. It’s safety work. The layout has to satisfy code, but it also has to read as even from a few metres away. Those are not always the same thing if you don’t plan ahead.
A good railing has three traits:
- Consistent spacing that looks deliberate from end to end
- Solid fastening so the balusters don’t loosen, twist, or rattle
- Clean alignment with plumb balusters and a smooth visual rhythm between posts
A railing can be structurally sound and still look amateur if the spacing drifts from section to section.
Material choice affects layout too. Wood balusters, aluminum balusters, composites, and full panel systems all behave differently during install. If you’re still deciding on materials, this guide to PVC deck railing is useful because it shows how different railing systems change both maintenance and installation choices.
What actually works on site
The best results come from using a repeatable method. Measure the section. Choose the spacing method. Mark both rails from the same reference point. Use a spacer or story pole. Check plumb as you go.
That sounds basic, but that’s the difference between a railing that goes in cleanly and one that needs half the balusters pulled back off. Good layout saves time because it prevents rework. It also keeps your deck from ending with that one ugly final gap everyone notices.
Understanding the Rules of Deck Baluster Spacing
You finish a rail section, step back, and it looks clean. Then the inspector drops a 4 inch sphere between two balusters, or checks the gap under the bottom rail, and the whole section fails. That is why spacing rules matter. Good-looking layout is part of the job, but passing inspection is the standard you build to.
Before you cut anything, confirm the code that applies in your area. The general rule used across much of North America is the 4-inch sphere rule. Openings in the railing assembly should not allow a 4-inch-diameter sphere to pass through. That includes the space between balusters, the openings near posts, and the gap below the bottom rail, as summarized in this 2024 IRC overview of baluster spacing history and current standard.

There is a reason inspectors stay strict on this point. Older code standards allowed much larger openings, and over time those limits tightened. The result is the 4 inch standard builders work with now. If you treat 4 inches as a target instead of a hard ceiling, you invite trouble.
Build in margin.
A layout that lands a little under the limit is easier to pass than one drawn right at the maximum. Wood can move with moisture. Rails are not always perfectly straight. A baluster can pull slightly during fastening, especially if the pilot hole is off or the screw bites harder on one side. I have seen a rail section measure fine on sawhorses and fail after installation because one end closed up and another opened just enough to matter.
That is why experienced builders usually avoid chasing a full 4 inch clear opening. They leave a little room for real-world movement and measuring error. If you are using metal systems such as Nuvo Iron balusters, consistency is easier to hold because the parts stay straighter, but the rule stays the same. Layout for a compliant finished opening, not a theoretical one.
Local code can tighten the standard further, and California is the place many DIYers get caught. State and municipal requirements can be stricter on guards, stairs, and inspection details than a generic national summary suggests. If your project is in California, or in any area with active local amendments, verify the exact opening limits and how your inspector measures them. It also helps to review the broader deck railing height code requirements at the same time, because height and spacing are usually checked together.
Use this order before you buy balusters or fasteners:
- Call your local building department and confirm the current guard and baluster spacing requirements.
- Ask whether deck guards and stair guards are treated differently for your project.
- Check the installation instructions for your railing system so your bracket spacing, fasteners, and bottom rail clearance match the manufacturer’s requirements.
- Measure each rail section on its own because equal-looking sections rarely divide perfectly the same way.
Material planning matters here too. Straight stock, consistent balusters, and quality screws make it much easier to hold tight tolerances, especially on long runs. If you are still sourcing parts, this guide on where to find timber and building materials for your project is a useful reminder that cleaner installs start with better material.
One last practical point. Cheap screws and light brackets can shift the baluster during install and ruin spacing you already laid out correctly. Heavy-duty fasteners from XTREME EDEALS INC. or a well-made metal baluster system save time because the parts stay where you put them. That matters when the difference between passing and failing is a gap you can barely see.
Gathering Your Essential Tools and Materials
The cleanest baluster job usually comes from ordinary tools used carefully, not fancy gear. What matters is having the right setup before you start, because spacing deck balusters goes badly when you stop halfway through to improvise.

The core kit
For most deck rail projects, keep these on hand:
- Tape measure and pencil for layout. A clear tape and sharp marks matter more than people think.
- Level and speed square so each baluster stays plumb and the rails stay honest.
- Cordless drill with proper bits for pilot holes, driving screws, and fastening brackets.
- Chop saw for repeatable, clean cuts if you’re trimming wood balusters or rail components.
- Spacer blocks or scrap stock cut to your target gap.
- Fasteners and washers matched to the material you’re installing.
If you’re piecing together a project list, this guide on where to find timber and building materials for your project is a practical reminder that good results start with straight material and decent hardware, not just good intentions.
Materials that change the job
Wood is familiar and easy to modify on site. Aluminum balusters, including Nuvo Iron options, usually install faster and keep the look crisp because every piece is uniform. Composite systems can be low-maintenance, but they need careful adherence to the manufacturer’s spacing and fastening instructions.
The hardware matters as much as the baluster itself. Cheap screws strip. Undersized lag bolts loosen. Light-duty connectors can make an otherwise decent railing feel soft.
In California, the hardware choice can also become a code issue. The CBC 2022 edition applies stricter requirements than the generic 4-inch rule in some situations. For stairs, the maximum opening is 4 3/8 inches, and seismic zones require enhanced baluster attachment. The source material also notes that general calculators often miss regional hardware needs, including reinforced post lag bolts, in this California-specific baluster spacing reference. If you’re buying a full system instead of assembling parts one by one, a browse through deck rail kits in Canada can help you compare what comes pre-matched.
What I wouldn’t skip
A few items save a lot of aggravation:
| Item | Why it matters |
|---|---|
| Pilot bit set | Helps prevent splitting near rail ends |
| Clamp | Holds rails or balusters while you check plumb |
| Spacer block | Speeds up install and keeps gaps consistent |
| Quality structural fasteners | Keeps the railing feeling solid over time |
Straight material, a dependable spacer, and proper fasteners will do more for the finished look than any cosmetic trick later.
Calculating Your Baluster Layout The Core Methods
This is the part that makes the rest of the install easy. If the calculation is sound, the layout goes quickly. If the math is off, the whole section turns into trial and error.
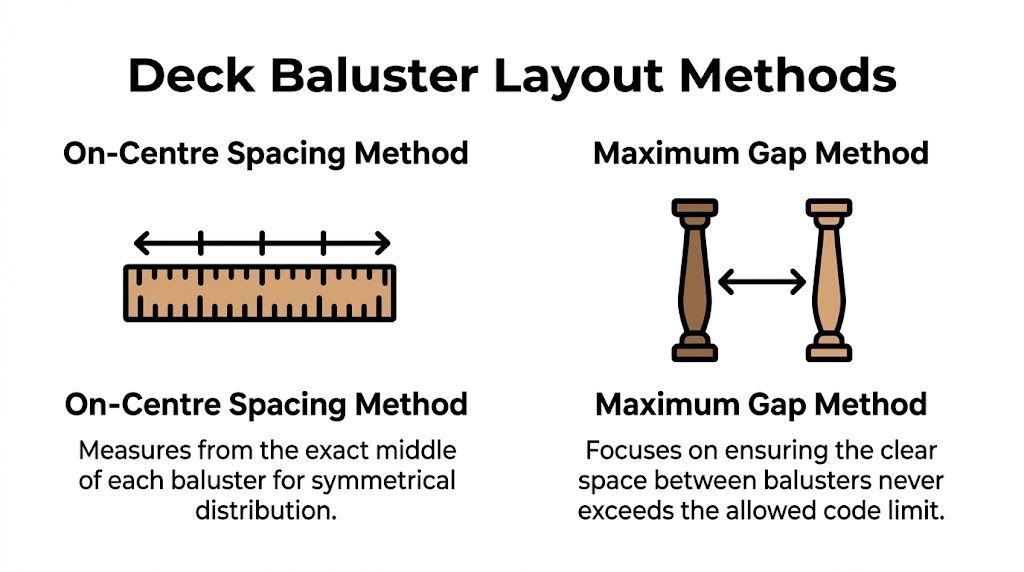
The on-centre method
This is the method most builders use for square balusters in straight runs. You measure from the centre of one baluster to the centre of the next.
With 2×2 balusters that measure 1.5 inches wide, installers use 5.5 inches on centre because that creates an exact 4-inch gap between balusters, as described in Fine Homebuilding’s baluster spacing formula.
The same source gives a clean example. A 158-3/8-inch railing section divided by 5.5 inches gives about 28.75 balusters, which gets rounded to 29 units in that layout approach.
This method works best when:
- You’re using uniform square balusters
- The rail run is straight
- You want a fast, repeatable pattern
The big advantage is speed. Once your centres are marked, installation becomes a rhythm instead of a custom measurement exercise on every baluster.
The maximum gap method
This one starts from the legal opening, not the centre point. Instead of asking where each baluster’s middle lands, you ask how many balusters you need so the clear spaces never exceed your target.
The sequence is simple:
- Measure the full inside span between posts or layout points.
- Decide how many balusters fit the look and code requirement.
- Subtract the total width of all balusters from the span.
- Divide the remaining space by the number of gaps.
- Adjust until every gap is even and comfortably within code.
This method is slower, but it’s useful when sections vary, when you’re working around trim details, or when the baluster profile isn’t a plain square.
Which method to use
Here’s the practical difference:
| Method | Best for | Watch out for |
|---|---|---|
| On-centre spacing | Standard square balusters and repeated sections | Assumes consistent baluster width |
| Maximum gap spacing | Odd lengths, custom rails, decorative profiles | Takes longer to calculate and mark |
If the baluster shape is unusual, don’t trust a standard spacing number. Measure the actual narrow point that controls the clear opening.
Baluster spacing calculators can speed up the arithmetic, and the Fine Homebuilding source notes that modern calculators help automate uniform interval layout. They’re useful, but they don’t replace checking real material in front of you. I still dry-lay a few pieces before drilling anything permanent.
Laying Out and Installing Your Deck Balusters
Once the math is set, the job shifts from numbers to repetition. Good installation is mostly about carrying the pattern accurately across every section and resisting the urge to freehand the last few pieces.

In California, post spacing affects the baluster layout as much as the balusters themselves. The California Building Code limits guard post spacing to 6 feet maximum on-centre, and CSLB 2024 data cited in this deck post spacing reference shows a 92% approval rate for decks with 6-foot post spacing or less, compared with 65% failures for spans over 7 feet. That same source notes that a 6-foot section typically needs about 13 balusters to keep the opening under the 4-inch limit.
The layout sequence that stays accurate
Start with one rail section at a time. Don’t try to mark the whole deck perimeter in one pass.
Use this order:
- Install or confirm the posts first. Every baluster section depends on the actual clear distance between them.
- Mark both ends of the section. Establish where the first and last baluster will sit.
- Transfer your layout to both top and bottom rails. A story pole helps if you have repeated spacing.
- Dry-fit a few balusters. Catching a layout error early is much easier than patching holes later.
- Fasten from one end to the other. Keep the pattern moving in one direction.
A spacer block is the fastest field method for uniform gaps. Cut a scrap to your target clear opening and use it repeatedly as you install each piece. It’s quicker than reading the tape for every gap, and it reduces small cumulative errors.
If you want a visual walkthrough of rail attachment before setting all your balusters, this guide on how to attach deck railing complements the layout process well.
Keeping balusters plumb and sections consistent
Check plumb often, especially with taller balusters. A slight lean at the bottom becomes obvious at the top rail.
This video shows the hands-on side of the process:
Two habits prevent most layout drift:
- Use the same reference face on every baluster if the profile isn’t perfectly symmetrical.
- Recalculate each section between posts instead of assuming every bay takes the same count.
One odd-sized section can still look right if every gap inside that section is even. What looks wrong is pretending different spans can use one identical layout.
Common Mistakes and Pro Tips for a Flawless Finish
The biggest mistakes in spacing deck balusters are predictable. That’s good news, because predictable mistakes are easy to avoid once you know where they happen.
Do this, not that
- Account for baluster width. Don’t calculate gaps from total span alone. The actual width of each baluster changes the final opening.
- Work from one end. Don’t start at both ends and hope the middle works out.
- Pre-drill near rail ends. Don’t force screws into dry or pressure-treated stock and expect zero splitting.
- Check actual dimensions. Don’t trust nominal sizing on wood, especially if appearance matters.
- Test a short section first. Don’t commit to the whole run before confirming the look and spacing in place.
A lot of ugly railings come from one bad assumption. Someone marks out a pattern on the bottom rail, transfers it loosely to the top rail, and then wonders why the balusters wander out of plumb.
Material choice can solve problems
Sometimes the cleanest fix isn’t better measuring. It’s using a more consistent product.
An emerging 2025-2026 California trend for fire-prone regions is the use of aluminum and composite baluster hybrids, driven by CBC Chapter 7A requirements. The same source notes that spacing for 1-inch diameter composites is often tightened to 3.75 inches, and that Nuvo Iron’s 6-inch on-centre aluminum balusters can reduce install time by 30% versus wood while meeting code in those applications, according to this baluster spacing and code compliance article.
That doesn’t mean wood is wrong. It means wood asks more from the installer. If you’re building with pressure-treated rails and wood balusters, expect to spend more time sorting pieces, pre-drilling, and correcting minor variation. If you’re using metal balusters, the install tends to feel more organised because each part is dimensionally consistent.
Small habits that make the job look professional
A few habits separate tidy work from rough work:
| Habit | Result |
|---|---|
| Sort balusters before install | Keeps warped or damaged pieces out of the visible run |
| Use one spacer block for the full section | Maintains a steady visual rhythm |
| Check the first few fasteners for pull | Prevents screws from skewing the baluster off mark |
| Stand back often | Helps you catch visual drift before it spreads |
The final look comes from discipline, not speed. Fast is fine when the setup is right. Fast and careless is what creates rework.
Build with Confidence and Get It Right the First Time
A railing can pass inspection and still feel second-rate a year later. The jobs that hold up are the ones where the last 5 percent gets the same attention as the layout. After the balusters are in, pros do one more check that many DIY builders skip. We load the rail by hand from several points, watch for fastener movement, and look down the run in low-angle light. That’s when a loose bracket, a twisted baluster, or a slight spacing drift shows up.
This matters even more in California work, where inspectors tend to look hard at the whole assembly, not just the opening between balusters. A rail that meets the spacing rule but has weak attachment, stair inconsistencies, or visible movement can still create trouble. On wildfire-zone and coastal jobs, material choice matters long after install day too. Metal balusters such as Nuvo Iron usually stay more consistent over time than site-cut wood, and heavy-duty screws, anchors, and brackets from XTREME EDEALS INC. help keep the frame tight when the deck cycles through heat, moisture, and use.
The payoff is simple.
A well-built railing disappears into the deck in the best way. It feels firm, looks straight, and stops drawing attention to itself. That’s the standard to aim for. Not just code-minimum spacing, but a finished rail that still looks right after seasons of sun, traffic, and movement.