
A lot of deck projects start the same way. You step outside after winter, look down, and realise the boards have gone dull, grey, and rough underfoot. Maybe water no longer beads on the surface. Maybe the rail tops feel splintery. Maybe the whole deck still looks structurally sound, but it has that tired look that makes the rest of the yard feel neglected.
That's the point where many start searching for answers and run straight into bad advice. They hear they need to wait months before touching new pressure-treated wood. They get told any stain will do. Or they focus on colour first and only think about prep after the stain starts peeling a year later.
Staining deck wood properly is less about brushing on a finish and more about controlling what the wood does before, during, and after the coating goes on. In Canada, that matters even more. Freeze-thaw cycles, spring moisture, summer sun, and long shoulder seasons punish shortcuts fast.
Bringing Your Weathered Deck Back to Life
A weathered deck isn't always a failed deck. Quite often, it's a surface that's been left exposed too long without the protection it needed. The boards turn silver, the grain lifts, dirt settles into the pores, and mildew starts claiming the shady corners. Homeowners often assume replacement is next. In many cases, careful prep and the right stain can bring the surface back into service and make the whole space feel usable again.
The biggest shift is understanding what stain is supposed to do. It's not just there to add colour. A good deck stain slows water uptake, reduces the damage from UV exposure, and helps the surface wear more evenly. On a backyard deck that sees snow, rain, and direct summer sun, that protective role matters as much as appearance.
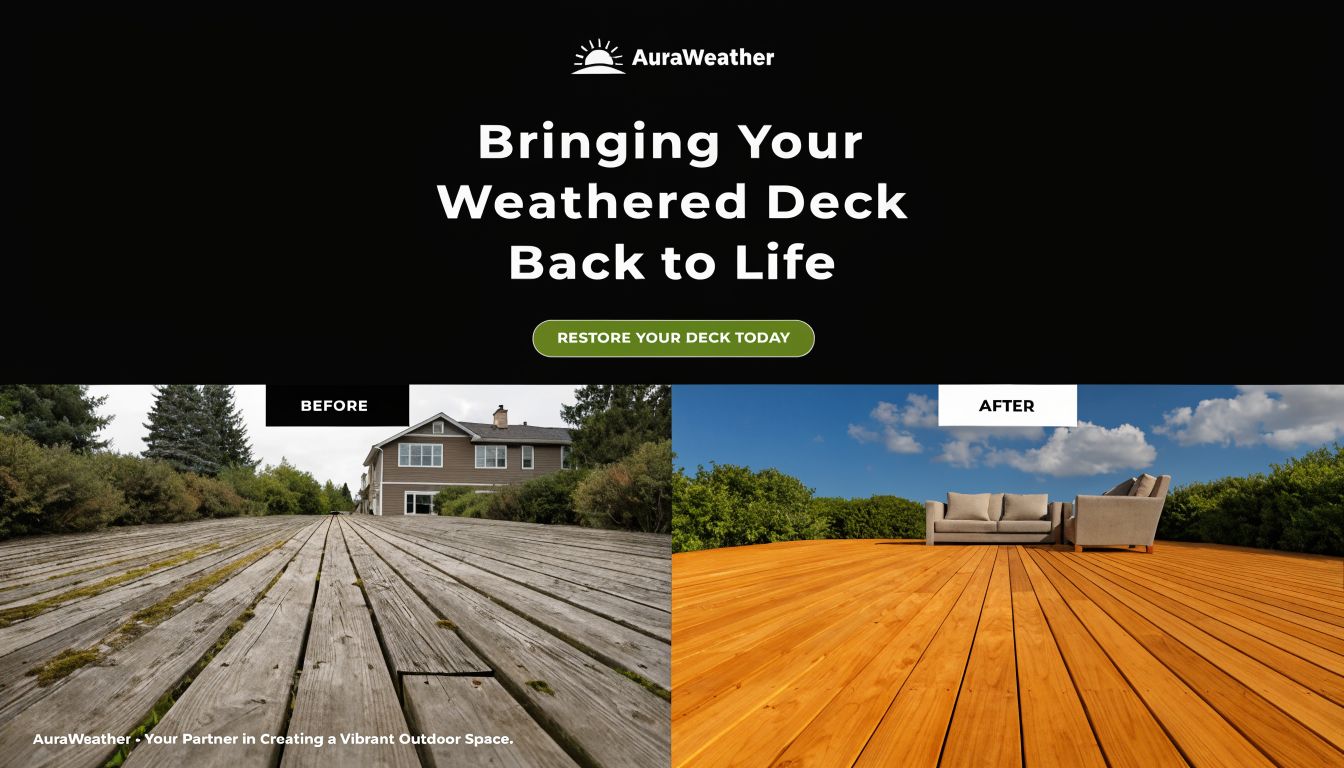
I've seen decks that looked beyond saving until they were cleaned properly, dried properly, and stained with a product that could penetrate the wood. The difference wasn't magic. The boards weren't made new. They were given a surface treatment that matched the wood's condition and the climate it had to survive.
That same logic shows up in other outdoor wood care. If you want a useful parallel for oily hardwoods and exposed exterior surfaces, Better Boat's tips for cleaning and sealing teak are worth a look because they reinforce the same core principle: clean the surface thoroughly, use the right product for the material, and don't skip protection just because the wood still “looks okay.”
A deck usually tells you what it needs. Grey fibres, blotchy absorption, dark mildew patches, and raised grain all point to surface prep problems, not just colour problems.
A good stain job restores more than the look. It restores confidence that the deck can handle another stretch of hard weather without slipping further into avoidable deterioration.
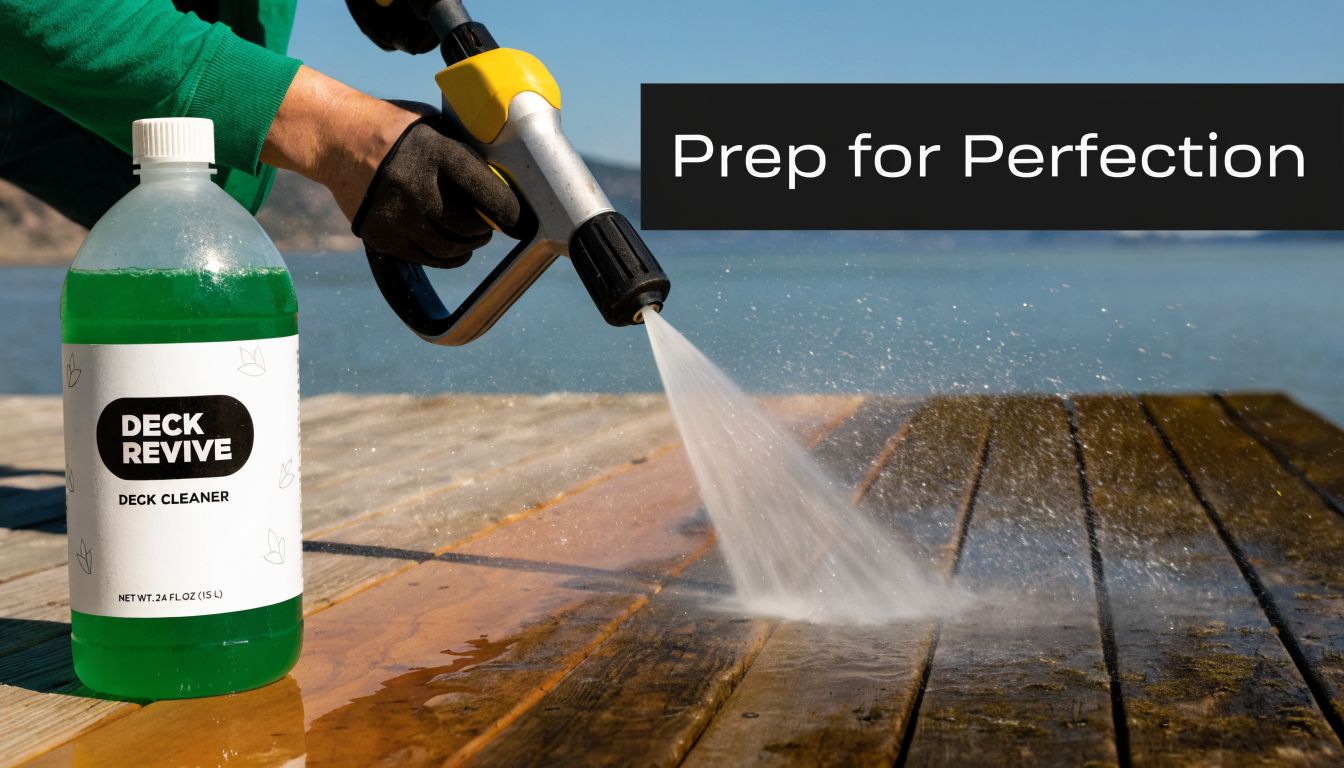
Preparing Your Deck for a Flawless Finish
Most failed stain jobs were doomed before the can was opened. The prep decides whether the stain penetrates, bonds, and wears evenly, or whether it sits on the surface and starts failing early.
Start with the myth that causes the most damage
A lot of homeowners still believe new pressure-treated lumber must sit for months before staining. That's not the standard to use. A common myth suggests new pressure-treated wood needs to “breathe” for months before staining, but once its moisture content is below 15%, it's ready, and waiting too long can let UV damage degrade the surface and hinder stain penetration. For the 80% of residential decks in Ontario built with pressure-treated wood, staining promptly can extend deck lifespan by 5 to 7 years, according to Warline Painting's review of pressure-treated deck staining timing.
That point matters because pressure-treated lumber is widely used here, and exposed boards don't improve by sitting around unprotected. They weather. They glaze. They collect contamination. Then people blame the stain for not soaking in.
Clean without shredding the wood
Pressure washing helps, but only when it's controlled. The goal is to remove dirt, loose fibres, old residue, and organic growth without carving lines into the board face.
Use a wood cleaner first if the deck has mildew, old grey oxidation, or embedded grime. Then pressure wash at a controlled setting instead of treating the deck like concrete. Keep the wand moving, work with the grain, and don't hover over one spot.
If you want a helpful outside perspective on pressure washing technique and surface care, learn about pressure washing in Colorado because the practical guidance on avoiding surface damage applies well beyond one region.
Repair the structure before the finish
Before sanding, inspect everything closely:
- Board faces: Look for soft spots, checks, edge splitting, and rot.
- Fasteners: Replace rusted, backed-out, or undersized screws.
- Rail connections: Tighten anything with movement before coating the deck.
- Joist tops: If you're replacing boards or opening sections, add protection where water sits. This is where joist tape for deck framing earns its keep by helping shield the top of the framing from trapped moisture.
This step gets skipped all the time. A beautiful stain coat over loose boards and corroded fasteners just hides problems for one season.
Practical rule: If a screw is already staining the wood with rust, don't stain around it and hope for the best. Fix the hardware first.
Let the deck dry, then sand for absorption
After washing, let the wood dry thoroughly. Then sand with 80-grit to open the surface and level raised fibres. Sanding isn't just cosmetic. It removes surface glaze and gives the stain a cleaner path into the wood.
Here's a good visual refresher before you move into the final prep stage:
A clean, dry, evenly sanded deck gives you a predictable surface. That predictability is what makes staining deck wood look professional instead of patchy.
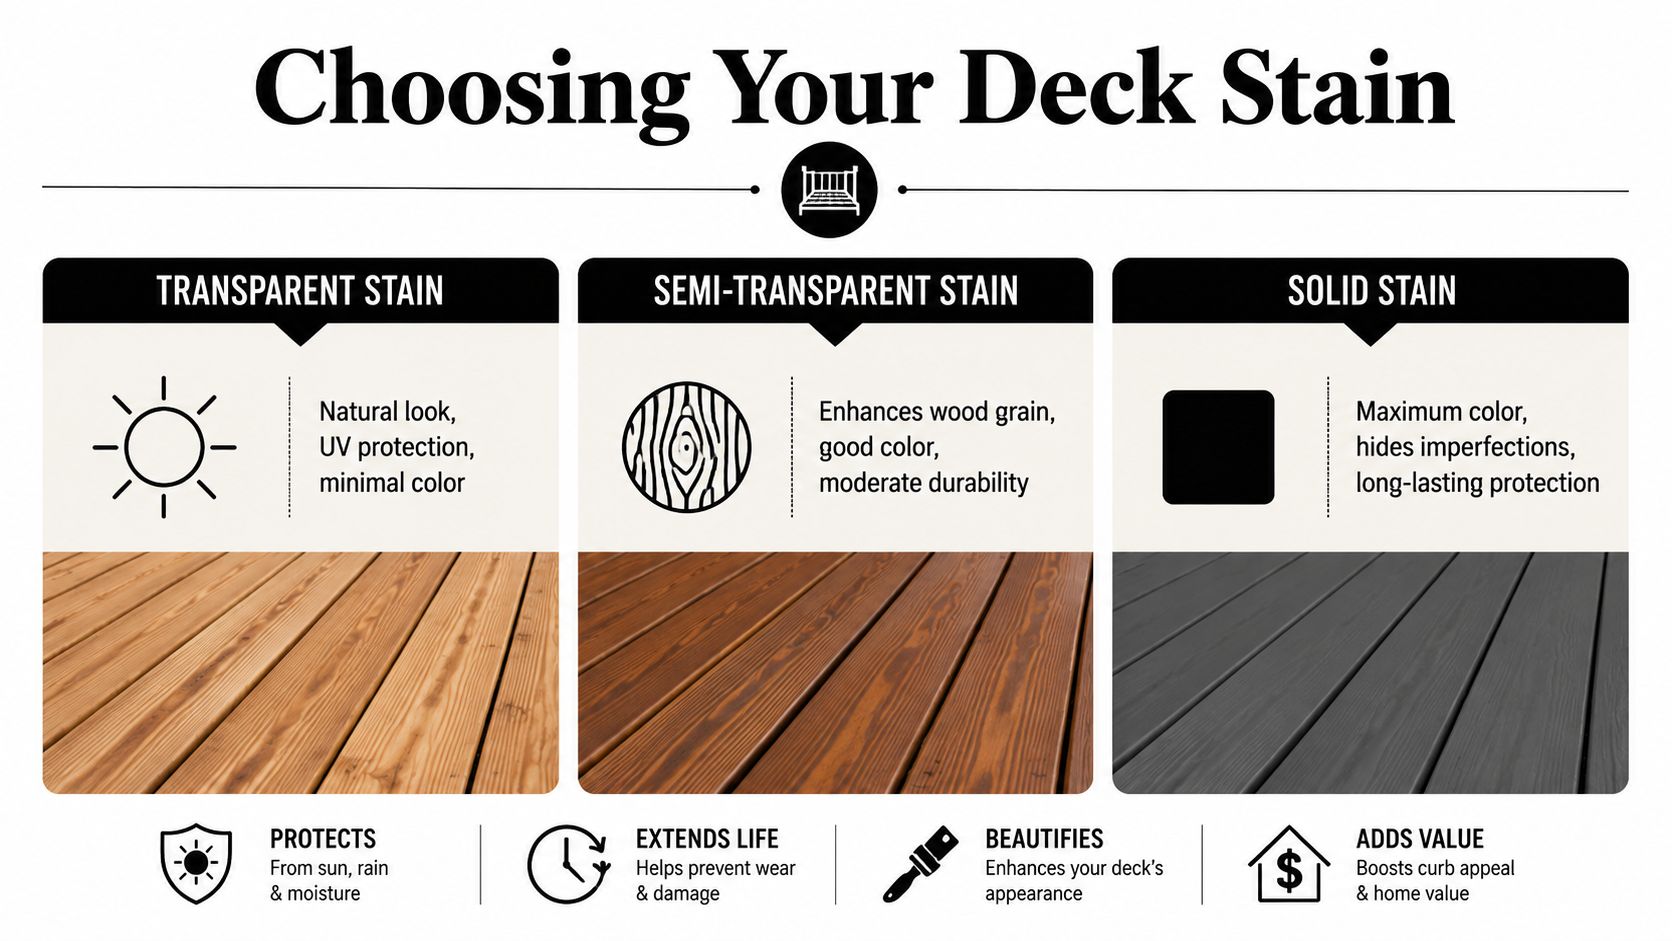
How to Choose the Right Deck Stain
It's common to shop for stain by colour chip first. That's understandable, but it's backwards. Start with how much wood grain you want to see, how much maintenance you're willing to do later, and how hard your local weather is on horizontal wood surfaces.
Opacity changes the whole maintenance plan
Transparent, semi-transparent, and solid stains don't just look different. They age differently and ask for different prep the next time around.
| Stain type | Best for | Trade-off |
|---|---|---|
| Transparent | Showcasing attractive grain on newer or cleaner wood | Least forgiving on weathered boards |
| Semi-transparent | Balancing colour, grain visibility, and penetration | Needs even prep or it can look blotchy |
| Solid | Hiding visual inconsistency and worn appearance | Covers grain and can create more prep later if it starts failing |
If the deck boards still have attractive grain and the surface is in decent condition, transparent or semi-transparent finishes usually age more naturally. If the boards are heavily weathered or visually inconsistent, solid stain can make the surface look more uniform. The catch is that solid products behave more like a film, so future maintenance often becomes less forgiving.
Oil-based versus water-based in Canadian conditions
In many Canadian climates, oil-based stains remain the practical choice for horizontal deck surfaces because they penetrate thoroughly and handle moisture movement better. The U.S. wood stain market is projected to reach US$4.9 billion by 2034, and oil-based stains are projected to grow at a CAGR of 8.4% from 2024 to 2034. The same market analysis notes that oil-based stains can last 3 to 5 years, compared with 1 to 2 years for some water-based alternatives in wet regions, because their deeper penetration helps resist UV and moisture damage. That projection comes from Fact.MR's wood stain market analysis.
That doesn't make water-based stains useless. They can work well in the right conditions and for the right maintenance expectations. But on decks exposed to freeze-thaw movement, repeated wetting, and summer sun, penetrating products usually give a better margin for error.
If the stain mostly sits on top of the board instead of soaking in, the weather will eventually expose that mistake.
Match the product to the wood and the look
A few practical pairings tend to work well:
- Newer pressure-treated decking: Semi-transparent penetrating stain often gives the best balance of protection and appearance.
- Older deck with mixed colour and repairs: A more opaque finish can even things out visually.
- Premium wood where grain matters: Transparent or lightly tinted semi-transparent products keep the character visible.
If you're comparing finish options against deck paints and more cosmetic renovation approaches, Rescreen Rescue's deck renovation tips are useful for understanding where a stain system makes more sense than a paint-like finish.
The wood itself also shapes the decision. If you're building or replacing structural elements with pressure-treated wood posts for fence and deck projects, choose a stain system that complements pressure-treated lumber instead of fighting it. That usually means a penetrating finish that moves with the wood rather than trying to seal it under a brittle surface film.
The Art of Application Perfecting Your Technique
Application is where patience shows. You can have the right product and still get lap marks, shiny patches, sticky areas, or uneven colour if the technique is sloppy.
Check moisture before you do anything else
The single biggest cause of stain adhesion failure is excess moisture. In Ontario's humid climate, wood should be below 20% moisture content for oil-based stains and 15% for water-based, and following the sequence of clean, wait 48 hours, test moisture, then sand with 80-grit can result in 92% five-year durability, versus a 45% failure rate without it, according to Consumer Reports' guidance on staining a deck.
That's why a moisture meter belongs in the kit. Don't guess based on how the wood looks. Don't guess because it hasn't rained in two days. Test the deck.
Use the right tool for the part of the deck
Different parts of the deck call for different tools.
- Brushes: Best for railings, end grain, stairs, and detail work. They push stain into pores and corners well.
- Pads: Good for broad deck boards when you want speed and control without overloading the surface.
- Rollers: Useful in limited cases, but they can leave too much material if you're not careful.
- Sprayers: Fast for rail systems and large surfaces, but only if you back-brush immediately.
A sprayer alone doesn't finish the job. It only distributes product. The brush or pad is what evens it out and works it into the wood.
Always back-brush after spraying. If you skip that step, you're often leaving stain on the surface instead of in the surface.
Work board by board
This is the method that separates professional-looking work from obvious DIY patching. Don't stop halfway across a board. Don't feather random edges in open sunlight. Start at one end of a full board and finish that board.
Keep a wet edge as you go. That means the section you're joining is still fresh enough to blend. Once a leading edge dries, lap marks become far more likely.
A clean workflow looks like this:
- Cut in the awkward areas first such as around posts, stairs, and rail connections.
- Coat a manageable run of boards while keeping the surface uniformly wet.
- Level puddles and overlaps immediately so the stain doesn't dry glossy in one spot and dry-starved in another.
- Check from two angles because missed spots often disappear when you only look straight down.
Respect weather and timing
Stain behaves differently in direct sun, shade, humidity, and moving air. The best application conditions are boring conditions. Mild temperatures, no immediate rain, and no blazing deck surface.
If the boards are hot, the stain can flash dry before it penetrates. If the air is damp and still, drying slows and the finish can stay tacky longer than expected. Early morning and late afternoon are often more forgiving than midday, especially on exposed deck surfaces.
Never stain in direct sun if the deck boards are already heating up under your feet. The product will tell on you.
Don't chase a thicker coat
More stain doesn't mean more protection. On deck boards, too much product often means a sticky surface, uneven sheen, and premature wear. Penetrating stains should penetrate. If material is pooling, you're applying too much or moving too slowly.
For rail tops, stair treads, and high-traffic areas, wipe or brush out excess before it starts setting. The finish should look even, not heavy.
Good application is steady, not dramatic. When staining deck wood, the winning technique usually looks almost uneventful while you're doing it. That's a good sign.
Common Deck Staining Mistakes and How to Fix Them
Often, the stain takes the blame when the actual problem was timing, prep, or weather. The fix starts with diagnosing the failure accurately.
Sticky finish that won't dry
Problem: The deck still feels tacky well after application.
Cause: Too much stain on the surface, poor penetration, or coating wood that still held too much moisture. Heavy shade and cool damp weather can make this worse.
Solution: Wipe down any obvious excess if the stain is still soft enough to move. If it has partially set into a gummy film, the surface usually needs cleaning and abrasion before recoating. Don't add another coat to “even it out.” That usually makes it worse.
Lap marks and dark overlap lines
Problem: You can see where one pass ended and the next began.
Cause: The stain dried before the next section was blended into it. This happens constantly when people work too slowly, stop in the middle of boards, or stain in direct sun.
Solution: If the marks are minor, a maintenance coat applied board by board can sometimes blend them. If they're severe, the deck often needs another prep cycle on the affected area so the surface can absorb uniformly.
Peeling or flaking after a season
Problem: The finish starts lifting instead of wearing away gradually.
Cause: The product formed too much of a surface film, or the deck was not prepared evenly. Residual mill glaze, old finish, contamination, or moisture underneath the coating can all trigger this.
Solution: Remove failing material before re-staining. Spot repairs over loose, flaking sections rarely last. This is one of those jobs where partial shortcuts tend to show up quickly.
Blotchy absorption and uneven colour
Problem: Some boards went dark, some stayed pale, and the whole deck looks inconsistent.
Cause: Uneven prep. Some boards were dirtier, smoother, wetter, or more weathered than others. Different board densities can also affect how the stain takes.
Solution: Correct the surface first, not the colour. Clean, dry, and sand consistently. Then apply stain in a controlled, board-by-board pattern.
The climate mistake people miss
Generic staining advice often ignores microclimates. In humid maritime climates, mildew-resistant additives matter, while in hot, dry prairie summers, stain should be applied during cooler parts of the day to avoid flash-drying that can reduce penetration by up to 30%, according to this discussion of climate-sensitive staining advice.
That's why two decks stained with the same product can age very differently. One was coated on a calm, dry, moderate day. The other was rushed in poor conditions. Same can. Different outcome.
Maintaining Your Deck for Long-Term Beauty
A stain job lasts longer when the deck gets simple, regular attention instead of total neglect followed by emergency work. Maintenance doesn't need to be complicated. It needs to be consistent.
Follow a simple yearly routine
At least once a year, give the deck a close inspection and a gentle cleaning. Clear debris from between boards, wash off surface dirt, and check the spots that stay damp longest, especially along the house, under planters, and around stair landings.
Watch for these signs:
- Fading on walking paths: Often the first sign the finish is thinning.
- Water soaking in quickly: A clue that protection is wearing off.
- Dark staining near connections: Often points to hardware or trapped moisture.
- Cracking at post tops and rail caps: End grain is vulnerable and needs protection.
If the surface still looks even and the stain is wearing thin, a light maintenance coat is often enough. If you're seeing broad failure, peeling, or major colour inconsistency, the deck needs proper prep before another full coat.
Think in systems, not just stain
The best deck protection comes from combining finish work with hardware choices that reduce water entry and hold the structure tight over time. Emerging trends focus on system-based longevity. Modern penetrating stains can extend deck life by 5+ years, and installing post caps protects the end grain, where 15% of post rot originates, while that combination can save homeowners an average of 20% on future repairs, according to The Craftsman Blog's discussion of staining mistakes and durability.
That system mindset applies to fasteners too. If you're replacing loose or corroded deck screws during maintenance, use stainless steel deck screws where the environment demands stronger corrosion resistance. Clean wood and a good stain won't solve staining from failing hardware.
A deck lasts longer when the finish, fasteners, framing protection, and post details all work together. Any weak point becomes the place water starts winning.
Good maintenance keeps you out of the expensive cycle where a deck gets ignored, overexposed, then stripped back harder than it should have been. That's the payoff. The deck keeps looking good, and the structure under it gets a better chance to last.
If you're ready to stain a new deck, refresh an older one, or replace the hardware that's holding the project back, XTREME EDEALS INC. carries the deck and fencing accessories, fasteners, joist hangers, post caps, screws, anchors, and other finishing hardware that help outdoor projects last. It's a practical place to source the parts that support a better stain job, from framing details through to the final touch points.