

Post Cap 4×6: The Ultimate Sizing and Style Guide
You're usually looking for a post cap 4×6 at the very end of the job. The deck frame is done. The rails are in. The fence line finally looks straight. Then you notice the tops of the posts still sitting there, exposed and unfinished, soaking up every bit of rain and sun they can get.
That top end grain is where a lot of outdoor wood starts ageing badly. Water sits there, the fibres swell, the top checks and splits, and the post starts looking older than the rest of the project. A cap fixes that problem while also giving the whole build a finished, deliberate look.
The catch is that 4×6 is often a label, not the true size. That's where most ordering mistakes happen. People buy a cap marked 4×6, slide it over the post, and find out too late that the fit is wrong.
A good cap should fit properly, suit the weather your project lives in, and match the style of the fence or deck instead of looking like an afterthought. Get those three things right and the cap does its job for years.
Your Project's Finishing Touch
The last hour of a deck or fence build is often when the shortcuts show up. The posts are cut, the rails are tight, the layout looks right, and then the bare tops stand out from across the yard. On a good build, that unfinished detail is hard to ignore.
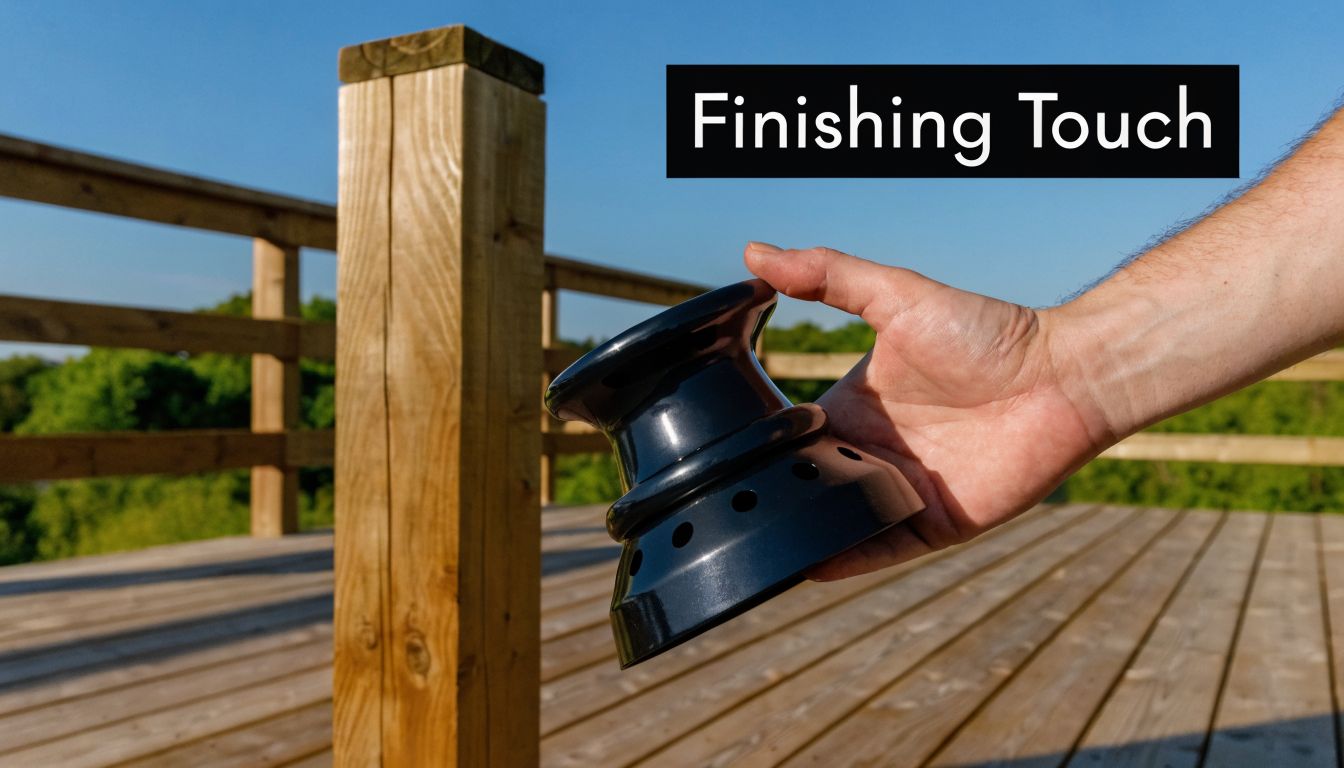
A 4×6 post cap is a small part with two jobs. It protects the top of the post, and it cleans up the finished look. That matters on deck guards, fence lines, gate posts, pergolas, and mailbox posts where the top is always visible.
It also tends to be the part people order wrong.
The reason is simple. A cap sold for a 4×6 post may fit a nominal 4×6 pressure-treated post, or it may be built for a true 4 in. x 6 in. timber. If you miss that distinction, the cap can arrive loose, too tight to seat properly, or visibly out of scale. If you need a quick reference point for common styles before you buy, look at these caps for fence posts in several standard sizes and finishes.
Why exposed post tops age badly
Post tops fail faster than side faces because the end grain drinks water. Sun bakes that moisture back out. Repeated wet and dry cycles lead to checking, splitting, stain failure, and premature wear at the very spot people notice first.
That is why I treat caps as protection first and trim second.
A good cap will not fix a poorly cut or badly twisted post, but it does reduce direct weather exposure and gives water a better surface to shed from. On treated lumber, cedar, and other exterior species, that extra protection helps the project keep its shape and finish longer.
What separates a good choice from a bad one
The right cap should fit the post you installed, hold up in the site conditions, and look proportional to the rest of the work. Miss any one of those and the problem shows up fast.
The usual failures are straightforward:
- Poor fit: The cap rocks, rattles, or leaves an obvious gap because the post was measured by label instead of by actual size.
- Wrong material: Thin metal can dent, low-grade plastic can chalk in sun, and bare steel hardware can rust-stain the post.
- Weak attachment: A cap set with the wrong adhesive or fasteners can lift, shift, or trap water where it should drain.
The good ones sit flat, stay put, and look like they were chosen with the build in mind instead of added at the end.
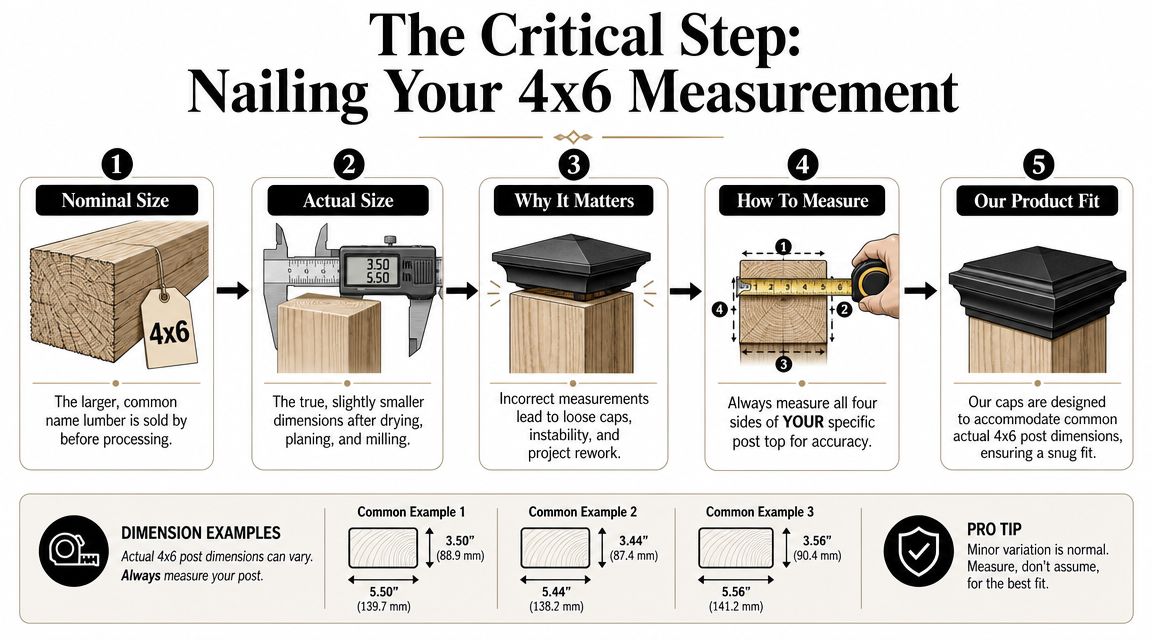
The Critical Step Nailing Your 4×6 Measurement
You order a 4×6 post cap, set it on the post, and it either rattles around or stops short by a quarter inch. That usually comes back to one mistake. The lumber label said 4×6, but the post in front of you is not a true 4 inches by 6 inches.
Nominal versus actual
This catches a lot of DIYers and even plenty of contractors on quick-order jobs. A cap sold as “4×6” may be built for a standard dressed post, not a true full-dimension timber. For many pressure-treated posts, that means an actual size closer to 3 1/2 in. x 5 1/2 in. or sometimes 3 5/8 in. x 5 5/8 in., while a real 4 in. x 6 in. post needs a true-size cap, as explained in this post cap sizing guide.
The label gets you into the right aisle. The tape measure gets you the right cap.
Measure the post, not the invoice
Measure the post at the very top, where the cap will sit. That matters because the top can dry out, swell, split, or get trimmed out of square. On repair work, I also check more than one post in the same run because older material is rarely consistent.
Use this process:
Measure both directions at the top
Check the full width and length where the cap opening will land.Confirm the post is square enough for a cap
If one side is crowned, mushroomed, or rough-cut, clean it up before you size the cap.Check each face for variation
Pressure-treated stock, rough lumber, and older posts can all be slightly off from one side to another.Match the cap opening to the actual post size
A cap should slide on without force and without a loose, sloppy gap. Too tight and you risk damaging the cap or trapping moisture against the sides. Too loose and the cap looks cheap, shifts in wind, and can be harder to fasten cleanly.
That last point is where people lose time. They shop by nominal size, then try to make the cap fit with adhesive or extra fasteners. Bad plan. Fit starts with the post dimensions.
What usually fits and what usually does not
Standard pressure-treated 4×6 posts often take a nominal-fit cap. Full-dimension timbers usually do not. Wrapped posts and sleeved posts need the finished outside measurement, not the structural core inside.
If you are comparing common nominal-size options, this cap for fence post collection is a useful reference point for standard fence and deck post sizing.
A few field checks help avoid a bad order:
- Pressure-treated deck post: Often sized for nominal-fit caps.
- Rough-sawn or true-dimension lumber: Usually needs a true-size cap.
- Post sleeve or trim wrap: Measure the outside after the wrap is installed.
- Existing fence repair: Measure every post you plan to cap, not just one sample.
A good fit should sit flat, leave room for proper fastening, and look intentional. If you have to pound it on or shim the inside, you bought the wrong size.
Choosing Your Material Durability Meets Design
Material choice decides how much maintenance you'll deal with later. It also decides whether the cap suits the site. A cap on an inland shaded fence doesn't live the same life as one on a sunny deck or near salt air.
What each material does well
Metal caps are the practical choice when you want durability and a sharper profile. Copper has a classic look and handles moisture well. Galvanized steel leans utilitarian and works where you want a hard-working finish rather than a decorative one. Powder-coated steel gives you a cleaner architectural look while still acting as a solid weather shield.
Resin and plastic caps appeal to buyers who want corrosion resistance and a simple install. They're fine in many settings, but material choice gets more important in harsher exposure. In regions with high UV exposure and wildfire risk, solid metal caps like copper or powder-coated steel are mainly about moisture protection and are non-combustible, while many decorative resin or plastic caps are chosen for corrosion resistance but may offer less durability against prolonged intense sun and have lower fire resistance, as noted in this material comparison for 4×6 post caps.
Wood caps can look right on traditional fences or heritage-style work, but they ask more from the owner. If the client doesn't want upkeep, I usually steer them away from wood-on-wood details at the post top.
4×6 Post Cap Material Comparison
| Material | Cost | Durability | Maintenance | Best For |
|---|---|---|---|---|
| Galvanized steel | Moderate | Strong weather resistance | Low to moderate | Utility fences, structural-looking details |
| Powder-coated steel | Moderate to higher | Durable with good finish protection | Low, inspect for scratches | Modern decks, visible rail posts |
| Copper | Higher | Strong moisture protection | Low if patina is acceptable | Premium traditional work |
| Resin or plastic | Lower to moderate | Site-dependent | Low, but inspect for sun wear | Budget-conscious decorative applications |
| Cedar or other wood | Varies | More exposure-sensitive | Higher | Rustic or all-wood aesthetics |
Choose the cap material the same way you choose exterior fasteners. Match it to weather, exposure, and how much maintenance the owner will actually do.
Matching the cap to the job site
A few jobsite rules make the decision simpler:
- Full sun: Metal usually holds the line better on appearance and durability.
- Wildfire-conscious area: Non-combustible metal caps make more sense than decorative plastic.
- Coastal exposure: Corrosion resistance matters more than style trends.
- High-visibility front fence: Finish quality matters as much as fit.
If you're already comparing cap finishes across common outdoor hardware categories, it can help to look at related metal options such as 6 x 6 post caps to see how materials and finishes carry across product lines.
A Style for Every Project
Once the fit and material are sorted, style becomes the fun part. A post cap 4×6 can then either disappear into the build or become a small architectural detail that ties the whole project together.
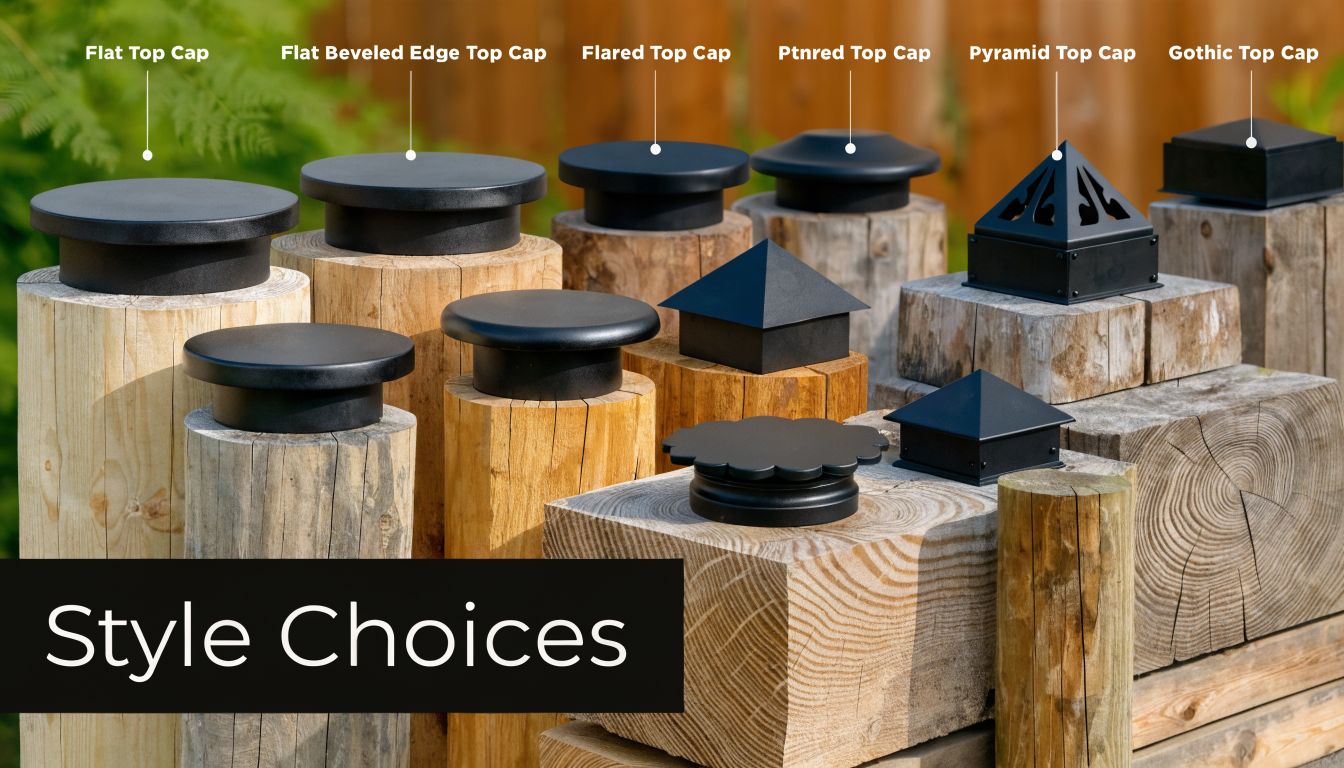
Styles that work in the real world
Pyramid caps are the easiest recommendation for most jobs. They look clean, shed water well, and suit both fences and decks without stealing attention.
Flat-top caps are more understated. They fit contemporary builds, square railing systems, and projects where you want the top line to stay crisp.
Ball-top and finial caps bring more personality. These look right on formal fences, gate posts, and older properties where a bit of ornament belongs.
Decorative formed caps sit in the middle. They add shape and shadow without going fully traditional.
Pick the style that matches the structure
A narrow modern deck with black balusters usually looks better with a simple metal pyramid or flat top. A front-yard fence around a character home can carry a ball top or finial without looking overdone. The mistake is mixing a very ornate cap with a stripped-down build, or putting a plain utility cap on a fence that clearly wants more detail.
This is also where fit still matters. Buyers keep asking whether a 4×6 cap will fit because the label is often nominal. Suppliers note that 4×6 caps are typically sized for actual post dimensions around 3.5 in x 5.5 in, with inside openings ranging from 3.5 in x 5.5 in to 3.75 in x 5.75 in to account for lumber variation, according to this 4×6 fit overview.
Where our products fit in
For true-size applications, XTREME EDEALS INC. carries decorative pyramid-style caps for actual 4" x 6" square wood posts, which is useful when you're not working with the more common nominal pressure-treated size. That distinction matters on custom lumber, some hardwood posts, and builds where the owner wants a decorative cap without guessing on fit.
A few style shortcuts help:
- Modern build: black powder-coated pyramid or flat top
- Traditional fence: copper tone, ball top, or finial
- Mailbox or lamp post: decorative cap with more profile
- Rear-yard privacy fence: simple cap that protects without drawing attention
Installation Made Simple
A good cap can still fail if it's installed like an afterthought. The method is simple, but the prep has to be right.
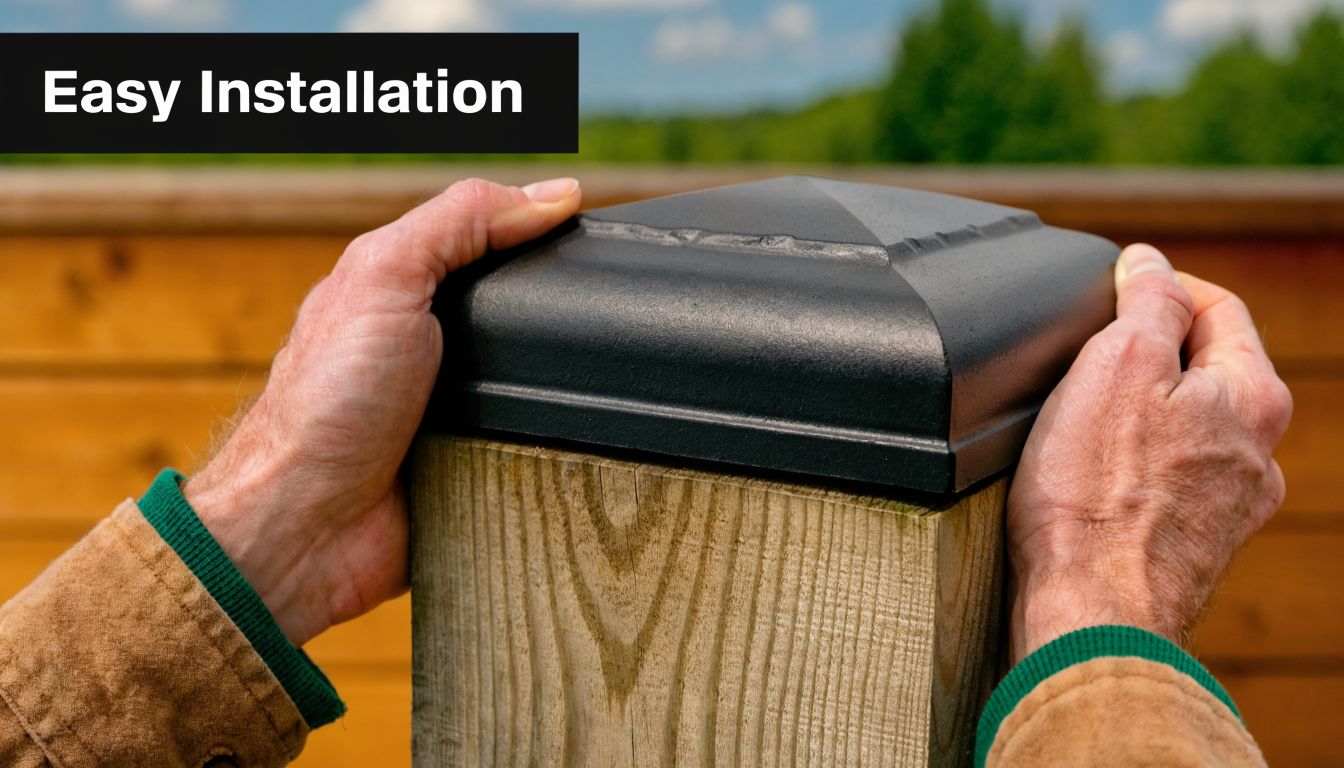
Prep the post top first
Before the cap goes on, the top of the post should be dry, reasonably clean, and free of splinters that can hold the cap off one corner. If there's a raised edge, old paint build-up, or a rough saw mark, flatten it lightly.
Keep these tools nearby:
- Tape measure for a last fit check
- Combination square if you want to confirm the top is even
- Sandpaper or sanding block for minor touch-up
- Exterior adhesive or silicone if the cap design calls for it
- Corrosion-resistant screws if the cap is pre-drilled or side-fastened
Two common ways to install decorative caps
Slip-over with adhesive works well on many decorative caps. Dry-fit first. If the fit is right, add a modest bead inside the cap or at the upper edge of the post, then seat it squarely. Wipe squeeze-out before it cures.
Screw-on installation is the better call where wind exposure is stronger or where the cap is heavier. Decorative caps don't carry the same structural load as a connector, but fastener discipline still matters. A structural connector like the Simpson BC46 uses a full schedule of 12 nails at the beam flange plus 6 nails at the post flange, each 0.162 x 3-1/2 in., for full strength, and for decorative caps the same principle applies in a simpler way: use two to four corrosion-resistant screws so the cap holds up to weather and movement, based on the fastening guidance in this Simpson BC46 product listing.
If the cap has screw holes, use them. Don't rely on friction alone where wind can get under the edges.
A good companion for this part of the job is a proper set of fasteners and fittings for outdoor hardware, especially when you're trying to avoid rust streaks and mixed-metal problems.
Watch the process before you do the first one
This install video gives a clear visual reference before you start on your own posts:
Common install mistakes
- Forcing a tight cap on with a mallet: that usually damages the finish or opens the post top.
- Using interior screws: they stain, rust, or fail outside.
- Skipping the dry fit: then finding out too late one corner is high.
- Installing over a soaked post: trapped moisture is never a good start.
Long-Term Care and Troubleshooting
A 4×6 post cap usually starts causing trouble after a season or two, not on install day. The common pattern is simple. The cap fit was a little loose or a little tight from the start, the post moved with weather, and now the cap rattles, lifts, or traps water. That is why getting the size right up front matters so much, especially with the nominal-versus-actual lumber mix-up that catches a lot of DIYers.
Post caps protect the top of the post, but only if water can shed and the cap stays seated properly. If the cap rocks, sits high on one corner, or seals moisture against a wet post top, the protection drops fast.
Simple upkeep that actually helps
Check caps during your normal exterior inspection in spring and again after the wet season. Look for four things. Movement, finish damage, trapped debris, and staining around fasteners.
Wash off dirt and pollen with mild soap and water. Skip harsh pads on powder-coated aluminum or painted steel because they scratch the finish and give corrosion a place to start. Copper is different. Either leave it alone and let it patina, or maintain the bright finish with products made for copper. Half-doing it usually leaves a blotchy result.
For homeowners who already keep seasonal exterior checklists, this comprehensive guide for Utah homeowners is a useful model for building your own deck and fence inspection routine.
Fixing the common problems
A slightly loose cap usually means the post is undersized for the cap, or the cap was ordered to nominal size while the actual post top came in smaller. Do not fill the gap with a pile of adhesive. That makes later repairs harder and often fails once the post shrinks again. Use a thin exterior-rated shim where it will not show, or refasten the cap with the method the manufacturer allows.
A slightly tight cap usually points to the opposite problem. The cap may be sized to a true 4×6 while the post is standard dimensional lumber, or the post top may have swollen from moisture. Pull the cap back off and confirm the actual measurement at the top of the post. If you only need a little clearance, sand the post top evenly and keep the edges square. If the mismatch is larger than that, change caps. Forcing it damages finishes and can split the post corners.
If a cap comes partly loose after weather exposure, remove it completely. Clean off old adhesive or sealant, check the post top for checks, twist, or standing moisture, and inspect the screws for rust or backing out. Then reinstall on a dry, sound surface.
If you see rust streaks or black staining, look at the fasteners first. Mixed metals and the wrong screw coating cause a lot of ugly callbacks. Replace suspect screws with corrosion-resistant fasteners that match the cap material as closely as possible.
A loose post cap usually comes back to sizing or fastening. Start there before chasing other causes.
Your Post Cap Questions Answered
Can I use a 4×6 cap on composite, vinyl-wrapped, or metal posts
Yes, if the cap matches the finished outside size of the post at the top.
That detail trips people up all the time. A wrapped 4×6 post may cover a wood core that is smaller than standard dimensional lumber, while some metal posts use trim sleeves that change the outside measurement again. Measure the post where the cap will sit and buy to that number, not to the name of the post system. If you skip that step, you can end up with a cap that fits the core on paper but not the finished post in the field.
Can I paint a metal post cap to match my fence
You can, but the prep and coating system need to match the metal and the factory finish. Powder-coated and prefinished caps usually hold up better than caps painted on site, especially on horizontal surfaces that sit in full sun and weather.
If you plan to paint, clean the cap well, use a primer and topcoat rated for exterior metal, and expect maintenance later. For most jobs, if the color matters, ordering the cap in the finish you want is the safer call.
What if my 4×6 post varies slightly from one post to the next
Assume nothing until you measure a few of them.
New pressure-treated posts from the same unit are often close, but mixed batches, older fences, resurfaced posts, and repair work can leave you with enough variation to matter. On a multi-post order, I check several tops before buying caps. If one post is off, it is cheaper to catch it before the order goes in than after half the caps are installed.
Use this buying checklist before you order:
- Confirm the post type: standard nominal lumber, true-size stock, wrapped post, or metal post with sleeve
- Measure the post top where the cap sits: actual size beats the store label every time
- Match the cap material to the site conditions: sun exposure, standing moisture, coastal air, and finish expectations all matter
- Choose the fastening method up front: friction fit, screw-on, adhesive-assisted, or a manufacturer-required combination
- Pick a style that fits the build: decorative caps for visible deck and fence lines, plain utility caps where function matters more than appearance
If you are comparing decorative and utility options across deck and fence hardware, browsing a full catalogue of post caps, fasteners, and related accessories in one place can save time and help prevent mismatched orders.
XTREME EDEALS INC. offers post caps, fence and deck hardware, and installation accessories in one catalogue, which makes it easier to match the cap size, style, and fastening method before you order. If you're sourcing parts for a new build or a retrofit, browse XTREME EDEALS INC. for compatible outdoor hardware and post cap options.