
You’re probably standing at the bottom of a staircase right now, looking at a rail that’s loose, dated, or missing altogether. Maybe it’s a deck stair that never got finished properly. Maybe it’s an older wood system that’s gone soft, twisted, or wobbly after too many Ontario winters. The job looks simple until you start shopping and realise half the advice online is written for U.S. code, not Canadian requirements.
That’s where a lot of first-time projects go sideways. The parts may look right, the finish may look sharp, but the install still fails if the height, spacing, angle, or hardware choice doesn’t match your stair and your local code. That matters more than most DIYers expect. Ontario data from 2025 shows 15% of residential deck and stair inspection failures were tied to non-compliant railings, with mismatched U.S.-centric kits listed as a primary issue, and fines can range from $500 to $2000 per violation according to this Ontario-focused product analysis.
Stair railing kits solve a real problem. They give you a coordinated system of rails, balusters, brackets, and fasteners that are meant to work together, instead of forcing you to piece together parts and hope the geometry lines up. For a homeowner, that means fewer surprises. For a contractor, it means less fiddling on site and fewer callbacks.
If you’re also thinking about the staircase as part of a bigger visual upgrade, this expert guide to staircase remodels is worth a look for design context. Safety comes first, but a railing should also look like it belongs with the rest of the house.
Your Guide to a Safer, More Stylish Stairway
A good stair railing kit is the closest thing this trade has to a shortcut that still respects proper workmanship. You’re not skipping the hard part. You’re removing unnecessary guesswork.
Most kits are built around one simple advantage. The components are engineered to fit one another. That means the rail profile matches the bracket, the balusters fit the rail openings, and the hardware is chosen for that assembly instead of left to chance. On stairs, that matters because stair angles expose bad planning fast. A level rail can hide a lot. A stair rail can’t.
Practical rule: If you have to “make it work” with a stair railing kit, it’s usually the wrong kit.
Canadian buyers need to be more careful than many online guides suggest. A product page may talk about adjustability, style, or finish, but leave out the details that decide whether the install is legal and safe. Height, opening limitations, graspability, and mounting method aren’t optional details. They’re the job.
A smart railing choice does three things at once:
- Meets code: The rail has to match the requirements for your stairway, not just look close.
- Fits the stair geometry: Angle range, post spacing, and bracket type need to suit the actual rise and run.
- Survives the climate: Ontario freeze-thaw cycles punish weak coatings, mixed metals, and poor fastener choices.
That’s why modern kits have become such a big part of the market. The broader railing market was valued at USD 51.82 billion in 2024 and is projected to reach USD 70.15 billion by 2030, while the outdoor railing segment held over 50% market share in 2024, according to TechSci Research’s railing market report. In Canada, that demand is tied directly to renovations, decks, balconies, and exterior stairs where durability and code compliance matter.
Understanding a Stair Railing Kit
A stair railing kit is best understood as a packaged system, not a pile of separate parts. It's similar to flat-pack furniture, but for a safety assembly. You still have to measure accurately and install it properly, but the main pieces are designed to work together.
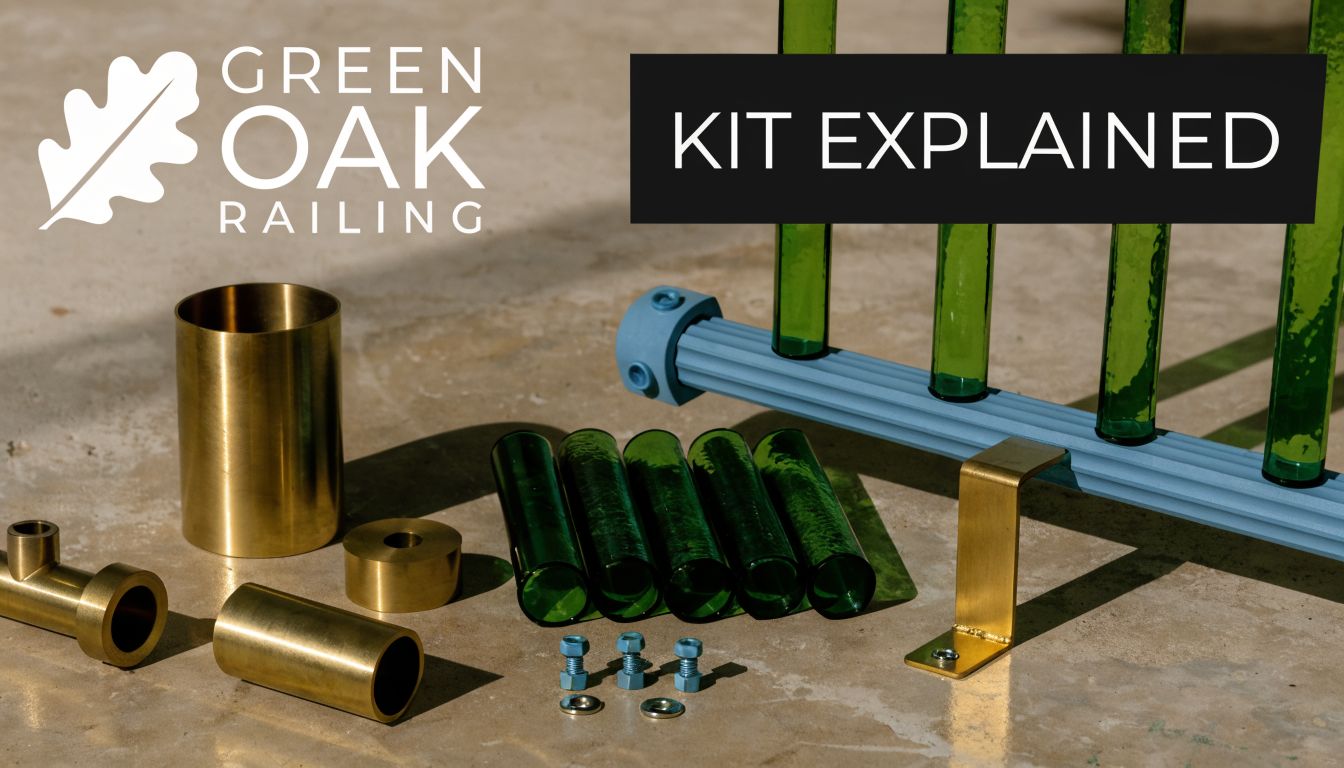
The core parts
Every stair kit revolves around a few structural components.
- Top rail: This is the upper member your hand follows as you move up and down the stair. On some systems it doubles as the visible hand contact surface. On others, especially guard systems, it’s part of the framed assembly and may need a separate graspable handrail depending on the application.
- Bottom rail: This ties the assembly together near the stair treads and sets the spacing pattern for the infill.
- Balusters or spindles: These are the vertical infill members. Decorative iron-look balusters and cleaner square profiles both show up often in kit builds.
- Posts: Posts do the heavy lifting. They transfer load to the framing or stair structure. If the posts are weak, the rest of the kit doesn’t matter.
- Brackets and mounting hardware: Stair brackets account for the slope. Post anchors, screws, bolts, and connectors keep the system rigid and aligned.
Some homeowners think the balusters are the important part because that’s what they see. In practice, the post and bracket setup decides whether the whole thing feels solid or flimsy.
Why kits work better than mixed parts
A lot of frustration starts when people try to build a “custom” assembly out of unrelated components. A handrail from one brand, brackets from another, generic balusters, then whatever screws happen to be in the truck. That approach can work in experienced hands, but it’s where many DIY installs lose time.
With a matched kit, you usually get:
- Known compatibility: Rail channels, baluster connectors, and slope hardware are intended to align.
- Cleaner purchasing: Fewer missed parts and fewer return trips.
- More predictable cuts: Stair angles are already part of the product design, rather than something you invent on site.
- Better finish quality: The visual lines are more consistent when all visible pieces belong to one system.
A stair rail should feel deliberate when you grab it. If it feels assembled from leftovers, it probably was.
What can still be customised
Using a kit doesn’t mean every staircase looks the same. You can still shape the finished look through infill style, post caps, hardware finish, and decorative accents. Square black balusters give a clean, modern line. More ornamental metal balusters lean traditional. Glass and cable create a lighter visual effect, though they come with their own installation demands.
Decorative pieces can be mixed in more freely than structural parts. That’s where details such as post caps or select accent hardware can personalise the job without compromising the engineering of the main assembly.
One caution matters here. A kit simplifies installation, but it doesn’t remove the need to check code, stair angle, or mounting conditions. The system may be complete in the box, but your stair still has the final say.
Choosing Your Material and Style
Material choice decides more than appearance. It affects how the rail handles salt, moisture, sun, cleaning, and impact. In Ontario, I’d treat material selection as a durability decision first and a style decision second.
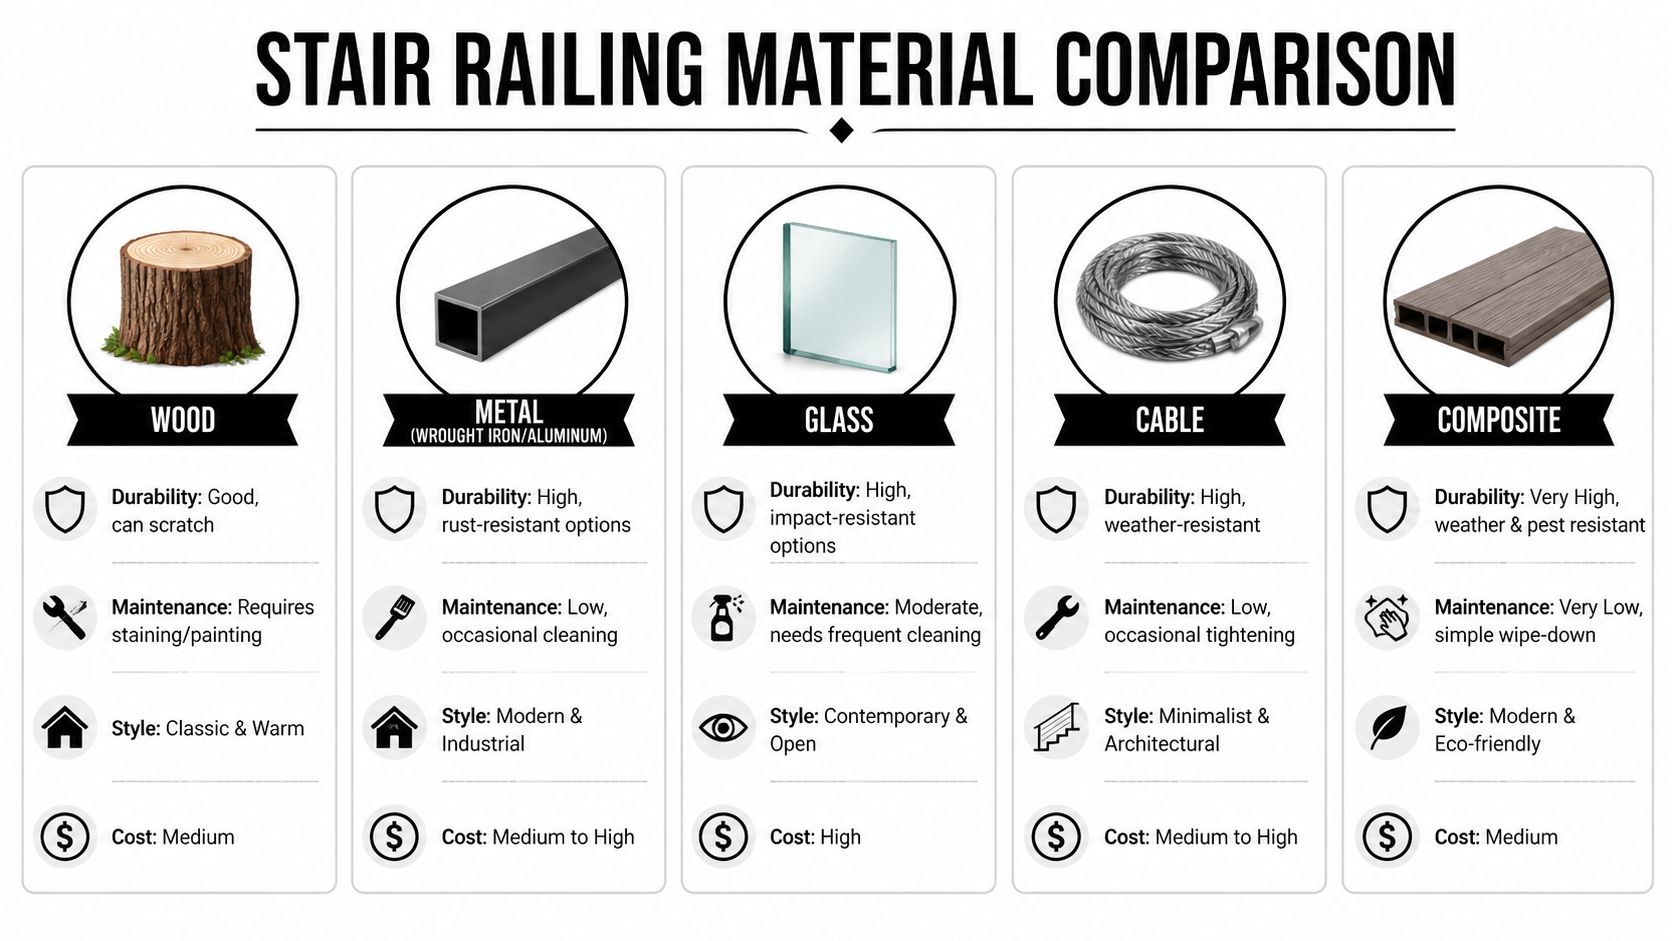
Aluminum
Aluminum is the easiest recommendation for most exterior stair railing kits in Canada. It’s light, stable, and low maintenance. Powder-coated aluminum stands up well to wet seasons and winter exposure, and it gives a crisp finished look without the upkeep burden of wood.
For DIY work, it’s forgiving. You can cut it cleanly with the right blade, handle longer sections without wrestling excessive weight, and keep the install looking sharp if your measurements are honest. If you’re comparing options, black aluminum handrails show why this style has become a default choice for modern deck and stair projects.
Best fit: homeowners who want a professional result with less maintenance and a contemporary look.
Composite
Composite railing works well when you want a fuller profile and a finish that feels closer to finished trim than metal fabrication. It doesn’t rot like wood, and many homeowners like how it coordinates with composite decking.
The downside is bulk. Some composite systems feel heavier visually, and stair sections can be less forgiving if your stair geometry is awkward. You also need to be disciplined about following the manufacturer’s mounting method. Composite looks neat when installed exactly as intended. It can look clumsy when improvised.
Best fit: decks where the railing should visually match composite boards and fascia.
Vinyl
Vinyl has its place, especially on lower-budget exterior projects where simple maintenance matters. It resists moisture well and doesn’t need painting, but many vinyl systems don’t deliver the same rigidity or refined finish as aluminum or better-built composite assemblies.
On stairs, cheap vinyl often shows its weaknesses. The lines can look bulky, and lower-end products can feel flexible in ways people notice immediately when they use the stairs.
Best fit: budget-conscious projects where ease of cleaning matters more than premium appearance.
Wood
Wood still wins on warmth. If the house is traditional and the deck is framed in pressure-treated lumber or cedar, a wood rail can look right in a way metal sometimes doesn’t. It’s also familiar. Most handy homeowners understand how to cut, fasten, and patch wood.
The trade-off is maintenance. Exterior wood needs regular attention, and stairs expose wear quickly because they’re touched, bumped, shovelled around, and soaked repeatedly. Wood also asks more of the builder. Straight cuts are easy. Durable detailing is not.
Best fit: homeowners who want a classic appearance and are willing to maintain it.
Other design-driven options
Glass and cable are popular for sightlines and a lighter look. They can suit stairs well, but they’re less forgiving than people expect. Glass needs precise support and regular cleaning. Cable demands careful layout and tensioning. Both can look excellent. Neither is the easiest first stair project.
If this is your first railing build, choose the material that gives you the fewest ways to make a bad mistake.
A quick side-by-side view
| Material | Upfront Cost (Per Linear Foot) | Maintenance Level | Durability/Lifespan | Best For |
|---|---|---|---|---|
| Wood | Lower to medium | High | Good if maintained | Traditional homes, budget builds |
| Aluminum | Medium | Low | Strong long-term exterior performer | Ontario decks, stairs, low-upkeep projects |
| Composite | Medium to higher | Low | Strong weather resistance | Matching composite decking systems |
| Vinyl | Lower to medium | Low | Fair to good depending on build quality | Basic exterior railing upgrades |
| Glass | Higher | Moderate | Strong when properly supported | Open views, contemporary design |
That table stays qualitative on purpose. Actual pricing shifts by profile, finish, post type, hardware pack, and whether the kit includes posts, brackets, or infill. What matters most is the pattern. Wood often looks affordable until you price future upkeep. Aluminum often costs more at checkout but saves you grief later.
What works in Ontario weather
For exposed deck stairs, aluminum is hard to beat. Composite is also strong if you like its look and you’re using a full matched system. Wood can still work, but only if you treat maintenance as part of the job, not a surprise that arrives two winters later.
If you’re aiming for a clean, contractor-grade finish without yearly touch-ups, metal systems and compatible hardware usually give the best long-term value.
How to Measure and Meet Canadian Building Codes
This is the part that separates a neat-looking install from one that is properly installed. If your measurements are sloppy or you buy the wrong stair section height, the nicest railing kit in the world won’t save you.

In Ontario, stair railing kits for many residential stair applications must meet OBC Section 9.8.8, which requires a minimum guard height of 1070 mm (42 inches) measured from the stair nosing. The same Ontario-focused source also notes that guards below that height can increase child fall-through risk by up to 40%, and non-compliant spacing on steep stairs can lead to failed inspections and retrofit costs averaging $500 to $1000 per section, based on this code-related product reference.
Measure the stair before you shop
A lot of buyers shop by opening width first. On stairs, that’s backwards. Start with the geometry.
Take these measurements:
- Overall opening length: Measure from finished post location to finished post location, not just tread edge to tread edge.
- Rise and run: Count the vertical rise and horizontal run across the stair section.
- Angle: The stair angle decides whether the kit’s brackets and baluster layout will work.
- Finished guard height location: Measure from the nosing line, because that’s where code cares about height.
- Mounting surface condition: Check whether you’re fastening to wood framing, concrete, or a retrofit post mount.
If you skip the nosing reference and measure from the wrong point, you can fool yourself into thinking a shorter rail will pass. It won’t.
The three code checks that catch DIYers
Most first-time mistakes come from these issues.
- Guard height: A rail that looks tall enough may still be short once it follows the stair slope and is measured correctly from the nosing.
- Opening limits: Baluster spacing changes visually on stairs. A spacing that seems tight when viewed straight-on can fail once projection along the angle is considered.
- Hand contact: Some systems look like handrails but don’t offer a properly graspable profile where one is required.
This is one reason generic guides aren’t enough. If you’ve never dealt with inspections, it helps to understand the role of building certifiers and how local approval works in practice. Even when that article discusses a different market, the bigger lesson still applies. Someone will judge the install by code, not by whether it looked reasonable in the box.
Site habit: I always check the code-critical dimensions on paper first, then dry-fit the rail before making final cuts.
Why a 36-inch stair kit can be the wrong buy
A common DIY mistake is buying a rail section because the finish matches the deck rail above. That works visually, but stairs don’t always allow the same section height.
On many Ontario stair applications, the deciding measurement is the required guard height from stair nosing. A shorter section that suits a level deck rail may not satisfy the stair condition once installed on an angle. That’s where people get trapped by attractive product photos and vague descriptions.
For a more detailed code reference tied to rail heights and related requirements, see this guide on deck railing height code.
A better way to verify fit
Use this field process before ordering:
- Mark the nosing line: Snap or visualise the line across the stair nosings.
- Set your intended post locations: Posts affect usable rail length and bracket clearance.
- Mock the rail height: Use a straight board or level as a temporary rail line.
- Check the infill path: Make sure baluster spacing won’t create an oversized opening once angled.
- Confirm bracket range: Adjustable brackets help, but only within their intended slope.
If you want a visual walk-through of measurement and stair rail planning, this video is useful before you start cutting.
What not to trust
Don’t trust a listing that only says “fits most stairs.” Don’t trust a rail height description without checking how it’s measured in use. Don’t assume your old rail was legal just because it’s been there for years.
A railing project becomes expensive when you install first and verify later. Measure the stair accurately, buy to the code condition, and treat the stair angle as a structural fact, not a suggestion.
Your Buying Checklist and Installation Overview
Buying the right kit is half the job. The other half is not sabotaging it during install. Most stair rail failures I see aren’t because the product was bad. They happen because the installer guessed at the angle, skipped layout, or used whatever fasteners were close at hand.

The buying checklist
Before you order, confirm these points in writing.
- Actual stair measurements: Record opening length, rise, run, and angle. Don’t rely on memory.
- Required rail height: Match the product to the legal condition of your stair, not the look you want.
- Bracket type: Fixed-angle and adjustable brackets solve different problems.
- Post method: Surface-mounted posts, fascia-mounted posts, and core structural posts all change the install.
- Included hardware: Check whether screws, anchors, balusters, and brackets are in the box.
- Separate hardware needs: Concrete anchors, post base hardware, lag bolts, and blocking materials may still be needed.
- Finish compatibility: Mixed metals can create corrosion issues if the hardware isn’t compatible.
The hardware point matters more than people think. According to the product-based technical reference from Peak, #10 stainless steel screws used for 2-inch uprights can reduce installation time by 40% compared with traditional methods, and powder-coated aluminum systems meeting ASTM B117 can deliver a 25-year lifespan in corrosive coastal or freeze-thaw environments, but only when paired with the correct compatible hardware to avoid galvanic corrosion, as outlined in Peak’s aluminum railing information.
What a clean install usually looks like
A proper stair railing install follows a sequence. Not every brand is identical, but the rhythm is similar.
Post layout and support
Start with the posts. If the posts move, the finished rail will move. That’s true even when the rail itself feels rigid in your hands.
Check framing below the mount points. Add blocking where required. Confirm that the post base sits flat and square. On stairs, a post that starts slightly out of plumb turns into a visible problem fast because every rail line references it.
Rail cutting and bracket prep
Measure twice isn’t enough on stairs. Measure, mock up, and then cut.
Dry-fit the top and bottom rail lengths before you commit. Make sure your bracket position allows for the rail profile, baluster insert points, and any trim pieces. If you’re cutting aluminum, use the right blade and support the section properly so the cut stays clean.
A rough cut can be hidden on a fence. On a stair rail, your eye finds it every time.
Infill assembly
Some kits ask you to load balusters into the rail before mounting. Others let you fasten the rail frame first and then complete the infill. Follow the intended order.
What doesn’t work is improvising the sequence because it seems faster. That usually leads to scratched finishes, bent balusters, or rails that need to come back down because one connector was missed.
Final fastening
People often over-tighten, under-tighten, or use the wrong screw entirely. Stainless hardware in the right application helps with both corrosion resistance and assembly speed. Cheap substitutions often strip, seize, stain the finish, or react badly with the rail material over time.
If you need a detailed walk-through of the process, this practical guide to railing stairs installation helps fill in the jobsite sequence.
Common mistakes that cost time
These are the errors that show up over and over:
- Buying by appearance only: Matching the deck rail style without checking the stair application.
- Skipping a dry fit: A stair rail almost always benefits from a mock-up before final cuts.
- Using incorrect fasteners: The wrong screw or anchor can compromise both finish and strength.
- Ignoring substrate condition: Rotten stringers, weak blocking, or cracked concrete can ruin a new install.
- Forgetting accessory parts: Post skirts, trim collars, closure pieces, and touch-up items are easy to miss.
What works best for a first project
If this is your first stair rail, choose a system with a clear angle range, a straightforward bracket set, and hardware that’s meant for the material. Keep the design simple. A clean black aluminum assembly with square balusters is easier to execute well than a highly customised mixed-material design.
A professional result comes from discipline more than talent. Lay everything out, respect the sequence, and don’t rush the cuts.
Estimating Costs and Planning for Maintenance
A common oversight is to budget for the kit and forget the rest. That’s how a “reasonable” railing project gets expensive. The true cost includes posts, mounts, anchors, blades, drill bits, touch-up materials, and your time. If you’re replacing an old rail, it may also include repairs to the stair structure underneath.
Material choice changes long-term value more than sticker price alone. Wood often gets chosen because the upfront buy feels manageable and the material is familiar. That can be fine for a sheltered stair or a homeowner who doesn’t mind regular upkeep. But exterior stairs take abuse. Shovels hit them. Salt lands on them. Water sits around fastener penetrations. Maintenance isn’t theoretical.
Where the money actually goes
A simple way to think about cost is to split it into three buckets:
- Initial materials: Rails, balusters, posts, brackets, fasteners, and any trim pieces.
- Installation support: Tools, saw blades, anchors, blocking, shims, and replacement hardware if something goes wrong.
- Lifetime upkeep: Cleaning, refinishing, repainting, part replacement, and occasional tightening or repair.
Wood tends to move more of the spending into the maintenance bucket. Aluminum and composite move more of it into the initial materials bucket.
The practical value question
If you plan to stay in the house, low-maintenance materials often make more sense than the cheapest possible start. You’re buying fewer headaches, not just a railing. That’s especially true on deck stairs, where wear shows up faster than on level sections.
Aluminum usually wins on effort. Wash it, inspect it, and keep an eye on hardware compatibility. Composite stays fairly low maintenance too, though some systems need closer attention to cosmetic wear and assembly details. Wood asks for the most ongoing care by a wide margin.
The cheapest rail to buy often becomes the most expensive rail to own.
Budgeting beyond the staircase
A railing upgrade rarely happens in isolation. Once you replace the stair rail, you may decide the deck skirting, treads, posts, or trim need attention too. That broader renovation mindset is the same reason articles about the cost of renovating a house are useful. Even though that guide looks at home renovation more broadly, the budgeting lesson applies directly here. Small finish projects often expand once adjacent materials are exposed.
The right question isn’t “What’s the cheapest stair railing kit?” It’s “What will still look good, feel solid, and ask the least of me after years of weather and daily use?” For many Canadian homeowners, that answer points to powder-coated aluminum or a well-matched composite system.
Frequently Asked Questions About Stair Railing Kits
Can I retrofit a new kit onto an existing deck stair?
Yes, but older stairs are where easy-looking jobs become technical. The post mounting surface may be weak, the angle may not match current kit ranges, and previous construction may not support the loads your new rail expects.
The retrofit issue is common enough that it shows up repeatedly in buyer questions. One retrofit-focused source notes 40% user dissatisfaction with kits on older stairs, and also states that adjustable kits can underperform in heavy snow while fixed-angle kits require careful matching to existing stair angles in the 37 to 42 degree range to meet the 0.9 kN/m load resistance referenced for codes like the BCBC, according to this discussion of aluminum stair rail retrofit concerns.
If you’re retrofitting, inspect the stair first. Don’t start with the rail. Start with the stringers, tread attachment, post location, and substrate condition. A new kit installed on a weak stair only gives you a nicer-looking problem.
Can I mix and match parts from different brands?
Structurally, I wouldn’t count on it unless you know exactly how those parts interact. Decorative elements are different. Post caps, trim details, and some accent pieces can often be chosen more freely.
The rail frame, brackets, baluster connectors, and mounting hardware should stay within one intended system. That’s the part carrying load and controlling spacing.
Are fixed-angle or adjustable stair kits better?
It depends on the stair. Adjustable kits help when the angle falls within the bracket’s intended range and the existing condition is reasonably regular. They’re useful on stairs that aren’t perfectly predictable.
Fixed-angle kits usually give a cleaner result when your stair matches the kit properly. Less adjustment often means fewer moving parts, less slop, and a more settled final assembly.
On older stairs, “adjustable” doesn’t mean “forgiving of bad geometry.”
What’s the best material for harsh Canadian winters?
For most exterior stairs, powder-coated aluminum is the safest recommendation. It handles weather well, asks less maintenance of the homeowner, and suits both modern and traditional homes depending on the profile you choose.
Composite is also a strong option when you want a fuller visual style and a coordinated deck system. Wood still has aesthetic appeal, but you need to be realistic about upkeep if the stair is exposed.
Do I need a separate handrail from the guard?
Sometimes yes. That depends on the application, the profile of the system, and the code condition involved. A guard assembly and a graspable handrail don’t always mean the same thing in practice.
If there’s any doubt, treat that as a question for your local authority before ordering. It’s easier to add the correct component on paper than after the posts are already set.
If you’re ready to choose parts with fewer surprises, XTREME EDEALS INC. is a practical place to source stair and deck hardware, balusters, post caps, brackets, anchors, fasteners, and finishing details in one order. Their catalogue is especially useful when you’ve already measured properly and want compatible components for a clean, code-aware build.