
You’re probably at the stage where the deck frame is done, the boards are down, and the railing is the part standing between “nearly finished” and “safe, polished, fully usable”. That’s where a lot of DIY projects go sideways. Balusters look simple, but they decide whether the railing feels solid, passes inspection, and still looks good after a few wet seasons.
Wooden balusters for decks remain popular for a reason. They suit older homes, cottages, and newer builds that need warmth instead of a cold manufactured look. They’re also forgiving to work with if you understand layout, wood movement, fastening, and finish. Get those right and wood looks better with age. Get them wrong and you end up with split pickets, uneven spacing, trapped moisture, and a callback job you didn’t want.
Your Guide to Installing Wooden Deck Balusters
A deck railing does three jobs at once. It protects people from a fall, frames the outdoor space, and sets the visual tone of the whole build. You can have perfectly laid decking boards and clean stairs, but if the balusters are crooked or the spacing is off, the entire project looks second-rate.
Wood works because it feels natural beside decking. Square balusters give a restrained, practical look. Turned profiles add more character. Either way, the essential work starts long before the first fastener goes in. You need the right species, the right dimensions, and a layout that respects local code instead of guessing your way through it.
In California especially, generic railing advice often isn’t enough. A projected 2025 California Building Standards Commission update, effective January 2026, mandates enhanced shear resistance for wooden balusters in earthquake-prone areas, and that detail is often missed in broad deck articles. The same source notes that 67% of users on some forums were querying this topic without resolution in discussions around code confusion and seismic anchoring requirements (California baluster update note).
Build it like an inspector and a finish carpenter will both look at it. One cares whether it’s legal. The other cares whether it’s clean, straight, and worth keeping.
That’s the mindset that produces good railing work. Safety and craftsmanship aren’t separate tasks. They’re the same task done properly.
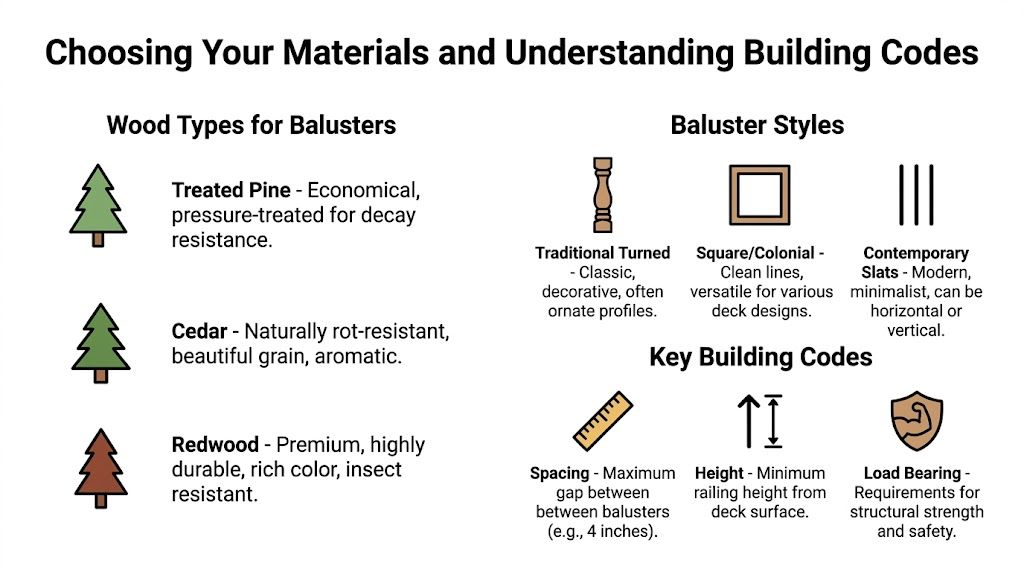
Choosing Your Materials and Understanding Building Codes
A railing can look straight from the yard and still fail in service. I see that happen when builders grab the cheapest 2x2s on the rack, skip the moisture check, and assume code is the same everywhere. On a deck, balusters are finish carpentry exposed to weather and treated as life-safety components by the inspector. Material choice and code layout have to work together from the start.
Wood remains a common railing material because it is easy to cut, easy to repair, and it fits the look of most deck framing. It also moves with moisture, checks at fasteners, and breaks down fast if end grain is left exposed. Those trade-offs matter more in places with hard sun, coastal air, freeze-thaw cycles, or wildfire rules that affect exterior assemblies.
Picking the right species
Pressure-treated pine is usually the practical baseline. It is affordable, available in most lumberyards, and suitable for painted railings or solid-color stain. The catch is moisture content. Fresh treated stock often comes wet enough to shrink and twist after installation, which can turn a clean layout into a wavy railing by the end of the season.
Cedar is easier to work with and usually gives a cleaner finished surface. It weighs less, cuts cleanly, and has better natural decay resistance than untreated softwood. For a stained railing where the wood will stay visible, cedar is often the safer bet.
Redwood still has a place, especially on West Coast projects where the deck is already built around that look. It costs more and can be harder to source consistently, but it holds up well and finishes beautifully when you start with clear, straight stock.
If you are sorting out the full material package, not just the railing, this guide on choosing the best timber for decking helps you compare species in a way that keeps the deck boards, posts, rails, and balusters working as one system.
Profile affects installation more than people expect
Square balusters are the most forgiving. They are easy to cut to identical length, easy to space with a simple jig, and easy to replace later if one splits.
Turned profiles need tighter quality control. Any variation in spacing, plumb, or rail height shows immediately because the eye tracks the decorative shape. Narrow decorative balusters also leave less room for pilot-hole errors and edge blowout. Thick profiles can make the railing look heavy and reduce the visual openness of the deck.
For a first build, square stock usually produces the best result with the fewest surprises.
A practical comparison
| Wood Type | Average Cost | Rot Resistance | Maintenance Level | Best For |
|---|---|---|---|---|
| Pressure-treated pine | Lower cost in most markets | Good when properly treated and sealed | Moderate to high | Painted railings, budget-conscious builds |
| Cedar | Mid-range | Naturally better than untreated softwood | Moderate | Stained railings, visible grain, easier handling |
| Redwood | Premium | Naturally durable | Moderate | High-end traditional decks and matched redwood projects |
The code points that actually matter
The baluster layout starts with the opening limit. The California Residential Code is based on the International Residential Code with state amendments, and guards are generally required to prevent passage of a 4-inch-diameter sphere through the open infill, as shown in the 2022 California code cycle published by the International Code Council and adopted for use beginning January 1, 2023 (California Residential Code publication information). Measure the clear opening, not the on-center spacing. A nominal 2×2 is smaller than 2 inches, and that difference matters.
Guard height is the next check. Many decks fall under a 36-inch minimum, but some jurisdictions and some conditions push that number higher. Stairs can bring in a different set of dimensions, and local amendments can be stricter than the base code. Before you buy balusters, confirm the deck railing height code requirements that apply where the deck is being built.
Regional rules also affect details that generic deck articles skip. In California, code review often goes beyond spacing and height. Fire-resistance requirements in wildland-urban interface zones, corrosion concerns near the coast, and structural demands in seismic regions can all change the right material and fastening approach. That does not always mean a different baluster. It often means different hardware, different coatings, or a different approval path with the local building department.
Good railing work starts on paper with actual code dimensions, actual lumber sizes, and actual site exposure.
What works in the field
Buy the straightest stock in the pile, then reject any pieces with twist, deep checks, or crushed corners. Match the species to the finish plan. Painted systems hide more defects but trap moisture if maintenance is ignored. Clear or semi-transparent finishes look better on cedar or redwood, but they show every milling mark and installation mistake.
The common failure is buying decorative balusters first and trying to force the layout afterward. That is how you get odd end gaps, weak fastening near the edges, and a railing that passes a glance but not an inspection. Start with code, calculate the spacing, then choose the profile that fits the opening cleanly.
Essential Tools and Accurate Measurements
A railing can look square from six feet away and still fail inspection because one gap drifted wide or a fastener split the end grain. I see that more than any dramatic mistake. The fix is not fancy joinery. It is disciplined layout, the right bits, and measurements taken from the actual opening instead of from assumptions.
The 4-inch sphere rule drives most baluster layout, but the reason goes beyond passing inspection. It exists to reduce fall and entrapment risk, and local enforcement can get stricter once regional conditions enter the picture. In California, for example, inspectors may also pay close attention to corrosion resistance near the coast and hardware suitability in wildfire and seismic zones. Measurement and tool choice are tied to code from the start.
Tools that earn their place
A small, well-chosen kit beats a crowded toolbox. For wooden balusters for decks, these are the tools I keep within reach:
- Tape measure and sharp pencil for layout lines you can trust later.
- Combination square or speed square to transfer marks cleanly and keep screw lines consistent.
- Spirit level to confirm plumb during installation, not after the pattern has drifted.
- Mitre saw for repeatable cuts, especially when one section needs a dozen identical pieces.
- Drill and driver so pilot holes and fastening stay separate and the pace stays steady.
- Pilot bits or countersink bits to reduce splitting near baluster ends.
- Clamps to hold rails or jigs where you want them while you mark and fasten.
- Spacing jig made from stable scrap or trimmed composite stock.
- Galvanised or exterior-rated fasteners matched to the lumber treatment and local exposure.
Fasteners deserve more attention than they get. In pressure-treated lumber, the wrong coating can corrode early. In wet or coastal climates, that problem shows up faster, often as black staining first and looseness later. Hardware is part of the safety system.
Measuring the run properly
Measure the clear opening between posts. Do not measure the deck bay and hope the rails will sort themselves out later.
Then lock down these three numbers before cutting:
- Finished rail opening height
- Actual baluster width, measured from the stock in hand, not the label
- Maximum permitted clear gap
That second point matters because nominal sizes lie. A 2×2 baluster is rarely a full 1 1/2 by 1 1/2 inches after milling, and decorative profiles can vary enough to throw off a full section. Check several pieces from the bundle. If the stock is inconsistent, sort it before layout.
For the layout itself, subtract the total width of all balusters from the clear run, then divide the remaining space into equal openings that stay under code. That gives you balanced end gaps and a cleaner pattern. Starting at one end and adjusting as you go usually leaves the last few spaces looking patched together.
If you want a visual method for the math, this guide to banister spindle spacing is useful for laying out repeated infill without ending up with awkward end gaps.
Stair sections need extra care. Measure along the rake of the rail, not the horizontal span. If you use the wrong line, the cut list can look right on paper and still leave uneven spacing once the balusters go in.
Use a jig, not your eye
A jig gives you repeatability. That is what keeps one clean section from turning into three uneven ones.
Make it from straight, dry scrap and mark the target gap on it. If the project includes multiple sections, make two matching jigs. One holds the spacing you just set, and the second helps place the next baluster. That speeds up the work and cuts down on cumulative error.
Practical rule: if you’re measuring every single gap one by one with a tape, you’re making the job slower and less accurate.
Count material with waste in mind
Count each section separately. Straight runs, stairs, short returns, and corners often need different lengths, different top cuts, or a few sacrificial pieces for setup.
Buy enough stock to reject bad pieces without forcing them into the visible run. Wood moves, some pieces arrive with twist or checks, and a few will split during test drilling no matter how careful you are. Planning for waste is part of clean work, not overbuying.
A Step-By-Step Guide to Installing Wooden Balusters
Good installation looks calm and repetitive. The prep is doing the heavy lifting. Once the rail sections are laid out properly, the work becomes a matter of clean cuts, sound fastening, and checking plumb before each piece locks the pattern in place.

A practical benchmark from California-focused installation guidance is this: to pass inspection, use #8 x 2.5-inch galvanised deck screws, pre-drill holes to avoid splitting, and keep the gap under 4 inches. The same source states that 98% of non-compliant DIY installations fail initial inspections, while professional installs achieve a 95% pass rate on re-inspection compared to 62% for DIY when those techniques are followed (inspection-focused baluster installation guidance).
Before fastening the first piece
Dry-fit a section first. Don’t assume cut stock from the saw station will all fit the same once you move to the deck. Rail openings drift, decking crowns, and posts aren’t always perfectly cooperative.
Check these first:
- Rail faces are straight and not introducing a bow.
- Balusters sit flat at top and bottom without rocking.
- End balusters look balanced relative to the posts.
- Fastener locations won’t split the stock at the ends.
Never force a tight baluster into place between rails. If it has to be hammered in, seasonal movement will punish that decision later.
Method one with balusters between rails
This is the cleaner traditional approach. The balusters sit in the space between a bottom rail and a top rail, and each piece is cut to fit the opening.
Step 1
Measure the exact distance between the underside of the top rail and the top of the bottom rail at several points. Use the shortest consistent dimension if there’s any variation, then cut test pieces before committing to the whole batch.
Step 2
Mark your baluster centres or edge lines on both rails. If you’re using a jig, transfer the pattern carefully and double-check that the final end gap still falls within code.
Step 3
Pre-drill the balusters near each end. This matters most with cedar, redwood, and any piece where the grain runs a little wild. Pilots reduce splitting and make screw placement more precise.
Step 4
Set the first baluster, check it for plumb, then fasten it with exterior-rated screws. Move to the opposite end of the section and install the last baluster next. That establishes the visual boundaries. Fill the field after that with your jig.
Method two with balusters face-fixed to rails
This method is often faster and can work well for certain designs, especially where the rail assembly is already in place and access is limited. The balusters attach to the outer face of the top and bottom rails rather than fitting between them.
It’s less forgiving visually. Every piece is exposed in the same plane, so waviness and inconsistent edges show immediately.
Use it when:
- the railing style suits a more applied look,
- you need simpler cutting,
- or the rail design makes between-rail fitting awkward.
Keep reveals consistent. A small layout error repeats across the whole run and becomes obvious from the yard.
Keep checking while you work
Don’t install a full section and inspect it later. Inspect as you go.
Look for:
- Plumb drift after every few pieces
- Gap variation caused by debris, rough edges, or a swelling jig
- Screw pull that twists a light baluster out of line
- Rail movement if the section wasn’t clamped firmly during installation
A short visual pause every few pieces saves a lot of rework. Step back and sight down the section. Your eye catches a wandering line faster than a tape measure sometimes does.
A visual demonstration can help if you want to compare your setup with a live install sequence.
Cutting for stairs and awkward sections
Stair balusters are where many clean deck projects lose their composure. The angle changes the visual rhythm, and each cut must match the rail pitch. Mark from the actual stair rail assembly whenever possible rather than trusting a copied angle from another section.
For short returns or transitions into a post, cut and fit those pieces individually. Don’t try to mass-produce them. Custom spots punish assumptions.
The railing doesn’t need speed. It needs consistency. Fast comes later, after the first section proves the method.
Applying Finishes for Lasting Protection
The railing isn’t finished when the screws are in. It’s only assembled. If the wood stays unprotected, weather starts undoing your work straight away.

Finish does more than improve colour. It slows moisture uptake, reduces surface checking, and protects the spots most likely to fail first, especially cut ends and fastener penetrations. That’s why raw treated wood left exposed often disappoints people. They assume the treatment is enough. It isn’t enough for appearance, and it often isn’t enough for long-term stability.
Choose the finish based on the wood and the look
Penetrating oils are a strong choice when you want the wood grain to remain visible and maintenance to be straightforward. They don’t build a heavy surface film, so touch-ups are usually easier.
Stains add colour control and help unify mixed stock. Paint provides the strongest visual reset, especially on budget lumber, but it also demands the best prep. If the surface isn’t clean, dry, and properly prepared, paint tends to show failure more dramatically than stain.
If you’re going the painted route, this guide on how to prepare wood for painting is worth reviewing before you open a tin. Prep quality usually determines whether the finish looks crisp or tired.
The details that make finish last
Focus on the vulnerable areas first:
- Seal every cut end because fresh cuts expose absorbent fibres.
- Coat bottom ends carefully where splashback and standing moisture are common.
- Brush finish into profiles and corners instead of just wiping broad faces.
- Don’t trap moisture by coating wood that’s still too wet from treatment or weather exposure.
Take your time around the top rail to baluster junctions. Water lingers there. If you rush those intersections, you’re leaving early failure points behind.
A lot of people also forget the surrounding trim details. Post caps matter because they help shed water away from end grain at the top of the post, where repeated wetting can shorten service life. If you’re selecting those details now, these tips on buying post caps for your fence or deck will help you match protection with appearance.
What doesn’t work
Bare wood doesn’t age gracefully in most deck settings. Nor does a rushed single coat applied only to the visible faces after installation. The hidden cuts, the lower ends, and the connection points need attention too. That’s where weather starts winning.
Long-Term Maintenance and Common Repairs
Wooden balusters for decks don’t need constant fuss, but they do need regular observation. Small defects stay small only if you catch them early.

The most important maintenance fact is this: 62% of wood rot failures originate from end-grain moisture wicking, untreated wood in coastal climates can fail in under 5 years, and properly treated and maintained wood can exceed a 25-year service life (wood rot and service life data for balusters).
The annual inspection routine
Walk the railing slowly, with one hand on the top rail and one eye on the joints. You’re looking for movement, not just damage. A baluster can still look decent and already be loose.
Check for:
- Loose balusters that move at the rail connection
- Open cracks near screws or nails
- Softened end grain at the bottom of the piece
- Finish failure where water sits repeatedly
- Staining or discolouration that suggests moisture is hanging around
If you find one failed piece, inspect the pieces beside it. Problems often cluster where water exposure or poor detailing repeats.
Cleaning and touch-ups
Wash off dirt, algae, and surface film before they hold moisture against the wood. Use a mild cleaning approach and a soft brush or pad rather than gouging the surface with aggressive tools. Let everything dry fully before sanding or recoating.
Light sanding helps fresh finish bond better. It also reveals whether a dark patch is only surface staining or the start of decay.
Common repairs that are worth doing
A wobbly baluster usually needs one of three fixes. Tighten or replace the fastener if the wood is still sound. Re-seat the piece if poor initial fit caused movement. Replace the baluster if the screw area has split out and no longer holds.
For minor splits, seal the area after it’s dry and monitor it. For soft end grain, replacement is usually smarter than trying to preserve compromised stock. Rot doesn’t become safer because it’s hidden under stain.
If your screwdriver sinks into the end grain with little resistance, stop thinking cosmetic repair. That piece has moved into replacement territory.
When replacement is the right call
Replace a baluster when it has significant cracking, recurring looseness, visible rot, or movement that returns after refastening. Match the new piece to the existing spacing and finish schedule, then inspect nearby pieces while you’re there. Maintenance is never just about the single part you can see fail.
Frequently Asked Questions About Wooden Balusters
Can I mix wood balusters with metal posts or rails
Yes, if the system is designed to work together structurally and visually. Mixed materials can look sharp, but the fasteners and connectors need to suit both materials and outdoor exposure. The biggest mistake is mixing styles that expand, weather, and age very differently without thinking through the joint details.
Should I install balusters before or after the rail section is mounted
For many straightforward sections, installing them after the main rail frame is set gives you better control over plumb and spacing. For shop-built panel sections, pre-assembly can speed things up if your dimensions are exact. The right choice depends on access, rail design, and whether the opening is perfectly consistent.
Are turned balusters harder to install than square ones
Yes, mostly because any spacing or alignment error shows more clearly. Square balusters hide small visual imperfections better. Turned profiles reward precision, but they also punish rushed layout.
Do I need to pre-drill every piece
Not always every single hole in every species, but pre-drilling is the safer habit, especially near ends and with drier stock. It reduces splitting and helps place fasteners exactly where you intended them.
What’s the most common DIY mistake
Uneven layout. Not because people can’t cut wood, but because they start installing before resolving the spacing pattern from post to post. Once the first few pieces go in wrong, the rest of the section becomes a compromise.
How do I handle a sloped or stair section
Measure and mark from the actual stair angle. Don’t assume the same cut works everywhere. Use one fitted test baluster first, confirm the angle and reveal, then copy from that proven piece.
If you’re gathering hardware, fasteners, post caps, balusters, or other deck accessories, XTREME EDEALS INC. is a practical place to source the pieces that finish the job properly. Their catalogue covers deck and fencing hardware, including balusters, post caps, connectors, screws, bolts, and brackets, which makes it easier to get compatible parts in one order instead of piecing the project together from several suppliers.


Leave a comment
You must be logged in to post a comment.