

You’re probably at the same point most deck owners reach after staring at samples, Pinterest saves, and a half-finished material list. The deck surface is easy to picture. The railing usually isn’t.
That’s where most projects either sharpen up or start looking pieced together. Black railings solve a lot of that indecision. They work with modern builds, older homes, light siding, dark trim, wood decking, composite boards, and open-view backyards. Beyond their versatility, they can look clean without turning into a maintenance chore.
The hard part isn’t deciding whether black looks good. It’s choosing the right system, buying parts that fit together, and installing everything so it feels solid under your hand. That means material choice, post layout, infill style, hardware compatibility, code, and the finishing pieces people forget until the last minute.
Why Black Deck Railings Are the Go-To Choice in 2026
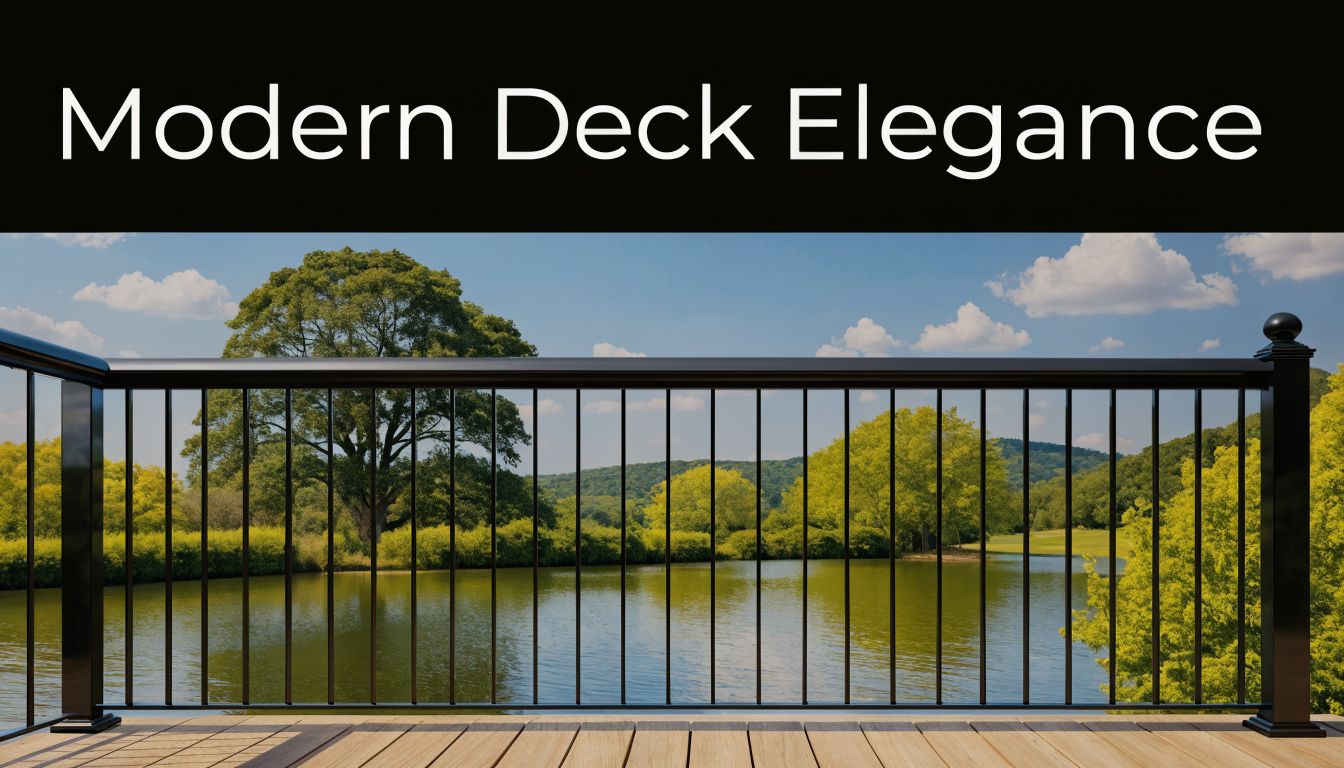
You finish the deck boards, step back, and the space still looks unfinished. That usually happens because the perimeter has no visual structure yet. Black railing fixes that fast. It outlines the deck, sharpens the edges, and lets the boards, landscaping, and view do the talking.
In California, black deck railings have grown quickly with modern exterior trends, and aluminum railing sales, including predominantly black finishes, rose 15 to 20% coast-to-coast according to national railing and decking trend reporting. That same source notes black as the top deck colour choice in a 2026 projection, largely because it pairs so easily with neutral exteriors.
What I like about black is that it does two jobs at once. From the house, it gives the deck a crisp border. From the yard, it visually recedes better than bulky white railing, which is why it works so well around water, trees, ravines, and long suburban sightlines.
If you’re still deciding on the overall look of the outdoor space, these modern outdoor deck designs for 2026 are useful because they show how railing, decking colour, stairs, and furniture need to work as one composition.
Where black works best
Black railing usually looks right in these situations:
- Modern exteriors: Clean lines, large windows, simple trim, broad stairs.
- Farmhouse and transitional homes: Especially with white, taupe, greige, or natural wood tones.
- View-facing decks: Lakes, greenbelts, backyards, ravines, or city edges.
- Mixed-material builds: Composite decking, wood posts, cable infill, or glass panels.
Black railing is one of the few deck choices that can feel current without locking you into a short-lived trend.
The smart way to approach deck railings black isn’t to shop by colour alone. Start with the use case. Do you want low upkeep, the strongest frame, a nearly invisible infill, a traditional baluster layout, or the easiest DIY install? That answer usually tells you what to buy long before brand names enter the conversation.
Choosing Your Black Railing Material
Material drives almost everything. It affects feel, maintenance, hardware, installation method, and whether the railing still looks good after a few seasons of sun, rain, salt, pollen, and foot traffic.
The short answer on materials
If you want the least upkeep, powder-coated aluminum is usually the practical default. If you want a more industrial look or need heavy-duty strength, steel has a place. If you want old-school detailing, wrought iron style systems still appeal, though they ask more from you over time. If you want a softer, more traditional profile, composite can work. If you want the lowest upfront entry and don’t mind repainting, painted wood is still viable.
For open views, black-framed cable or glass systems often sit on aluminum or steel posts rather than standing alone as an all-in-one material category. That distinction matters when you order parts.
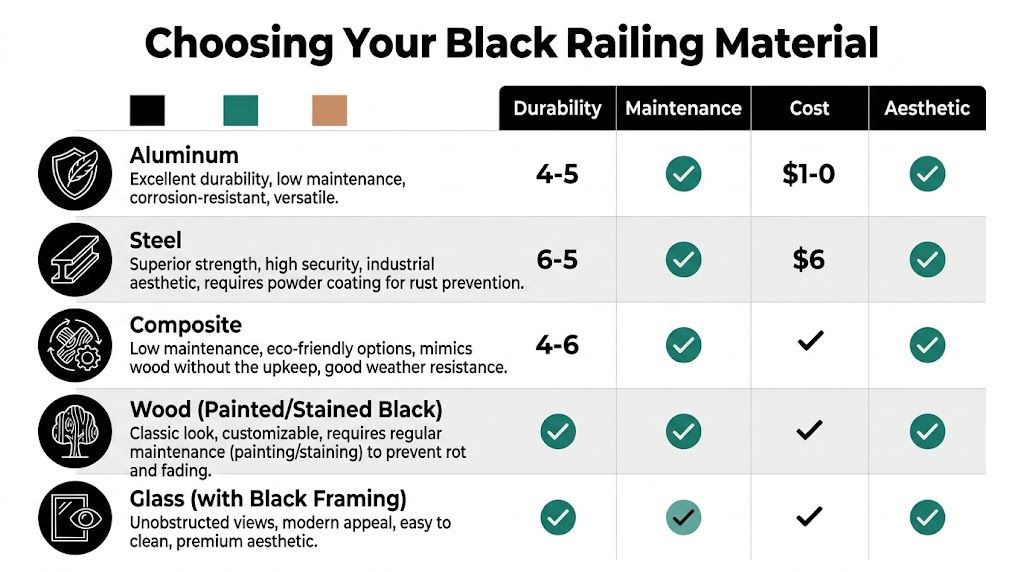
Black deck railing material comparison
| Material | Upfront Cost (per linear ft) | Maintenance Level | Lifespan | Best For |
|---|---|---|---|---|
| Aluminum | Higher than painted wood | Low | Long service life with routine cleaning | DIY builds, low-maintenance decks, coastal and inland exposure |
| Steel | Moderate to high | Moderate | Long if coating stays intact | Security, industrial styling, rigid frames |
| Wrought iron style metal | Moderate to high | Moderate to high | Long with upkeep | Decorative, traditional, custom-looking projects |
| Composite | Moderate | Low to moderate | Good long-term weather resistance | Wood-look projects with less upkeep |
| Painted wood | Lower upfront | High | Depends heavily on maintenance | Budget-sensitive builds, custom carpentry details |
Aluminum
This is the material I’d put at the top of the shortlist for most homeowners. It’s light enough to handle, usually easier to cut and assemble than heavier steel systems, and it doesn’t ask for staining, sealing, or repainting as part of normal ownership.
Black aluminum also fits a wide range of infill styles. You can run classic square balusters, framed glass, or a cable layout depending on the post system you choose. That flexibility matters when you’re trying to keep stairs, landings, and main deck runs visually consistent.
Steel
Steel feels stout. If you grab the top rail and want that dense, rigid feel, steel has an edge. The trade-off is finish protection. Once the coating is compromised, you have to stay ahead of rust.
Steel works well on urban decks, rental properties that need a tougher feel, and projects where the owner likes a sharper industrial look. It’s not always the friendliest material for casual DIY installation because it’s heavier and less forgiving.
Wrought iron style metal
A lot of people say “wrought iron” when they really mean a black decorative metal railing with a traditional profile. That style still suits older homes, porches, and raised decks where ornate details don’t look out of place.
The catch is upkeep. Decorative profiles create more edges and joints where finish wear shows up sooner. If you love the look, it can be worth it. You just need to go in knowing it’s not the low-attention option.
Field note: The more decorative the railing profile, the more places you create for dust, moisture, and visible wear to collect.
Composite
Composite railing fills the gap between metal minimalism and wood tradition. It can give you thicker rails and a more substantial visual frame, which some homes need. On a rustic or suburban build, that added mass can look more natural than a thin metal system.
Composite usually isn’t the first pick if your priority is preserving a view. It’s better when you want the railing to read as part of the architecture, not disappear into the background.
Painted wood
Painted wood black can look excellent for a while. It’s also the option that lures people into underestimating future work. Every exposed cut, end grain, and fastener location becomes part of your maintenance plan.
Wood makes sense if you’re already building custom wood stairs and skirting, if you want site-built flexibility, or if the project budget demands it. Just don’t confuse lower upfront price with lower ownership cost.
Cable and glass within black systems
If you want the cleanest possible sightline, cable and glass deserve their own thought process.
For durability, marine-grade 316 stainless steel cable systems with black powder-coated aluminum posts can exceed 3,000 lbs tensile strength per cable run, and black oxidized coatings showed 40% less visible corrosion than raw stainless in ASTM B117 salt fog testing, according to CityPost product data. That’s why cable systems are so common on view decks and coastal-style projects.
Glass gives you the most uninterrupted visual field, but it also shows fingerprints, pollen, water spotting, and edge grime faster than cable or balusters. Cable hides less dirt than people expect too, especially if tensioning hardware wasn’t planned cleanly from the start.
What works and what doesn’t
A practical way to choose:
- Choose aluminum if you want a straightforward, low-maintenance system that suits most homes.
- Choose steel if strength and a heavier visual feel matter more than easy handling.
- Choose composite if your house needs a fuller railing profile and you don’t want painted wood.
- Choose painted wood if you accept ongoing upkeep and want site-built freedom.
- Choose cable or glass infill if preserving the view ranks above all else.
What usually doesn’t work is mixing a premium infill with bargain structural parts. Cheap posts, weak brackets, and random fasteners can make even expensive black railing look shaky and unfinished.
Budgeting for Your Project The True Cost of Black Railings
The material price is only the first number. It’s rarely the whole budget.
Most black railing projects include posts, top and bottom rails, infill, brackets, post base hardware, structural fasteners, trim pieces, post caps, anchors for masonry if needed, touch-up paint or coating repair products, and sometimes a few tools you don’t already own. Stairs add more complication because angle cuts, brackets, and layout take longer and usually create more waste.
What homeowners forget to include
These items often get missed on the first pass:
- Fasteners and anchors: Lag screws, carriage bolts, washers, wedge anchors, sleeve anchors, and structural screws.
- Post trim and caps: Small cost, but they change the finished look a lot.
- Cutting and drilling supplies: Metal blades, bits, step bits, layout tools, clamps.
- Waste and errors: One wrong cut on a rail kit can force a replacement order.
- Delivery timing: If parts arrive from multiple suppliers at different times, the job can stall.
Upfront cost versus ownership cost
A lot of people compare black aluminum to painted wood and stop at day-one price. That’s not how the project behaves after installation.
A 5-year cost comparison published with an UltraModern rails product resource states that black aluminum railings usually cost more upfront than painted wood, but their near-zero maintenance often makes them more affordable over time, especially in harsh California climates where wood needs regular sealing or repainting to fight rot and fading, as noted in this 5-year cost comparison discussion.
That lines up with what builders see in the field. Wood asks for your time repeatedly. Aluminum asks for cleaning.
A practical budgeting method
Instead of chasing the cheapest linear-foot price, budget in layers:
- Structure first: Posts, rails, anchors, and the code-critical parts.
- Infill next: Balusters, cable, or glass.
- Finishing hardware: Caps, trim, connector covers, touch-up items.
- Tools and contingencies: The stuff that keeps a weekend project from dragging into next month.
Spend the money where failure is expensive to fix. Posts, anchors, and brackets come before decorative upgrades.
If you’re hiring out the install, keep in mind that labour tends to rise when the system needs precise cable tensioning, glass handling, or custom stair transitions. A simpler black baluster system can be less dramatic visually, but it can save time and reduce installation surprises.
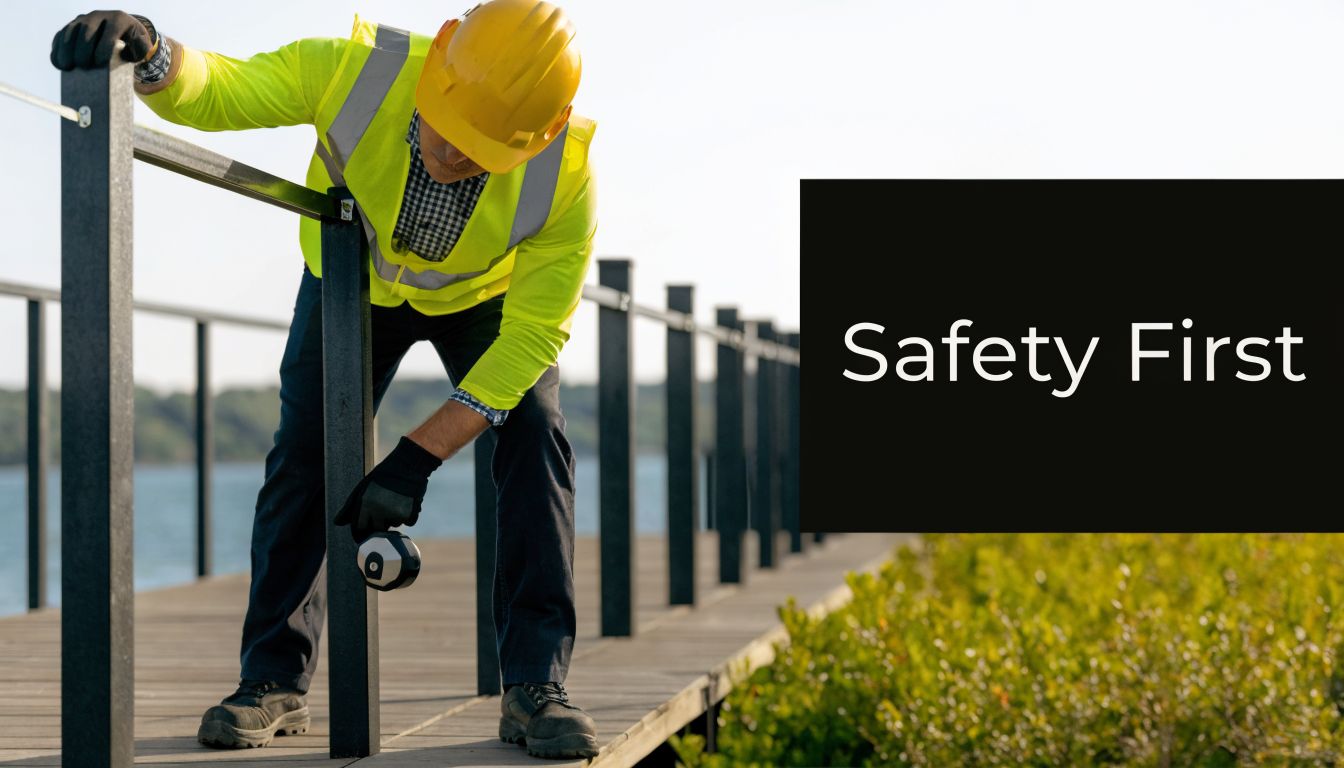
Meeting Safety Codes and Measuring for a Perfect Fit
A good-looking railing that fails inspection isn’t done. Before you choose style, make sure the system can be installed to local code and measured correctly.
In regions like California, decks more than 30 inches above grade need guards with a top rail height of at least 42 inches, baluster spacing must not allow a 4-inch sphere to pass through, and the railing must withstand a 200 lb concentrated load, according to deck railing code guidance. If you need a plain-language overview before ordering, this guide to deck railing height code is worth reviewing.
The code numbers that actually matter
Most homeowners don’t need the entire code book. They need the handful of measurements that affect buying decisions.
- Rail height: Know whether your deck condition calls for a guard and what finished height is required.
- Opening limits: Balusters, cable spacing, and lower gaps all have to satisfy the sphere rule.
- Load resistance: The top rail and post connection need to feel rigid because they’re carrying real force, not just visual weight.
The biggest DIY mistake is ordering a system that looks right in a photo but doesn’t match the required finished height once mounted on your framing or decking build-up.
How to measure without creating ordering problems
Measure the deck in this order:
- Mark every straight run from outside edge to outside edge where railing will sit.
- Identify corners, stairs, and end posts separately. Those aren’t interchangeable pieces.
- Measure the mounting surface, not just the visible edge. Fascia mount and surface mount layouts need different hardware and clearances.
- Check post locations against joists or blocking before buying. A railing post needs structure under it.
- Confirm finished height from walking surface, not from framing below.
Measure the deck twice, then sketch it once. A rough overhead drawing catches more mistakes than a list of disconnected numbers.
Common fit issues
A few problems show up over and over:
- Posts land where there’s no backing. That means adding blocking or changing the layout.
- Stair angles get ignored until late. Then the straight-run kit doesn’t solve the stair section.
- Sleeve dimensions are overlooked. Some post trims and caps only fit true post sizes.
- Cable layouts aren’t planned for end tensioning. Hardware clearance matters.
If you’re using a system with multiple brackets and infill pieces, watch this walkthrough before cutting anything:
A builder’s rule on posts
Posts aren’t decorative. They are the structure of the railing. If a post connection feels questionable before infill goes in, it won’t improve later. Fix it then, not after the top rail is finished and the caps are on.
Design Inspiration Pairing Black Railings with Your Home
Black railing works because it adapts. It can look restrained, rustic, sharp, or almost invisible depending on what you pair it with.
Historical adoption data shows black railings gained traction across styles from coastal Craftsman to urban industrial, and by 2022 black made up 60% of aluminum railing colour selections in some regions. The same source notes that black visually recedes to frame views and hides dirt up to 5 times better than lighter colours, according to this black aluminum railing trend discussion.

For more style directions, this collection of deck railing ideas that will inspire you and your guests helps narrow down what fits your house instead of what only looks good in a showroom.
The modern minimalist
This is the easiest pairing for black railing. Think light composite decking, simple fascia, charcoal-framed doors, and minimal trim changes. Use slim posts and either cable or narrow vertical balusters.
The goal isn’t to make the railing a feature. It’s to make it disappear into the lines of the house. On a deck with a strong view, this approach usually feels the cleanest.
The warm wood contrast
Black and natural wood is one of the most reliable combinations in outdoor design. Cedar tones, pressure-treated wood that has weathered evenly, and mid-tone composite boards all gain definition against black rails.
Black vertical balusters often beat cable. The contrast is strong, but the build still feels grounded rather than ultra-modern.
If the decking has a lot of grain or colour movement, a simple black railing usually calms the whole composition down.
The farmhouse and transitional look
White siding, black window frames, and warm timber accents already create a clear palette. A black railing fits that scheme without needing special treatment. In these homes, slightly thicker top rails and more traditional post spacing often look better than the thinnest modern systems.
Glass can work here, but it often feels too sleek unless the rest of the exterior is equally clean-lined.
The urban industrial build
This style gives you more freedom to lean into heavier steel profiles, cable infill, darker decking, concrete, and exposed hardware. Matte black looks especially good when the home already has black-framed glazing, metal lighting, or dark cladding.
Use restraint with decorative parts. Industrial projects look strongest when the components feel functional.
Choosing the right infill for the look
Different infills change the whole mood:
- Vertical balusters: Familiar, versatile, and usually the simplest to coordinate.
- Cable: Open, modern, and best where the view matters.
- Glass panels: Most transparent visually, but they ask for more cleaning discipline.
- Mixed systems: Black frame with glass on one side, balusters on another, can work if done intentionally.
A common mistake is treating black as the entire design plan. It isn’t. The railing needs to relate to the decking board colour, post size, stair design, skirting, and even the outdoor furniture. When those pieces agree, deck railings black look deliberate instead of trendy.
An Overview of Installation and Long-Term Maintenance
Most railing installations go smoothly when the prep is right. Most frustrating ones fail before the first bracket is attached.
What to know before you start
Lay out every part before cutting. That includes posts, rails, brackets, infill, fasteners, trim, and any transition hardware for stairs or corners. A simple dry-fit on the deck surface can reveal missing parts, mismatched finishes, or left-hand versus right-hand bracket issues before you commit.
Tool-wise, most jobs need a tape, square, drill and driver, level, clamps, appropriate saw blade for metal or composite components, wrenches, safety gear, and a way to keep posts plumb while fastening. If you’re working with cable, add whatever tensioning and cut-end tools the system requires.
The sequence that keeps installs clean
The order matters more than people think.
- Set and secure posts first: Don’t assume rail sections will pull crooked posts into line.
- Confirm heights before cutting rails: One bad cut can waste an expensive section.
- Install top and bottom rail framing next: Get the skeleton right before adding infill.
- Add infill carefully: Balusters, cable, or glass all punish rushed spacing.
- Finish with trim and caps: Leave the cosmetic pieces until structural work is done.
Where DIY installs go sideways
Problems usually come from impatience, not complexity. Posts are slightly out of plumb, rail cuts are taken from the wrong face, hardware gets overtightened, or spacing is checked at one end only.
Cable systems add another layer. They look simple when finished, but tensioning needs to stay consistent across the whole run. Glass systems create a different issue. Every small alignment error becomes visible immediately.
Clean installation is mostly layout discipline. The visible result comes from the invisible prep.
Long-term care
Black powder-coated systems are usually easy to live with. Regular washing with soap and water handles most routine dirt. That’s especially useful on decks exposed to pollen, road dust, or coastal residue.
For broader upkeep habits, this collection of practical articles on deck maintenance is useful because it covers the surrounding cleaning and care habits that affect the whole outdoor space, not just the rail.
For minor scuffs, use the manufacturer’s touch-up method if one is available. Don’t improvise with whatever black paint is in the garage unless you’re prepared for a sheen mismatch. On painted wood, expect more frequent maintenance at joints, end grain, and high-touch areas like gates and stair rails.
Finding Your Railing System and Accessories at XTREME EDEALS INC
Once you know your material, infill style, post size, and mounting method, buying gets simpler. At that point you’re not browsing. You’re matching components.
The practical shopping list usually starts with structural pieces and ends with finishing parts. Posts and rails determine the system. After that come the accessories that make the railing feel complete instead of improvised.
The parts that matter most
Look for compatibility in these categories:
- Post caps: Decorative and protective. They finish the top of the post and need to match actual post size, not nominal size on a rough sketch.
- Balusters and infill components: These set the look and spacing pattern.
- Base brackets and connectors: Critical where posts meet framing or masonry.
- Fasteners and anchors: You need the right bolts, washers, screws, and anchors for the substrate.
- Trim pieces and hardware covers: Small parts, big visual payoff.
Product fit matters more than brand stacking
A lot of railing headaches come from mixing beautiful components that were never meant to work together. A post cap might fit a true 3×3 metal post but not a surfaced wood post. A baluster connector might conflict with rail profile depth. A base bracket might need more clearance than the fascia detail allows.
That’s why it helps to buy with a parts list built from your sketch, not from isolated product pages. If your build uses 2×2, 4×4, or true 6×6 posts, verify each accessory against the actual dimension before ordering.
For buyers sourcing parts in one place, deck rail kits in Canada can help narrow the starting point, especially if you’re trying to pair rail components with hardware and finishing accessories in the same order. XTREME EDEALS INC also carries relevant categories such as Nuvo Iron post caps, including black options like the 3-inch by 3-inch ball post cap for metal and wood posts, along with balusters, brackets, and fasteners that fit deck and fence projects.
A sensible buying order
Buy in this sequence:
- Core railing system
- Mounting and structural hardware
- Infill and layout-specific parts
- Caps, trims, and decorative finish pieces
- Extra fasteners and one spare of any small critical part
That approach reduces mid-project delays. It also lowers the chance of ending up with a polished post cap and no correct bracket to hold the rail below it.
Frequently Asked Questions About Black Deck Railings
Do black railings get too hot in the sun
They can get warm, especially dark metal in direct summer sun. In normal deck use, that’s usually more noticeable on top rails than on balusters. Material choice affects this. Some profiles and finishes feel hotter than others. If heat is a concern, test a sample in the actual exposure your deck gets.
Can I install black railings on a concrete patio
Yes, if the system is designed for that mounting method and the anchors suit concrete. The key question is whether you need a guard for safety or you’re adding a low decorative perimeter. Surface condition, slope, and anchor edge distance all matter.
Is it possible to paint my existing railing black
Sometimes, but it depends on what the railing is made of and how well the current finish is bonded. Painting old wood or metal black can work as a refresh, but it won’t turn a worn-out railing into a low-maintenance system. If the structure is loose, undersized, or deteriorated, replacement makes more sense.
What’s the easiest black railing style for a capable DIYer
Usually a straightforward aluminum system with vertical balusters. It tends to involve fewer special adjustments than cable or glass and gives a clean result without demanding as much tuning during installation.
Do black railings make a small deck look smaller
Not usually. In many cases they do the opposite because black recedes visually. Bulky rail profiles can make a small deck feel tighter, but slim black posts and clean infill often keep the space feeling open.
If you’ve got the deck measured and know your style direction, XTREME EDEALS INC. is a practical place to start matching the small but important parts that make a black railing system come together, from post caps and balusters to brackets, anchors, and fasteners.


Leave a comment
You must be logged in to post a comment.