

A self-closing gate hinge is far more than a simple convenience—it’s a fundamental piece of hardware for safety, security, and your own peace of mind. These hinges are designed to automatically swing a gate shut behind you, making sure an entryway is never left open by accident. For properties with pools, yards with pets, or any area needing controlled access, a reliable self-closing gate hinge isn't just a good idea; it's essential.
Why a Self-Closing Hinge Is a Must-Have
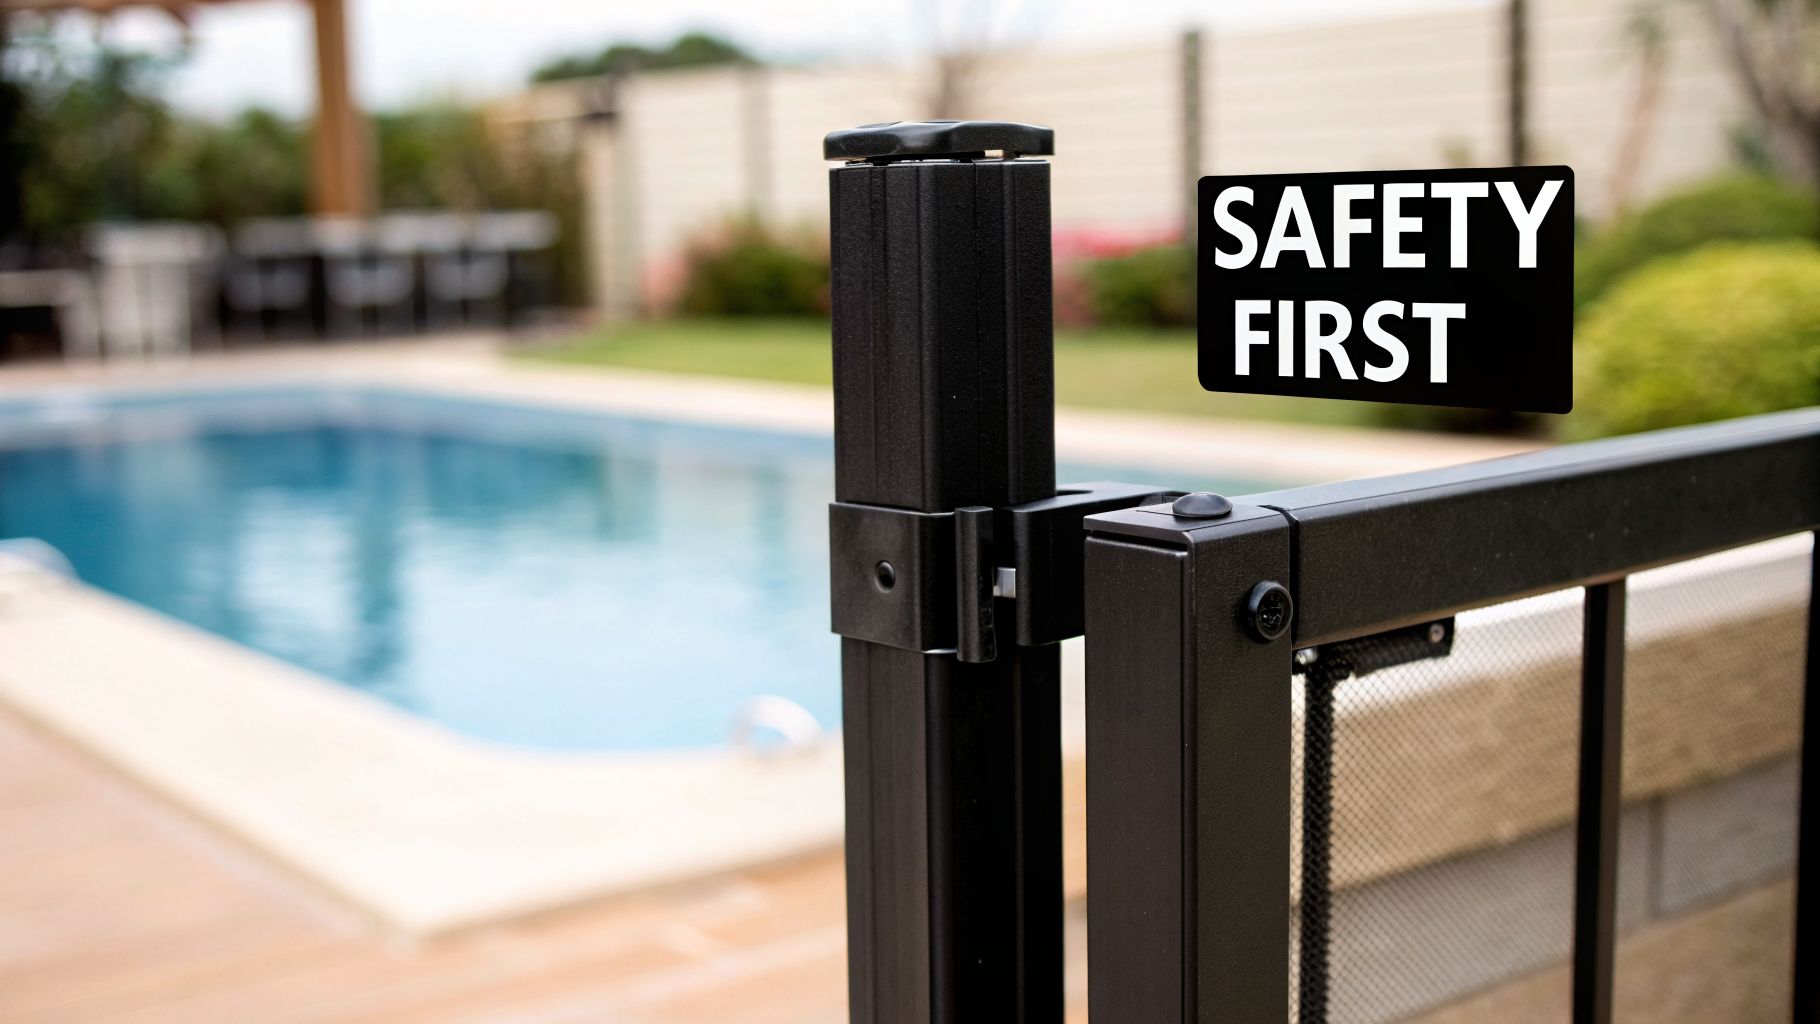
It’s easy to overlook a hinge as a minor detail, but a quality self-closing model is a critical investment. Whether it’s stopping a toddler from wandering towards the pool or keeping an escape-artist dog safely in the backyard, its function is vital. This is exactly why many local building codes now mandate them for pool enclosures and other specific applications.
This focus on safety is reshaping the Canadian housing market. In 2023, out of more than 250,000 new single-family homes built, an impressive 68% included enhanced gate hardware like self-closing hinges to comply with updated building codes. This demand is a driving force in the North American door hinges market.
Durability in Harsh Climates
For anyone living in Canada, a hinge's ability to stand up to our weather is non-negotiable. We’ve all seen the frustration of rust and mechanical failure after just one tough winter. That’s why choosing hardware built for real-world durability is so critical.
Here at XTREME EDEALS INC., we only stand by products designed to last. Brands like Nuvo Iron and Decorex craft their hinges from tough, robust materials that fight off corrosion and keep working through those brutal freeze-thaw cycles. Investing in a proven product means your gate will operate smoothly for years, not just a single season.
A Critical Part of Child Safety
For families with young children, a self-closing gate hinge is an absolute necessity. It ensures the gate closes and latches on its own, every time. This simple mechanism provides a constant, reliable barrier to hazardous areas like pools or busy streets. For more tips on making your entire property safer, a great resource is A Room By Room Guide On How To Childproof Your Home.
The ultimate benefit is peace of mind. Knowing your gate will close securely every single time, without fail, removes that constant worry of it being left ajar by a visitor, a child, or even a strong gust of wind.
How to Select the Perfect Self Closing Hinge
Picking the right self-closing gate hinge isn't just a minor detail—it's what makes the difference between a gate that works flawlessly for years and one that sags, slams, or just stops latching after one tough season. Get this choice right, and you've got a reliable, safe entrance. The good news is that finding the perfect hinge really comes down to understanding your gate and your environment.
First, you need to think about the closing mechanism. This is the engine of the hinge, and you'll generally find two types on the market: spring-loaded and hydraulic.
- Spring-loaded hinges are the workhorses. They use a powerful coiled spring to pull the gate shut. They’re reliable, strong, and generally more budget-friendly, which makes them a go-to for most projects.
- Hydraulic hinges are the more refined option. They use fluid pressure for a whisper-quiet, smooth close. If you want a controlled, soft-close action without any chance of slamming, this is your pick.
While hydraulic hinges offer a touch of luxury, a well-made spring-loaded hinge, like our Nuvo Iron models, packs more than enough power and durability for the vast majority of residential gates.
Matching Material to Your Needs
The hinge material is just as crucial as the mechanism inside it, especially here in Canada. Your hardware is going to be up against snow, ice, and relentless rain, so this is no place to cut corners. The material dictates how well your hinge will resist rust and stand up to daily use.
Here at XTREME EDEALS INC., we see what works and what doesn't. Stainless steel is the top-tier choice for a reason. It offers unmatched strength and the best defence against corrosion, making it perfect for heavy gates or for properties near saltwater. For a solid balance of performance and price, galvanized steel is a fantastic all-rounder, offering good rust prevention for most situations.
We're also seeing a lot of polymer hinges, and for good reason. These aren't just plastic; they are engineered from high-strength materials that are totally rust-proof. Our popular Nuvo Iron Polymer Gate Hinges are an excellent, low-maintenance choice for lighter vinyl or aluminum gates, especially around pools.
The Most Critical Factor Gate Weight and Size
Honestly, no decision matters more than matching the hinge to your gate’s weight and size. If you install an under-specced hinge, it’s not a matter of if it will fail, but when. It will wear out fast, causing the gate to sag, bind, and eventually stop closing properly. Always check the manufacturer's weight rating and take it seriously.
To figure out your gate's weight, a bathroom scale is your best friend. Just put a piece of wood on the scale to protect it, then rest the unhinged end of the gate on the wood. Take the number on the scale and double it. You'll have a surprisingly accurate measurement of your gate's total weight.
Think about it this way: a light aluminum pool gate might only be 20 kg (around 44 lbs), easily handled by a set of polymer hinges. But a big, 2-metre-wide cedar privacy gate could easily push past 70 kg (over 150 lbs). For a beast like that, you'd absolutely need a set of heavy-duty stainless steel hinges built to carry that load. For more insight on the kinds of fasteners and fittings that complete these jobs, it's worth seeing what options are available.
Self Closing Hinge Material Comparison
To make the decision a bit easier, let's lay out the common materials and see where each one really performs best. This quick comparison should help you match your gate's needs to the right hardware.
| Material | Best For | Pros | Cons |
|---|---|---|---|
| Stainless Steel | Heavy wood or metal gates; harsh or coastal climates. | Maximum strength and corrosion resistance; long lifespan. | Higher initial cost. |
| Galvanized Steel | Mid-weight wood or steel gates; general purpose use. | Good strength and rust resistance; cost-effective. | Can eventually rust if the coating is compromised. |
| Polymer | Lightweight vinyl or aluminum gates, especially pool gates. | Completely rust-proof; UV resistant; low maintenance. | Lower weight capacity compared to metal. |
Let's put this into a real-world scenario. Imagine a contractor installing a decorative iron gate that weighs 45 kg (100 lbs) for a client's front walkway. Polymer is immediately out because of the weight. The choice is between galvanized and stainless steel. Given that this is a highly visible feature and the client wants long-term performance without worrying about rust, a Nuvo Iron Stainless Steel Self Closing Gate Hinge is the smarter investment. It’s all about picking the right tool for the job to ensure it looks great and works right for years to come.
Step-by-Step Installation
Alright, you've picked out the perfect set of self-closing hinges. Now comes the part that really matters: the installation. This is where a good plan and a little bit of patience will separate a smooth, reliable gate from a constant headache.
Let's walk through how to get a professional result without the frustration. Proper prep is half the battle, and it all starts with getting your tools in order.
Gearing Up: The Tools You'll Need
Before you touch a single screw, do yourself a favour and lay out your tools. It makes the whole process go smoother when you’re not hunting for something mid-job.
- Drill with the Right Bits: For pilot holes and driving screws. Make sure your bits are sharp and match your fasteners to avoid stripping screw heads.
- Measuring Tape: Your best friend for accurate placement. No shortcuts here.
- Level: A 2-foot or 4-foot level is non-negotiable. This is how you'll make sure the gate and hinges are perfectly plumb and level, preventing future sagging and binding.
- Pencil or Marker: For crisp, clear marks on your post and gate.
- Screwdriver: A manual screwdriver is perfect for that final turn, giving you the control to tighten screws securely without overdoing it.
- Shims or Wood Blocks: Invaluable for propping the gate up to the perfect height and getting the gap just right while you work.
And don't forget the fasteners. Stick with the screws that came with your hinges—they're rated for the hinge's specific load. If you're mounting to a surface like concrete or brick, you'll need the right anchors for the job. For those trickier installations, XTREME EDEALS INC. carries a wide selection of specialty fasteners. If you're dealing with concrete, our guide on using wedge anchors in concrete is a great resource to check out.
Prepping The Gate And Post
With your tools ready, take a look at your gate and post. The mounting surfaces need to be clean, dry, and free of any gunk. A stray bit of dirt or an old paint flake can throw off the hinge alignment and cause problems down the road.
Now, grab your level and check the post. Is it perfectly plumb (straight up and down)? A post that’s even slightly off-kilter will sabotage your gate’s alignment and make a clean close nearly impossible. If it’s not plumb, you have to fix that first. The same goes for the gate itself—make sure it's square and solid. A warped gate puts a ton of stress on your hinges, no matter how good they are.
This quick visual sums up the thinking that got you to this point—matching your gate's specs to the right hardware.
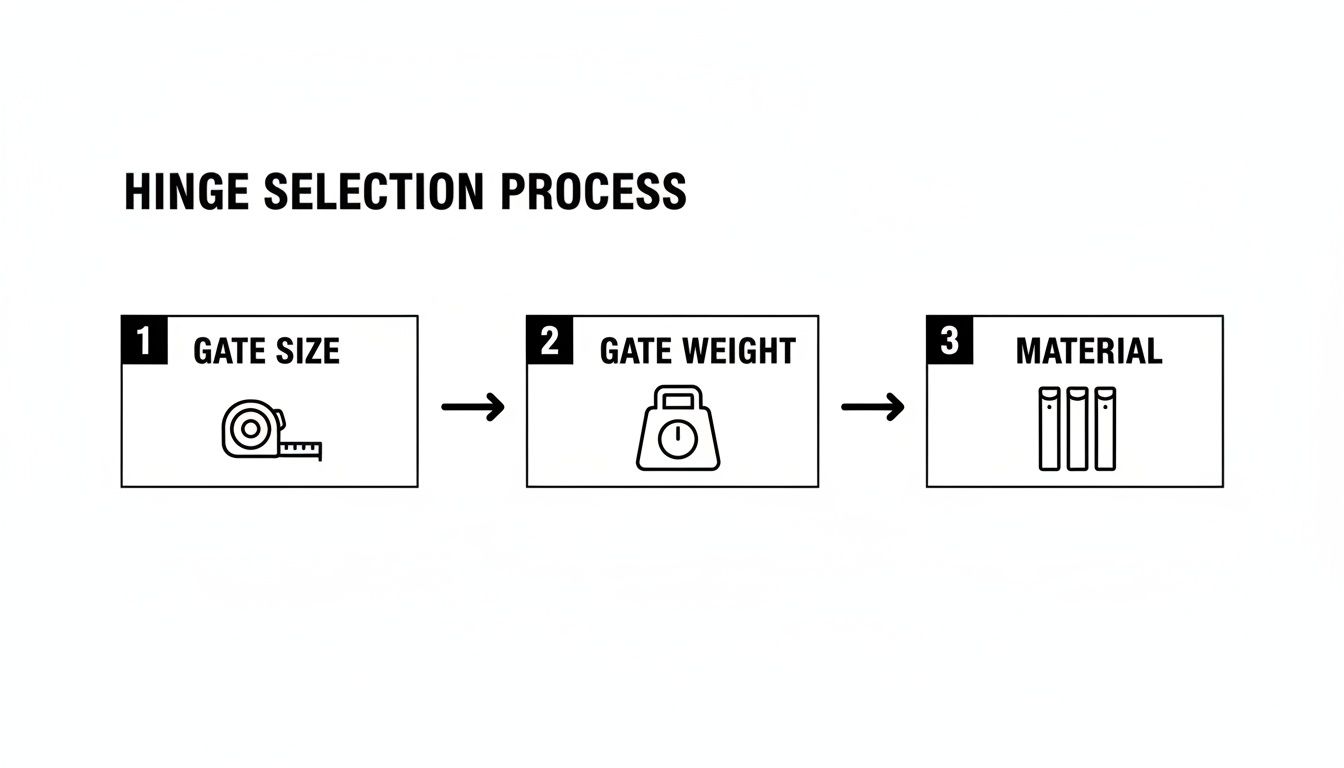
Getting this right ensures the hardware you're about to install can actually handle the job you're asking it to do.
Marking For A Perfect Hang
This is where precision pays off. Bad measurements are the number one cause of a crooked, poorly functioning gate. Your goal is to create the perfect gap between the gate and the post so it can swing without scraping. Always check the hinge manufacturer’s instructions for their recommended gap measurement.
Use your shims and wood blocks to prop the gate into its final position next to the post. Nudge the shims around until the gate is level and you have the right gap on both the hinge and latch sides. Once you're happy with the position, you're ready to mark. A solid rule of thumb is to place your hinges about 15-20 cm (6-8 inches) from the top and bottom of the gate.
Hold the top hinge tight against both the gate and the post, making sure it's sitting flush. Mark your screw holes with the pencil, then repeat the process for the bottom hinge.
Pro Tip: The gap between the post and the gate is the most critical measurement you'll make. Too tight, and the gate will bind. Too loose, and your latch won't catch properly. Trust the manufacturer's specs—they've done the testing for you.
Attaching The Hinges The Right Way
Now it's time to bring it all together. The biggest mistake people make here is driving all the screws in and tightening them down immediately. A more methodical approach will save you a lot of grief.
First, drill small pilot holes on all your marks. This is a crucial step, especially in wood or vinyl, because it keeps the material from splitting when you drive in the screws.
Next, attach the hinges to the gate itself. Drive the screws until they're snug, but don’t crank them down just yet. You want a little bit of play for final adjustments.
Now, with your shims still holding the gate in place, line up the hinge plates with your marks on the post. Drive in just one screw per hinge to hold the gate up. Take a step back. Is the gap even from top to bottom? Is the gate level?
If it all looks good, go ahead and drive in the rest of the screws, tightening them all down securely. Give the gate a few test swings. It should move freely with zero resistance. If you feel any binding, loosen the screws slightly, make your adjustment, and tighten them back up. This careful process ensures your self-closing hinges will work perfectly for years to come.
Fine-Tuning Your Hinge for Flawless Operation
Getting your gate hung is a big win, but don't pack up your tools just yet. A proper installation is only half the battle; the real magic of a self-closing gate hinge happens in the final adjustments. This is where you transform a simple swinging gate into a safe, reliable barrier that behaves exactly the way you want it to.
Think of it this way: proper adjustment dictates the closing speed and the latching force. It’s the difference between a gate that slams shut with a bone-jarring crash and one that’s too timid to even latch properly. Get this right, and you’ve got a system that works perfectly every single time.
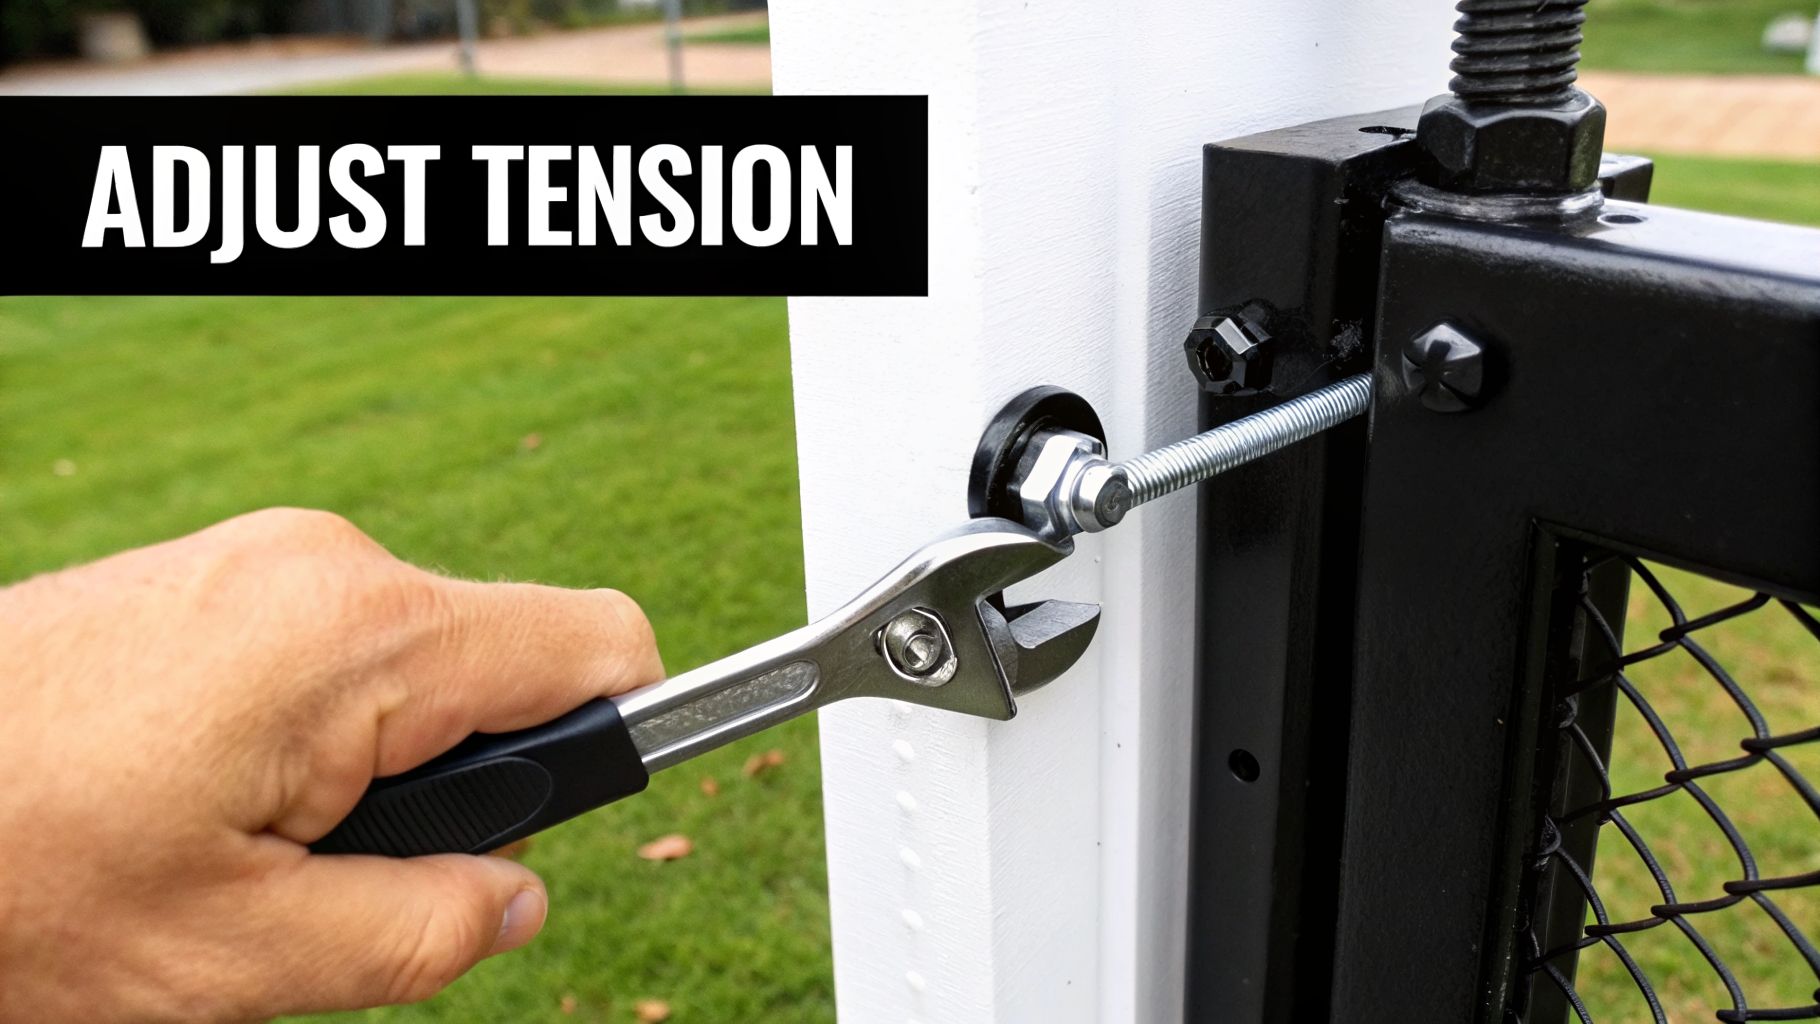
Adjusting Tension for the Perfect Close
At the heart of any self-closing hinge is the internal spring mechanism. This is where the power to close the gate comes from. Most spring-loaded models, like the high-quality options from Nuvo Iron you can find at XTREME EDEALS INC., will come with a simple tensioning tool—usually a small pin or a special hex key.
Your goal here is to find that sweet spot. You need enough power to close the gate and engage the latch without a second thought, but not so much that it sounds like you’re testing a battering ram. A gate that slams is more than just an annoyance; it causes premature wear on your latch, the post, and even the hinge itself.
The perfect close is swift but controlled. A well-adjusted gate should swing shut at a deliberate pace and click securely into the latch without bouncing back. For a standard residential gate, a closing time of 3-5 seconds from fully open is a great target.
Always start with the lowest tension setting. Insert the adjustment tool into the designated slot on the hinge barrel and turn it to increase the tension one notch at a time. After every single click, open the gate and let it go. Do this a few times from different positions. This lets you feel the change in speed and force, helping you zero in on that perfect setting for your gate's specific weight and size.
Troubleshooting Common Hinge Headaches
Even with the best installation, things can sometimes go a little sideways. Don't sweat it. Most of the common hiccups are simple to diagnose and fix. Knowing what to look for will get your gate back in working order fast.
Gate Closes Too Slowly or Doesn't Latch: This is the number one problem I see, and it’s almost always about tension. The hinge just doesn't have enough muscle. Crank the tension up one click at a time until the gate closes with authority.
Gate Slams Shut: You’ve got the opposite problem—too much tension. The spring is overpowering the gate. Just back the tension off, one notch at a time, until you get that firm, controlled close.
Gate Squeaks or Grinds: A bit of noise often just means it's time for some lubrication, especially after a long, wet season. But it can also be a red flag for binding caused by misalignment. Double-check that your gate is still hanging perfectly straight.
Gate Sags or Drags on the Ground: This one's more serious. It might be loose fasteners, but it often points to hinges that are too small for the job. An undersized self-closing gate hinge will wear out fast and let the gate droop. If tightening all the screws doesn’t help, you probably need to upgrade to a heavier-duty set of hinges, like our Nuvo Iron Heavy Duty models.
Diagnosing Deeper Problems
What if you've fiddled with the tension and it's still not right? Time to play detective and look at the alignment.
Take a hard look at the gap between the gate and the latch post. Has it shifted? Gates and posts can settle over time, throwing the latch mechanism out of whack. While you're there, check the hinges. Are all the screws still rock solid? The constant movement of a gate, especially a heavy one, can work fasteners loose.
Here’s a quick diagnostic checklist I run through:
- Check Tension First: Is it too weak or too strong? Adjust and test again.
- Inspect Latch Alignment: Does the latch bolt hit the strike plate dead-on? If not, you may need to adjust the latch's position slightly.
- Confirm Hinge Tightness: Grab the bottom of the gate and try to lift it. Any wiggle or vertical play means loose screws. Tighten every fastener on both the gate and the post.
- Re-check for Plumb and Level: Pull out your level again. Check the gate and the post. If either has shifted out of position, it will never close cleanly.
Working through these steps systematically will help you pinpoint and fix just about any issue. It’s this commitment to practical, hands-on knowledge that we believe in at XTREME EDEALS INC.—we’re here to provide not just the parts, but the expertise to get the job done right.
Long-Term Hinge Maintenance and Safety Checks
Once your self closing gate hinge is installed and adjusted, the job isn't quite finished. A little bit of ongoing care is the best way to protect your hardware and make sure your gate works as a reliable safety feature for years to come. Think of it as a quick, seasonal checkup for one of the hardest-working parts of your fence.
With just a few minutes of attention each season, you can head off problems like rust, wear, and unexpected failures. This is especially important for keeping the high-quality gate hardware we offer at XTREME EDEALS INC in top shape.
A Simple Seasonal Checklist
Running through a quick inspection is the easiest way to catch small issues before they turn into bigger headaches. I recommend doing this a few times a year, and it's absolutely critical after a harsh Canadian winter has had its way with your hardware.
- Visual Inspection: Get up close and really look at the hinges. You're searching for any hints of rust on steel, cracks in a polymer body, or any other visible damage.
- Check the Fasteners: Gate movement can vibrate screws loose over time. Give each one a quick check with a screwdriver to make sure everything is still snug and secure.
- Gate Alignment: Swing the gate open and closed a few times. Does it move smoothly? It shouldn't drag on the ground or scrape against the latch post.
- Latch and Close: Now, let the gate close by itself. A properly adjusted hinge should guide the gate to a secure latch without slamming shut or bouncing back open.
A well-maintained gate is a safe gate. This entire routine takes less than five minutes but can add years to the life of your hardware, making sure it does its job: providing security and peace of mind.
Cleaning and Protecting Your Hinges
How you clean your hinges really comes down to what they're made of. Using the wrong cleaner can strip a finish or even speed up corrosion, so it pays to get it right.
For Stainless Steel & Galvanized Steel:
All you need is a bit of mild soap and warm water. Grab a soft cloth and gently wipe away any dirt, grime, or—especially after winter—salt residue. Rinse it off with clean water and dry it completely to avoid water spots or rust.
For Powder-Coated Finishes:
These coatings, found on products like our Nuvo Iron Aluminum Hinges, are designed to be tough, but harsh chemicals are their kryptonite. Stick to a pH-neutral soap and water. Never reach for abrasive cleaners, scouring pads, or solvents, as they can easily scratch or strip that protective layer right off.
For Polymer Hinges:
Polymer is about as low-maintenance as it gets. In most cases, a simple wipe with a damp cloth is all it takes to keep these hinges looking and working great.
The Importance of Proper Lubrication
After a long season of snow, ice, and road salt, lubrication isn't just a good idea—it's essential. This one simple step is what keeps the internal spring mechanism moving quietly and without any friction.
When you're picking a lubricant, steer clear of heavy greases or general-purpose oils like WD-40. They tend to attract dirt and can gum up the internal parts over time.
Your best bet is a silicone-based spray lubricant. It does an excellent job of repelling moisture without leaving behind a sticky mess that collects dust and debris. Just a quick spray directly into the hinge’s adjustment slots or onto any visible moving parts will do. Swing the gate back and forth a few times to work the lubricant deep into the mechanism. You'll probably feel the difference right away in how smoothly the gate operates.
Common Questions About Self Closing Gate Hinges
Even the most straightforward project can leave you with a few lingering questions. After years of supplying fence and deck hardware, we’ve pretty much heard them all. Here, we're tackling the most common things people ask about the self closing gate hinge, with clear answers to get you past any hurdles.
Think of this as your go-to reference for those "what if" moments. We’ve picked out the questions that pop up time and again, covering everything from material choices to why a gate just won't close right.
Can I Use a Self Closing Hinge on Any Type of Gate?
The short answer is yes, but there's a huge "if" attached: the hinge absolutely must be rated for your gate’s material and weight. It's a non-negotiable. Trying to hang a heavy cedar privacy gate with a lightweight polymer hinge designed for vinyl is just asking for trouble.
For instance, a standard vinyl gate might only weigh about 20 kg (44 lbs), making it a perfect match for our Nuvo Iron Polymer Gate Hinges. But a solid wood or ornamental iron gate? Those can easily top 70 kg (150 lbs). For that kind of load, you have to step up to heavy-duty steel or stainless steel hinges built to handle the stress. Always, always check the weight capacity before you buy.
How Many Hinges Do I Actually Need?
For most residential gates—anything under 1.8 metres (6 feet) high and within a standard weight range—two hinges will do the job perfectly. You’ll place one near the top and one near the bottom, which gives you a stable and consistent closing action.
But when you're dealing with a taller or heavier gate, adding a third hinge in the centre is a very smart move. This extra support distributes the load more evenly, which helps prevent the gate from sagging or twisting over time. It also takes a lot of stress off the other two hinges. A good rule of thumb is if your gate is over 1.8 metres tall or is getting close to the weight limit of a two-hinge set, just add the third.
Always defer to the manufacturer’s recommendations. Some heavy-duty hinge systems are specifically designed as sets of three for gates that exceed certain weights, like 120 kg or more.
Why Won't My New Hinge Close the Gate All the Way?
This is, without a doubt, the number one problem people run into. The good news is that 90% of the time, the fix is incredibly simple: the spring tension is just too low. The internal spring simply doesn’t have enough oomph to overcome the gate's weight and click it into the latch.
Grab the adjustment tool that came with your hinges and increase the tension one notch at a time. After each little adjustment, give the gate a swing and see how it closes. You’re aiming for a close that's firm and confident, making sure the latch engages securely every single time.
If you’ve cranked up the tension and it’s still not working, take a step back and check your gate’s alignment. If it isn’t hanging perfectly plumb and level, that friction alone can be enough to stop it from closing properly.
For any project, having the right hardware is the key to a job well done. At XTREME EDEALS INC., we stock a wide selection of high-quality, durable self-closing gate hinges and accessories from trusted brands like Nuvo Iron to ensure your gate is safe, secure, and built to last.
Explore our full range of gate hardware at https://www.xtremeedeals.ca.


Leave a comment
You must be logged in to post a comment.