
You’re usually looking at a sign post u channel when a flimsy round pipe or light stake has already failed, or when you know the sign needs to stay put through wind, freeze, vibration, and everyday abuse. That’s the point where the post stops being a minor accessory and becomes the foundation of the whole job.
A good installation isn’t just a steel post in the ground. It’s the post, the right length, the right finish, the right bolts and washers, the right anchor method for the surface, and the finishing details that keep the system working years later. Miss one of those pieces and the sign may still go up, but it won’t hold up.
Why U-Channel Posts Are the Professional Standard
A sign that has to stay straight through wind, snow, vibration, and routine knocks needs a support system that resists twist, carries load properly, and gives you fixed mounting points. That is why U-channel posts keep showing up on professional installs.
The advantage is not just the post profile. It is the whole system around it. A U-channel post accepts standard hardware, works with established anchor methods, and makes it easier to finish the job with the right cap, washers, and corrosion-resistant fasteners instead of piecing together pipe, straps, and leftover bolts from the truck. That saves time during installation and avoids the loose, rattling fit that shows up later.
Where U-channel earns its place
U-channel performs well on driveway signs, parking and traffic signs, fence-line notices, jobsite markers, and property identification. These are not delicate installations. They deal with wind load, mower impact, wet soil, freeze-thaw movement, and the occasional person grabbing the sign as a handhold.
In the field, the appeal is consistency. You can stock standard posts, matching bolts, nuts, washers, anchors, and caps, then build a repeatable install process across one property or an entire site. That matters to contractors managing multiple signs, and it matters to DIYers who do not want to discover halfway through the job that the post, hardware, and base method do not work together.
A proper U-channel setup also reduces field modification. Regular mounting holes mean faster sign alignment and cleaner fastening. The installer spends less time drilling steel on site and more time setting the post plumb, choosing the correct embedment or anchor approach, and protecting exposed hardware from corrosion.
Why professionals keep specifying it
Professionals stick with U-channel because it is predictable. The post is made for sign mounting, the hardware is easy to source, and the finished assembly can be serviced later without fighting custom brackets or improvised attachments.
Failures usually come from system mistakes, not from the basic post design. A good post still performs poorly if it is too short for the sign area, set too shallow, paired with mixed fasteners, or left open at the top to collect water and debris. Those details decide whether the sign still looks right in a few years or needs to be reset.
If the sign matters, treat the post, anchors, fasteners, and finishing pieces as one assembly. That is the standard professionals follow, and it is usually the difference between a quick install and a durable one.
Understanding the U-Channel Sign Post
A U-channel post carries the load that makes the whole sign assembly work. The sign panel gets seen first, but the post, fasteners, anchor method, and top finish decide whether that install stays straight, quiet, and serviceable after weather and impact start working on it.

The shape is what makes it useful
The channel profile gives you two advantages in one piece. It adds stiffness for wind and vibration, and it gives you a flat, predictable mounting face for the sign hardware. That is a big reason contractors keep using U-channel instead of adapting pipe, angle, or whatever steel happens to be on the truck.
The material matters too. Quality posts are typically produced from re-rolled rail steel, and the section shape helps spread side load through the post instead of concentrating it at one awkward mounting point. In the field, that means less fighting with brackets, cleaner sign alignment, and fewer improvised fixes.
What to inspect before you buy
The previous section already covered the common professional spec, so the useful question here is what those details do for the installer.
A good U-channel post should have straight, cleanly punched holes, consistent spacing, and a properly formed tapered end. If the holes are ragged, off-line, or inconsistent, the problems show up fast. Bolts bind, washers do not sit flat, sign faces sit crooked, and crews start slotting holes or forcing hardware to make things fit.
That is how a cheap post turns into a slow install.
Why the hole pattern matters so much
Pre-punched holes are not just a convenience feature. They are what ties the post into the rest of the system. The hole layout determines how easily you can mount the sign, adjust height, stack hardware for double-sided panels, and return later for service without drilling hardened steel in the field.
Here is what that means on site:
| Feature | What it changes during installation |
|---|---|
| Pre-punched mounting holes | Lets you bolt signs on quickly with standard hardware |
| Consistent spacing | Makes height adjustment and panel alignment repeatable |
| Long usable mounting area | Gives you flexibility when grade or setback changes |
| Tapered lower end | Helps with cleaner ground entry in driven installs |
Good hole alignment also affects finishing parts. Post caps fit better, exposed top openings stay protected, and the finished install looks intentional instead of pieced together.
A U-channel post is only one part of the assembly
This is the mistake I see all the time. Someone buys the post and treats everything else as an afterthought. Then the install gets delayed because the bolt length is wrong, the washers are undersized, the anchor style does not match the soil or base, or the top of the post gets left open.
A proper U-channel setup is a matched system. The post has to work with the sign’s mounting holes, the correct nuts and bolts, the anchor or drive method, and the finishing accessories that protect the post after installation. If any one of those pieces is wrong, the post itself cannot make up for it.
That is why experienced installers inspect the post beyond length and finish. They check hole pattern, straightness, edge quality, taper, and whether the post will accept the exact hardware package the job requires.
Choosing the Right U-Channel Post for Your Project
A lot of bad installs are decided at the ordering stage. The crew has the sign face, the location, and the deadline, but the post gets picked by price or by a rough guess on length. Then the jobsite starts exposing underlying problems. Wet soil, shallow embedment, a larger sign face than expected, or a finish that will not hold up through a few winters.
Choose the finish for the site conditions
The first decision for a durable installation is the post finish, because the finish sets the corrosion margin for the environment.
For year-round outdoor use, especially along roads, in wet ground, or anywhere that sees freeze-thaw cycles, hot-dipped galvanized is usually the safer call. It holds up better when the post spends years dealing with moisture, splash, and temperature swings. Green baked enamel still works for lighter-duty installs or locations where the post needs to blend in visually, but it gives you less room for abuse if the site stays damp or sees salt.
Here is the trade-off:
| Finish | Best use | Trade-off |
|---|---|---|
| Hot-dipped galvanized | Permanent outdoor installs, wet climates, freeze-thaw exposure | More industrial appearance |
| Green baked enamel | Appearance-sensitive or lighter-duty installs | Lower corrosion resistance in harsher conditions |
If the post is going near irrigation, roadside spray, or winter salt, galvanizing is the better long-term buy.
Size the post around finished height and embedment
Length needs to cover the full installation, not just the visible portion above grade. Measure the sign’s target height first, then add the buried depth needed for the soil and the exposure. If the ground is soft, disturbed, or seasonally wet, give the post more embedment instead of hoping a shorter one will stay put.
That matters more than many buyers expect. A post that looks fine on paper can come up short once you account for slope, setback, and the actual finished sign height.
A practical way to choose is:
- Small notice or property signs: Shorter posts can work if the buried section is still adequate.
- Larger panels or open, windy locations: Add length so the post keeps enough support below grade.
- Soft ground: Increase buried depth.
- Long-term installs: Choose a post weight and length that leave a safety margin instead of working at the limit.
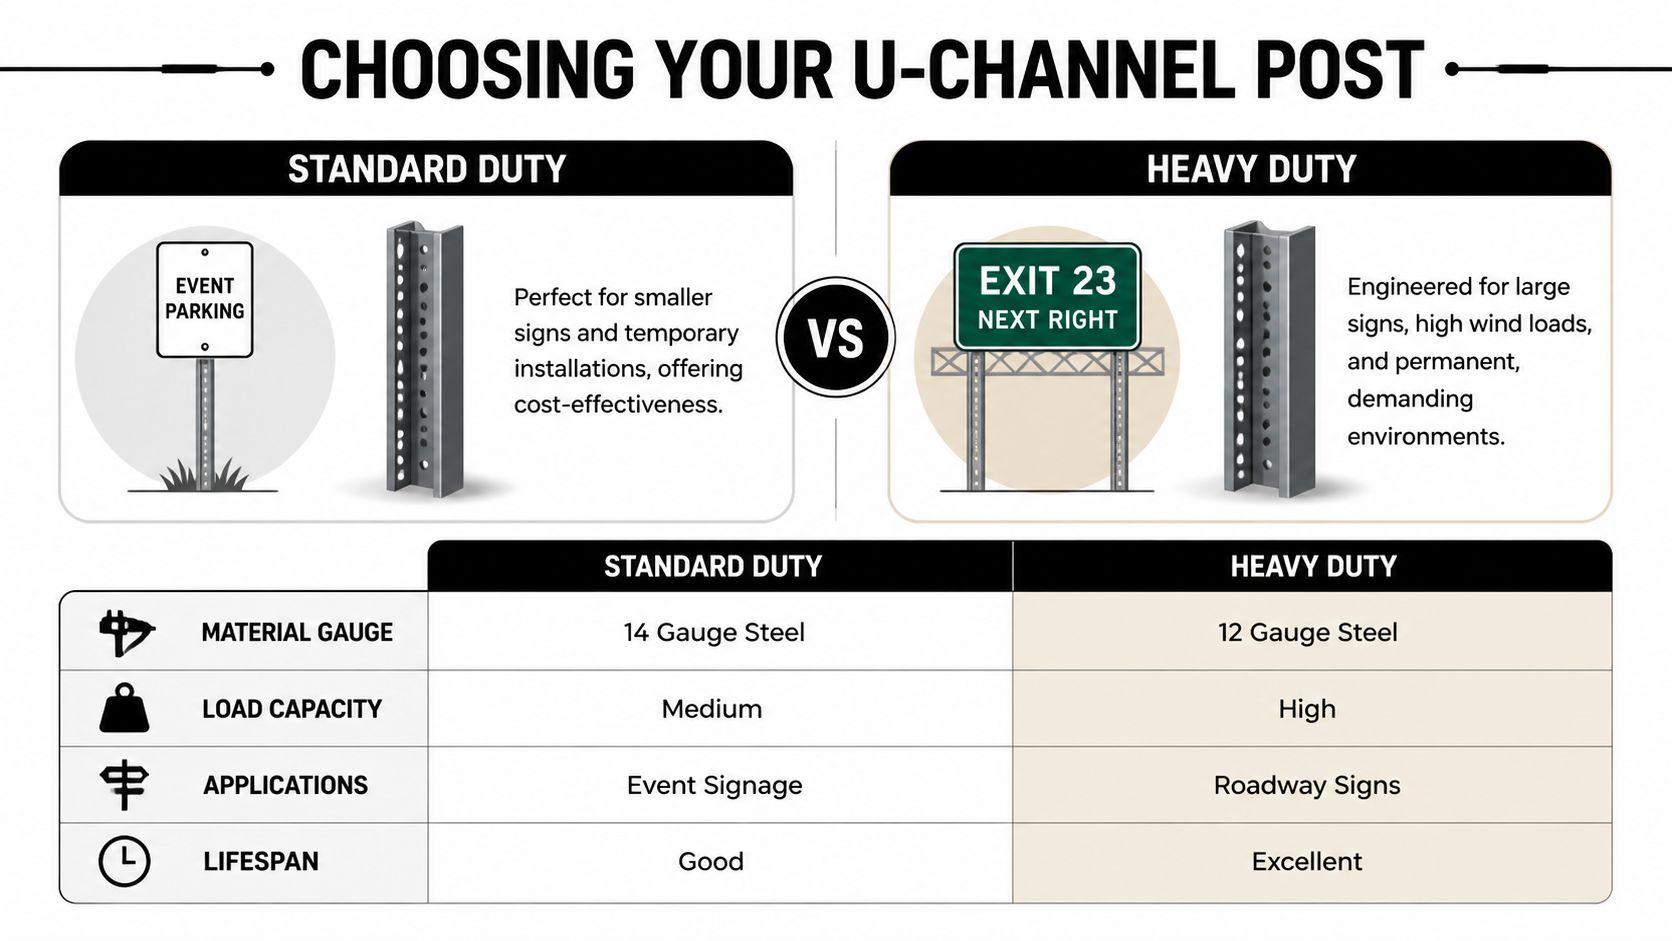
Pick a duty level that matches the load
Underspecifying U-channel posts frequently results in costly rework. U-channel posts are not all the same once the sign face gets larger or the site gets rougher. A lightly loaded parking or notice sign can do well on a standard post. A larger sign, an exposed roadside location, or any install expected to stay straight for years usually justifies a heavier section.
I tell customers to buy for the site, not for the calm weather on install day. Wind, vibration, frost movement, and occasional bumps are what the post has to survive.
Going heavier does add cost. It also reduces callbacks, leaning posts, and replacement labor. On many jobs, that is the better value.
Buy the post as part of the full assembly
A professional result depends on more than the post itself. Before you order, confirm the sign’s hole pattern, the hardware size you plan to use, the ground condition or base material, and whether you need finishing parts like post caps. A post that is technically the right length can still slow the job down if the hardware package or mounting method was never matched to it.
Use this checklist before you place the order:
- Required sign height above grade
- Expected burial depth for the actual soil or base
- Exposure to moisture, salt, freeze-thaw, or traffic vibration
- Sign size and wind exposure
- Mounting method, driven in soil or anchored to a hard surface
- Compatible bolts, washers, nuts, anchors, and post caps
Answer those clearly and you will choose the right sign post u channel with fewer surprises on site and a much better chance of finishing the whole system correctly the first time.
Essential Fasteners and Anchors You Will Need
A post on its own doesn’t complete anything. The sign needs secure attachment hardware, and the post needs a mounting method that suits the surface. That’s where a lot of installations get downgraded by convenience. People use whatever bolts are in the bin, mix washers, or pick anchors meant for another material.

Fasteners for the sign face
For most sign mounting jobs, the basic hardware set is simple: bolts, nuts, and washers sized to the sign and the post hole pattern. The goal is a tight, clean connection that won’t oval out the sign face or loosen under vibration.
Use hardware that matches the mounting holes properly. Don’t force a poor fit. Don’t stack random washers to make up for the wrong bolt length. A neat mechanical connection usually performs better and looks better.
A practical hardware kit usually includes:
- Mounting bolts: Sized to pass cleanly through sign and post holes
- Flat washers: To spread load and reduce distortion at the sign face
- Locking nuts: To resist loosening where vibration is expected
- Extra washers or spacers when needed: For double-sided or offset assemblies
Anchors for concrete and hard surfaces
If the post can’t be driven into soil, anchoring becomes the critical decision. Many installers then need to slow down and match the anchor to the substrate.
- Sleeve anchors: Useful when mounting into existing concrete where moderate clamping strength and straightforward installation matter.
- Wedge anchors: A strong choice for solid concrete footings and base plate setups where a firm mechanical hold is needed.
- Surface mounting caution: Don’t treat asphalt like concrete. If the support needs structural anchoring, the anchor has to bear into a suitable concrete substrate.
The complete system matters at the end of service too
Steel U-channel posts have one more practical advantage. The material itself remains useful after removal. The steel used in these posts is 100% recyclable, as noted in this recycled steel product listing.
That matters for contractors managing tear-outs, property owners upgrading signage, and anyone trying to avoid waste on a recurring maintenance cycle.
A professional installation is easier to remove cleanly later because the system was assembled properly in the first place.
Common hardware mistakes
A few habits create most of the trouble:
- Undersized bolts: They let the sign shift and chatter.
- Mixed metals without thought: They can age poorly outdoors.
- Wrong anchor for the base material: The post may feel tight at first and still fail later.
- No finishing accessory plan: Open tops and exposed edges age faster.
How to Install U-Channel Posts Correctly
A straight, durable installation starts before the post touches the ground. Good posts still fail when they’re set in the wrong spot, driven out of plumb, or buried too shallow for the climate.
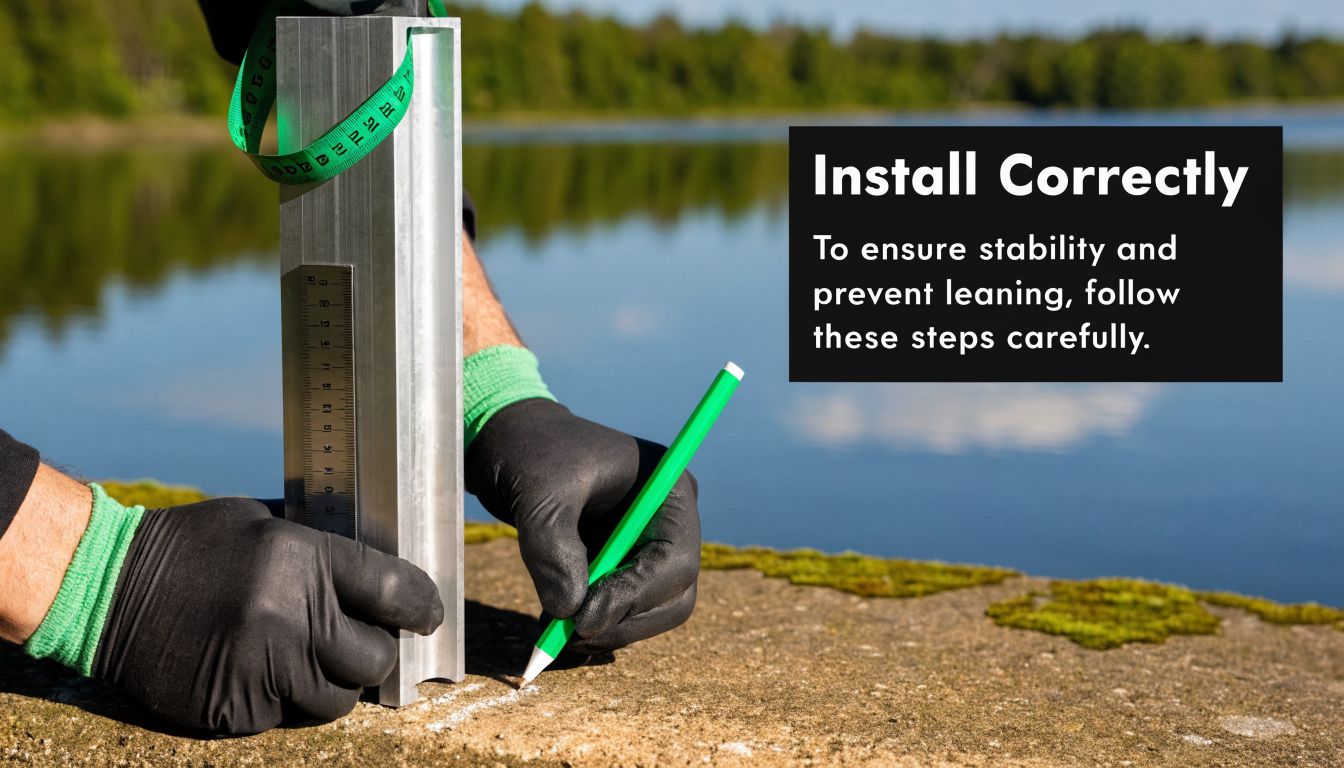
Lay out the location properly
Mark the exact position first. Check for underground utilities and confirm the sign won’t interfere with gates, walk paths, snow clearing, or vehicle movement. Then confirm the finished sign height before choosing the embedment point.
For a basic ground-driven install, keep these tools close:
- Post driver
- Level
- Tape measure
- Marker or pencil
- Shovel or digging tools if the ground needs opening
- Wrenches for final hardware
If the site is uneven, measure from finished grade, not from a rough reference point that may change after landscaping or paving repairs.
Depth is not optional
In freeze-prone regions, shallow placement is where many jobs go wrong. For Ontario and similar climates, engineering guidance and best practice call for a burial depth of 36 to 48 inches to keep the post below the typical frost line, according to this frost-depth installation reference.
That’s the difference between a post that stays put and one that starts creeping, leaning, or heaving after winter.
If your site freezes hard, depth isn’t a detail. It’s the installation.
Driving the post
When driving directly into soil, keep the tapered end aligned and start carefully so the post doesn’t twist off line. Use a level often, not just at the end. Small deviations become large ones fast.
A clean sequence looks like this:
- Set alignment early: Position the post with the mounting face oriented correctly.
- Begin with controlled strikes: Don’t overdrive the first hits and send the post off plumb.
- Check level repeatedly: Correct while the post still moves.
- Drive or set to full planned depth: Don’t stop early because it “feels solid”.
- Recheck orientation: The hole pattern must face the way the sign will mount cleanly.
A visual walkthrough can help if you want to compare your setup technique in the field.
When ground driving isn’t the right method
Some sites don’t want a driven post. Rocky fill, hardscape zones, formed concrete, and areas with strict placement requirements often call for a base or anchor solution instead. In those cases, the right move is to mount with a suitable anchor system rather than forcing a soil-style install where it doesn’t belong.
For exposed locations, installation quality matters as much as post quality. In some high-wind regions, building codes require posts to withstand up to 110 mph gusts when properly installed with deeper embeds or concrete base anchors, as noted in this high-wind installation discussion.
Field checks before mounting the sign
Before you hang the sign face, verify four things:
| Check | What to confirm |
|---|---|
| Plumb | Post is vertical in both directions |
| Depth | Full planned burial or anchor engagement achieved |
| Orientation | Hole pattern faces the correct mounting direction |
| Stability | No wobble, rocking, or loose base condition |
Get those right and the rest of the job becomes much easier.
Mounting Signs and Adding Finishing Touches
Once the post is set correctly, the sign itself should go on without forcing, bending, or improvised spacing. This part is where a clean installation starts looking professional instead of merely functional.
Mount the sign without stressing the panel
Line the sign holes up with the post’s pre-punched pattern. Use bolts, washers, and locking nuts that fit the assembly cleanly, then tighten until the sign is secure without crushing or distorting the sign face.
A practical order helps:
- Hold the sign at final height first: Confirm sightline and clearance before inserting all hardware.
- Start bolts loosely: That gives you room to level the sign.
- Level the panel: Tighten only after the sign is visually and mechanically correct.
- Snug evenly: Uneven tightening can twist the sign or leave a corner loose.
If you’re mounting a double-sided assembly or a sign with brackets, keep the hardware stack organised. Most rattles start with poor hardware alignment rather than post movement.
Pay attention in exposed areas
Where wind is a concern, attachment quality matters as much as embedment. As noted earlier, quality U-channel posts can meet demanding wind conditions when they’re paired with deep embeds or concrete base anchors, including regions where standards call for resistance to up to 110 mph gusts in the proper installation context.
That means loose mounting hardware defeats the point. The post may be strong enough, but the sign still fails if the connection is sloppy.
A strong post with weak mounting hardware is still a weak system.
Finish the top properly
One of the most overlooked accessories is the post cap. It’s a small part, but it does two useful jobs. It gives the installation a finished look, and it helps reduce water entry into the open top of the channel.
That matters over time. Water, debris, and freeze-thaw cycling inside any open steel section can shorten the life of the installation. A simple cap is cheap insurance and makes the final result look intentional.
Good finishing touches often include:
- Protective post caps: To reduce water and debris entry
- Clean hardware selection: Matching finish and fit
- Final alignment check: Stand back and sight the sign from approach angles
- Touch-up cleanup: Remove metal shavings, packaging, and layout marks
The difference between a rough install and a professional one is often that last ten minutes.
Maintenance and Smart Buying for Your Project
A U-channel sign installation doesn’t need constant attention, but it does need occasional checks. Walk by once in a while and look at the obvious failure points first: loose nuts, a sign panel starting to chatter, movement at the base, and any shifting in the surrounding grade.
For long-term sites, treat signage like any other small facility asset. If you manage multiple posts across parking, access, or fence-line areas, keeping a simple inspection list helps you catch small issues before they become replacement jobs. Facility teams that want a broader framework for that kind of upkeep may find a facility manager's asset guide useful for organising inspection and replacement planning.
A smart buying approach
For a one-off DIY job, buy the full system at once so you don’t lose time hunting for hardware mid-install. For trade work, standardise what you stock so crews aren’t mixing post lengths, finishes, and anchor types from one job to the next.
A sound purchase list usually includes:
- The correct post length and finish
- Matching sign mounting bolts, nuts, and washers
- Anchors if the site is concrete-based
- Post caps or finishing accessories
- A few spare hardware pieces for service calls
That’s how you avoid the common trap of buying a post and discovering later that you still need half the system.
If you need the complete package in one place, XTREME EDEALS INC. carries practical hardware for outdoor projects, including fasteners, anchors, and finishing accessories that help turn a basic post purchase into a complete, durable installation.